WSL2+Cilium: The rise of eBPF
Introduction
It’s almost the end of the year 2022, and the Isovalent Santa brought us a series of Cilium badges while we wait between Christmas and the New Year.
To obtain them, check the Isovalent Labs and locate the ones with the tag “Earn a badge”. Perform the Lab, answer the quiz and voilà!
While we learn about Cilium (and have fun doing so), we can also show it off to the world.
Now, you might think what it does have to do with WSL? Thank you for asking, and the answer is quite logic (at least for me): Cilium uses a Linux Kernel capability named eBPF. Therefore, we can run an “equivalent” Lab locally, just for fun, to see how WSL2 behaves out-of-the-box and if any extra configuration is needed to be able to run Cilium.
And really, it’s just for fun as the Labs are very well done and you shouldn’t need to create anything locally.
So let’s jump into our spaceship (read: distro) and get our first badge of honor: Getting Started with Cilium.
Note: As this blog is like a game, for the first time there will be ratings for the different stages. It’s totally subjective and the ratings will be on different topics for each stage.
Prerequisites
Here’s the list of components I used for this blog post:
OS: Windows 11 Professional version 22H2 - channel: Insiders dev / build: 25267
WSL2 distro: Ubuntu 22.04
- The Cilium Lab uses this distro, so to be able to compare “oranges to oranges”, we’ll keep the same distro
- Since WSL v0.67.6, systemD can be enabled in
/etc/wsl.conf - The distro hostname has been changed in
/etc/wsl.conf
Docker: Docker Desktop (for Windows)
- Version: 4.15.0 (93002)
- Docker socket shared with the distro: Settings > Resources > WSL integration
[Optional] Terminal: Windows Terminal
- Version: 1.15.3466.0
Stage 0: Mod the Kernel
While this is Stage 0, it’s being written after a series of try and fails getting Cilium to run on WSL2.
Still, in terms of reading flow, the goal is that we start with the right foot.
Build the Kernel
As stated in the intro, Cilium relies on eBPF which uses Linux Kernel capabilities directly. Therefore, we need to ensure the right modules are enabled in the WSL2 Kernel and loaded in our distro.
There’s already many blogs and documentation on how to build a WSL2 Kernel, so the steps described below will be condensed so we can start building our local Lab.
- Get the WSL2 Kernel from Github.com
# Path: $HOME
git clone https://github.com/microsoft/WSL2-Linux-Kernel.git
- Edit the Kernel config file
# Path: $HOME/WSL2-Linux-Kernel
vi Microsoft/config-wsl

# Enable the Kernel modules based on https://docs.cilium.io/en/v1.12/operations/system_requirements/

## Base requirements
CONFIG_BPF=y
CONFIG_BPF_SYSCALL=y
CONFIG_NET_CLS_BPF=y
CONFIG_BPF_JIT=y
CONFIG_NET_CLS_ACT=y
CONFIG_NET_SCH_INGRESS=y
CONFIG_CRYPTO_SHA1=y
CONFIG_CRYPTO_USER_API_HASH=y
CONFIG_CGROUPS=y
CONFIG_CGROUP_BPF=y

## Iptables-based Masquerading
CONFIG_NETFILTER_XT_SET=m
CONFIG_IP_SET=m
CONFIG_IP_SET_HASH_IP=m

## L7 and FQDN Policies
CONFIG_NETFILTER_XT_TARGET_TPROXY=m
CONFIG_NETFILTER_XT_TARGET_CT=m
CONFIG_NETFILTER_XT_MATCH_MARK=m
CONFIG_NETFILTER_XT_MATCH_SOCKET=m

## IPsec
CONFIG_XFRM=y
CONFIG_XFRM_OFFLOAD=y
CONFIG_XFRM_STATISTICS=y
CONFIG_XFRM_ALGO=m
CONFIG_XFRM_USER=m
CONFIG_INET_ESP=m
CONFIG_INET_IPCOMP=m
CONFIG_INET_XFRM_TUNNEL=m
CONFIG_INET_TUNNEL=m
CONFIG_INET6_ESP=m
CONFIG_INET6_IPCOMP=m
CONFIG_INET6_XFRM_TUNNEL=m
CONFIG_INET6_TUNNEL=m
CONFIG_INET_XFRM_MODE_TUNNEL=m
CONFIG_CRYPTO_AEAD=m
CONFIG_CRYPTO_AEAD2=m
CONFIG_CRYPTO_GCM=m
CONFIG_CRYPTO_SEQIV=m
CONFIG_CRYPTO_CBC=m
CONFIG_CRYPTO_HMAC=m
CONFIG_CRYPTO_SHA256=m
CONFIG_CRYPTO_AES=m
Note: All the modules in the docs have been enabled as it might be needed later on. Be careful, some modules were already enabled in the default Kernel config, however they need to be set as modular (
m) instead of pre-enabled (y).
- Compile the Kernel with the updated config
# Path: $HOME/WSL2-Linux-Kernel
make KCONFIG_CONFIG=Microsoft/config-wsl
Configure WSL2
Once the Kernel is built, we need to configure both the distro and WSL2 as follow:
- Install the Kernel headers and modules in the distro
# Path: $HOME/WSL2-Linux-Kernel
## Headers
sudo make headers_install

## Modules
sudo make modules_install
- Copy the compiled Kernel to the Windows filesystem
# Path: $HOME/WSL2-Linux-Kernel
# [Optional] Create a Kernel directory on Windows filesystem
mkdir /mnt/c/wslkernel

# Copy the compiled Kernel
cp arch/x86/boot/bzImage /mnt/c/wslkernel/kernel-cilium
- Exit the distro and stop WSL
# Powershell
wsl --shutdown
- Create/Update the $env:USERPROFILE/.wslconfig
# If you don't have VSCode installed, use notepad.exe instead
code $env:USERPROFILE/.wslconfig

# Set the Kernel path
[wsl2]
kernel = c:\\wslkernel\\kernel-cilium
Load the modules
With the new Kernel loaded, we can configure the modules to be loaded at each distro boot:
- Start a new WSL session and create a file to load the modules
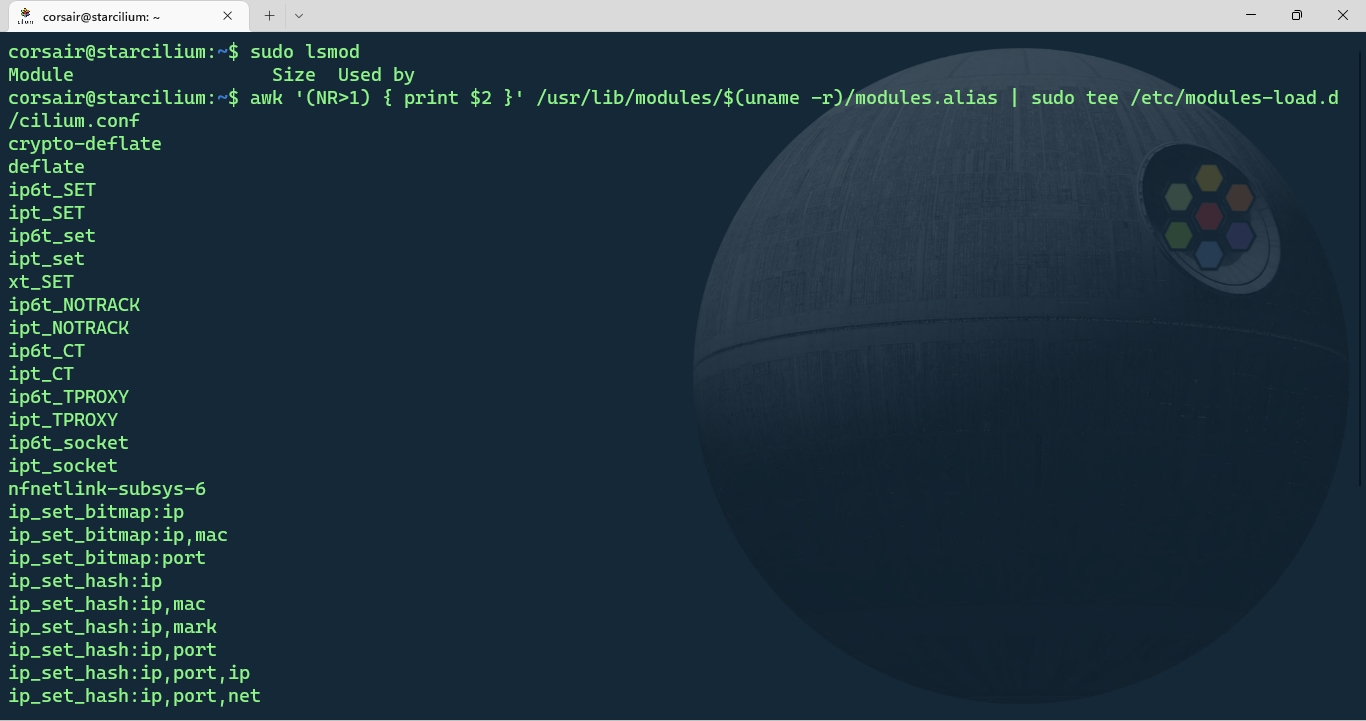
# Check which modules are loaded (the list should be empty)
sudo lsmod

# Create a file to load the modules when the distro boots
## The first line of the modules.alias file is ignored as it's the header "Alias"
awk '(NR>1) { print $2 }' /usr/lib/modules/$(uname -r)/modules.alias | sudo tee /etc/modules-load.d/cilium.conf
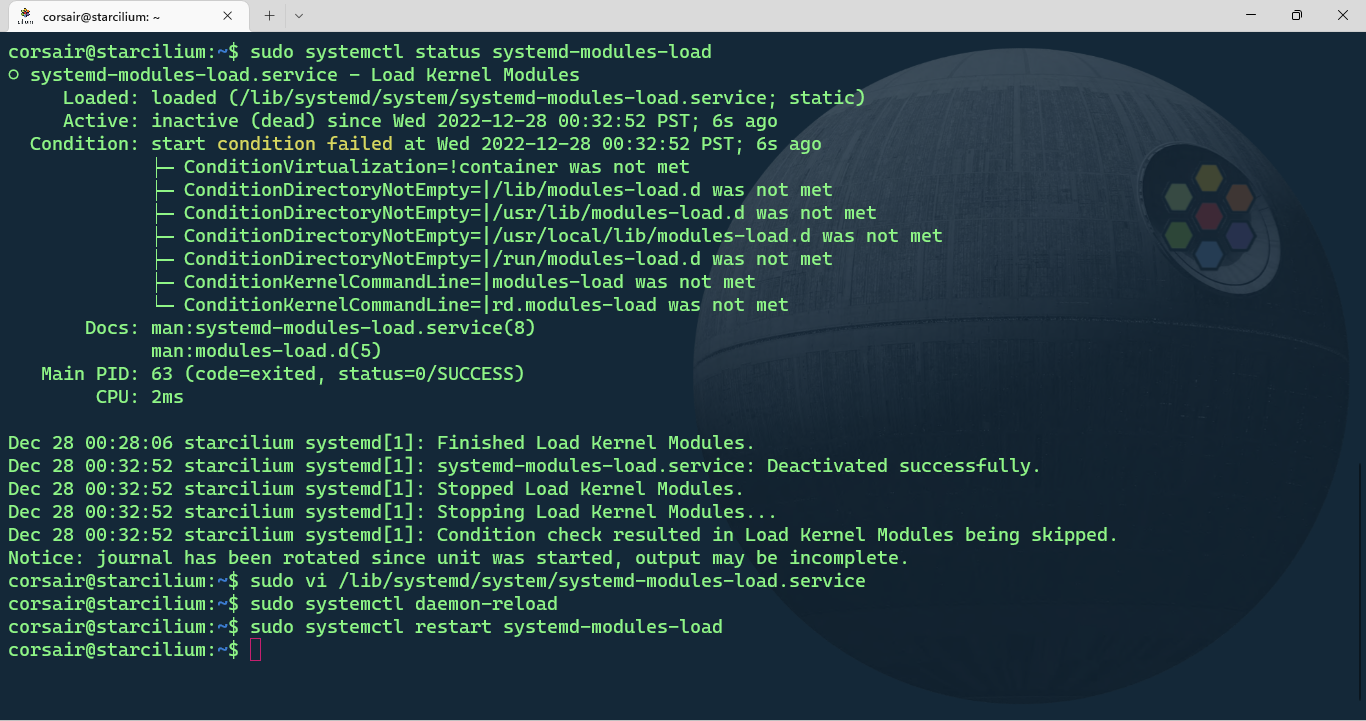
- Edit the systemd-modules-load.service
# By default, the systemd-modules-load service fails due to the conditions not met
sudo systemctl status systemd-modules-load

# Edit the service and comment the conditions line from the "!container"
sudo vi /lib/systemd/system/systemd-modules-load.service
...
#ConditionVirtualization=!container
#ConditionDirectoryNotEmpty=|/lib/modules-load.d
#ConditionDirectoryNotEmpty=|/usr/lib/modules-load.d
#ConditionDirectoryNotEmpty=|/usr/local/lib/modules-load.d
#ConditionDirectoryNotEmpty=|/etc/modules-load.d
#ConditionDirectoryNotEmpty=|/run/modules-load.d
#ConditionKernelCommandLine=|modules-load
#ConditionKernelCommandLine=|rd.modules-load
...

# Reload the systemD daemon
sudo systemctl daemon-reload

# Restart the systemd-modules-load service
sudo systemctl restart systemd-modules-load
- Check if the modules are now loaded
# [Optional] Check the systemd-modules-load service
sudo systemctl status systemd-modules-load

# Check the modules loaded
sudo lsmod

We are now fully prepared to start our journey!
Checkpoint 0
Ok, that’s a first deep dive into the WSL and Linux seas, and to be totally sincere this took quite some time to figure all out. Between the Kernel modules needed and not present in the stock Kernel, to the systemD behavior inside WSL2, the learnings were many and meaningful.
The ratings for this stage are:
Out-of-the-box experience: 2⁄5
- The extra configuration needed shows two things: WSL2 by default is limited to general purpose, and it can be extended if we know what and where to search.
WSL2 Linux capabilities: 4⁄5
- WSL2 is still evolving at a very rapid pace and a full equivalency with a bare metal Linux instance is approaching. However, there’s still some differences due to the WSL2 architecture and one of them is the management of modules. For the time being, we cannot load the modules dynamically as it’s possible in every modern Linux distro.
Overall setup: 3⁄5
- While the adaptability is great and we could achieve our goal, the manual tasks make it somewhat difficult to implement.
Stage 1: Build the KinD fleet
The first stage of the Lab, gives us with the KinD cluster configuration, which provides us with the following information:
The cluster is composed of 3 nodes: 1 control-plane and 2 workers
The default Container Network Interface, or CNI for short, has been disabled in order to have Cilium set as the CNI
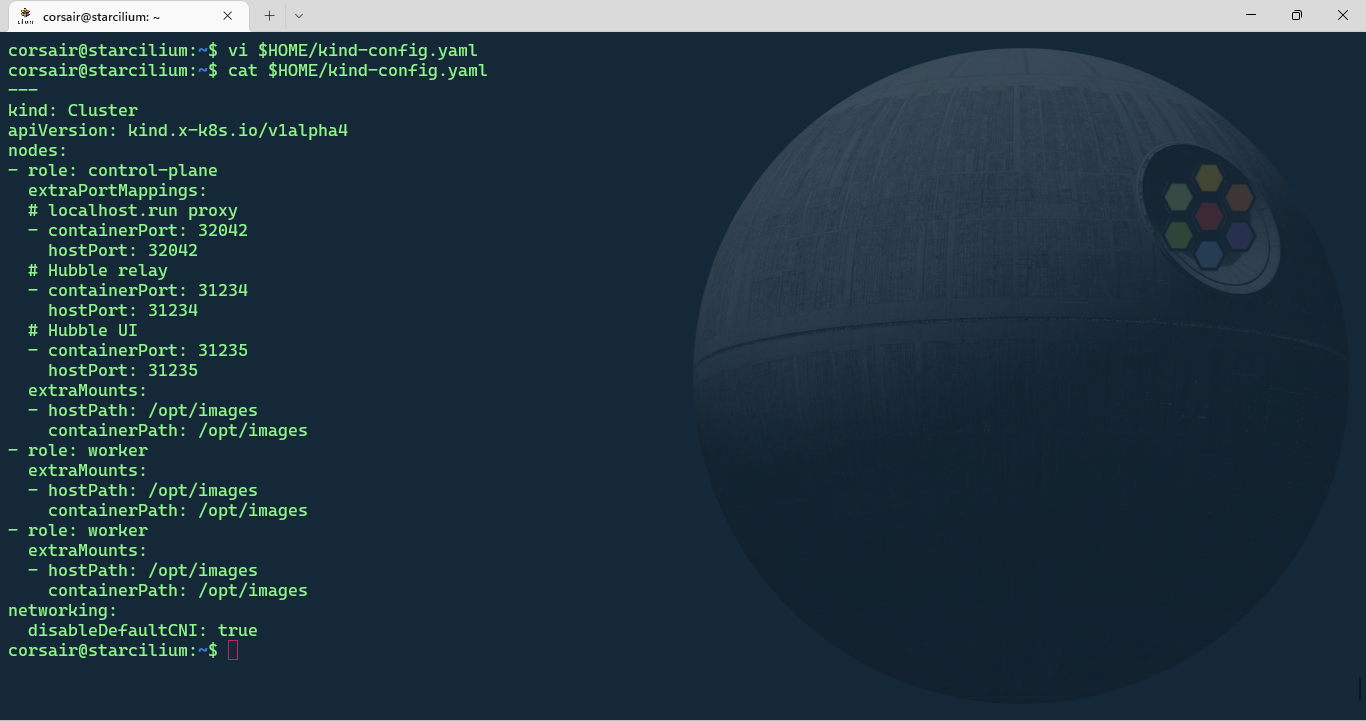
As we will need the configuration for our local KinD cluster, let’s save it locally:
# Run the command given in the Lab instructions
cat /etc/kind/${KIND_CONFIG}.yaml

## Copy the output by selecting it

# On your WSL distro, create a new file
vi $HOME/kind-config.yaml

# Check if the file has been successfully saved
cat $HOME/kind-config.yaml
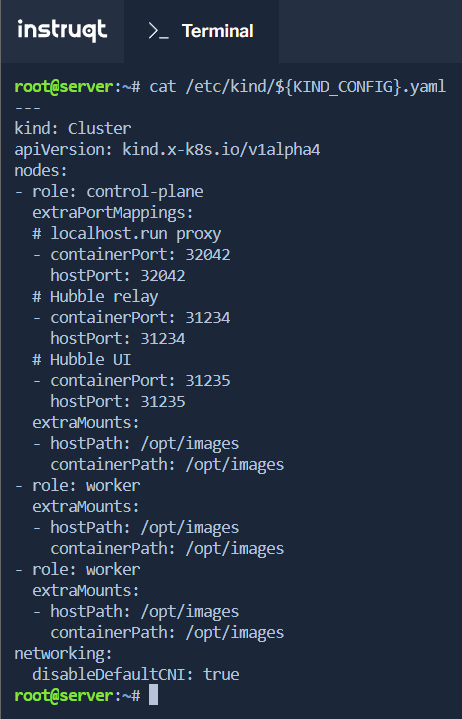
Attention: the KinD configuration file has a special mount to
/opt/imageswhich contains images that will be loaded inside the Lab’s own cluster. We do not have access to these files, therefore we might run alternatives whenever possible.This is why the Lab should be done primarily if you really want to learn about Cilium in the best conditions.
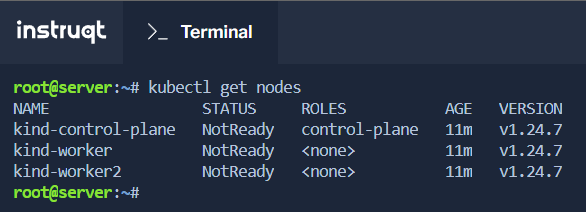
The Lab has already the KinD cluster running, so we can list the nodes:
kubectl get nodes
With the configuration file, we can create the local cluster on WSL.
Install KinD
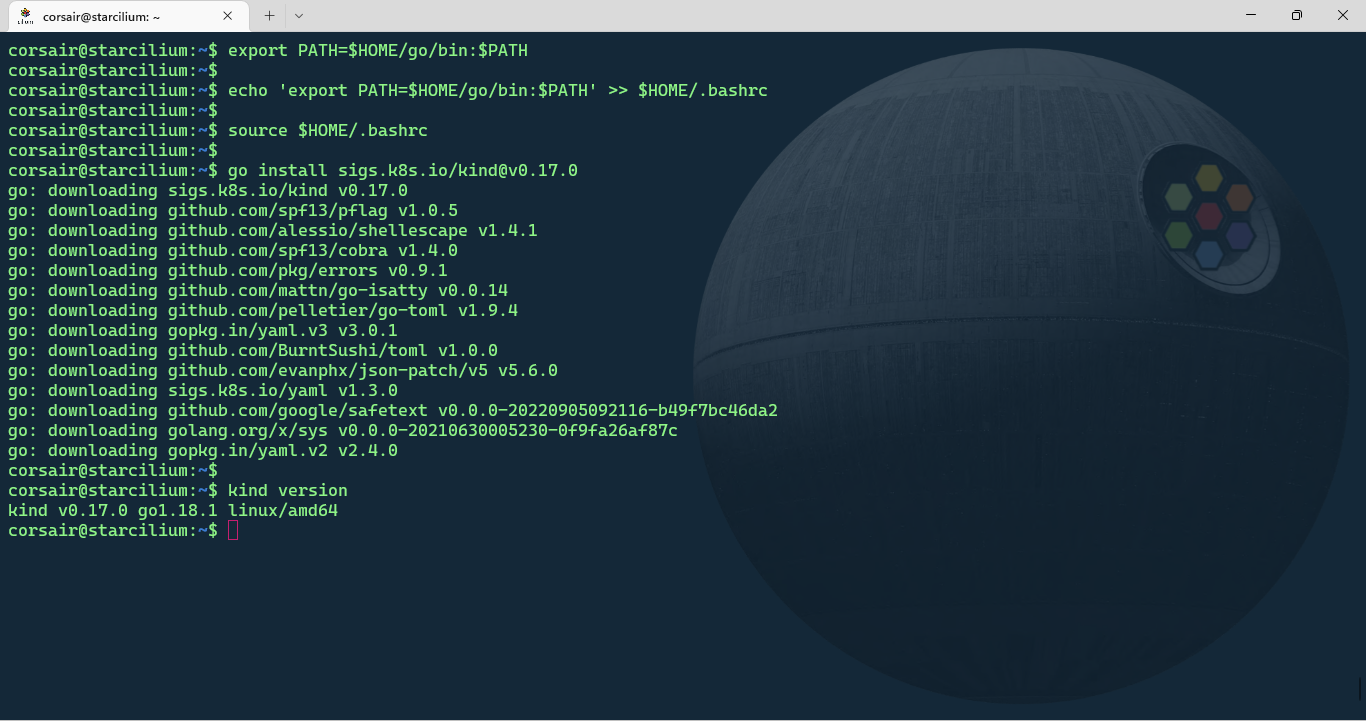
Based on the KinD website, the easiest way to install KinD is as follow:
# [Optional] Install GO
sudo apt install golang-go

# [Optional] Add GO "bin" directory to your PATH variable
## Only in the current shell session
export PATH=$HOME/go/bin:$PATH

## In your shell configuration file for all future sessions
echo 'export PATH=$HOME/go/bin:$PATH' >> $HOME/.bashrc
source $HOME/.bashrc

# Install KinD
go install sigs.k8s.io/kind@v0.17.0

# Check if KinD has been correctly installed
kind version
NOTE: As stated on the prerequisites, the distro used in this blog post is Ubuntu, so if another distro is used, please refer to the appropriate documentation to install KinD.
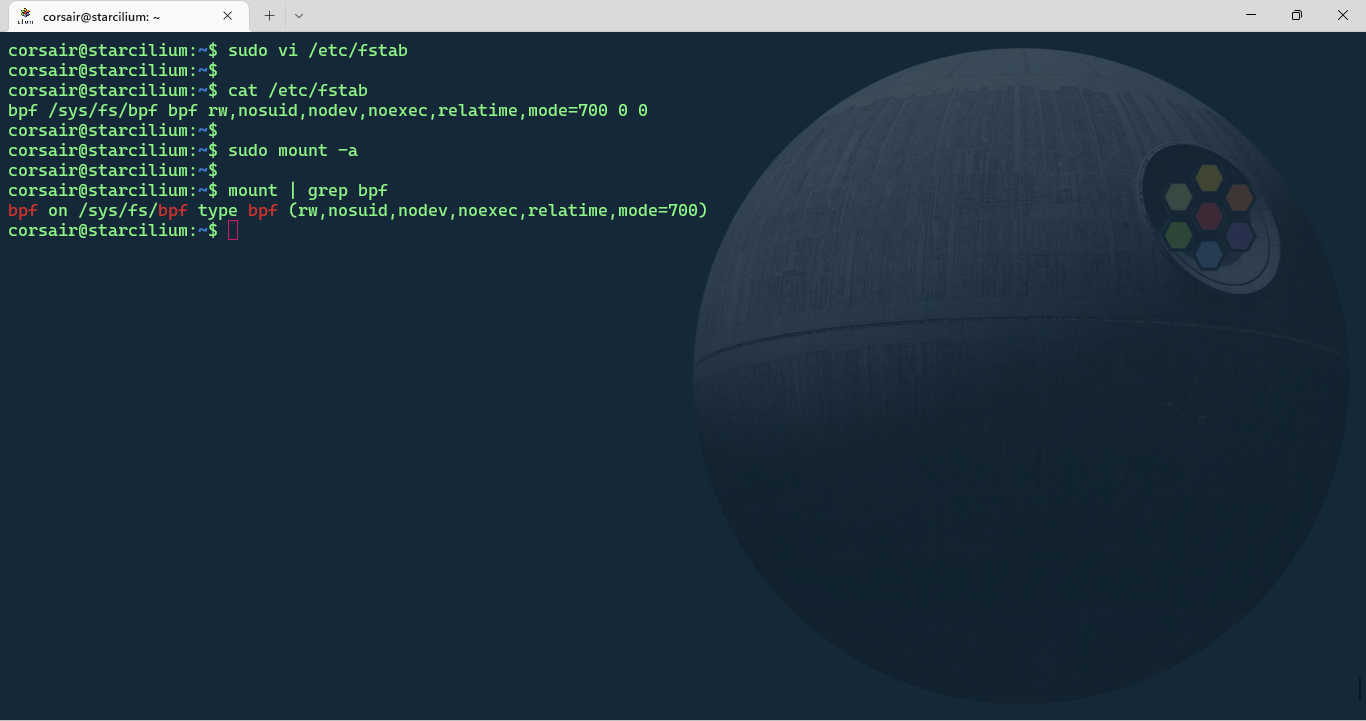
Add the bpf mount
Before the cluster can be created, and to avoid redoing all the work as I did… we need to mount the bpf filesystem:
# Add the filesystem to the FSTAB file
sudo vi /etc/fstab

## Add the following line
bpf /sys/fs/bpf bpf rw,nosuid,nodev,noexec,relatime,mode=700 0 0

# Check if the file has been successfully saved
cat /etc/fstab

# Mount all the filesystems present in FSTAB
sudo mount -a

# Check if the BPF filesystem is correctly mounted
mount | grep bpf
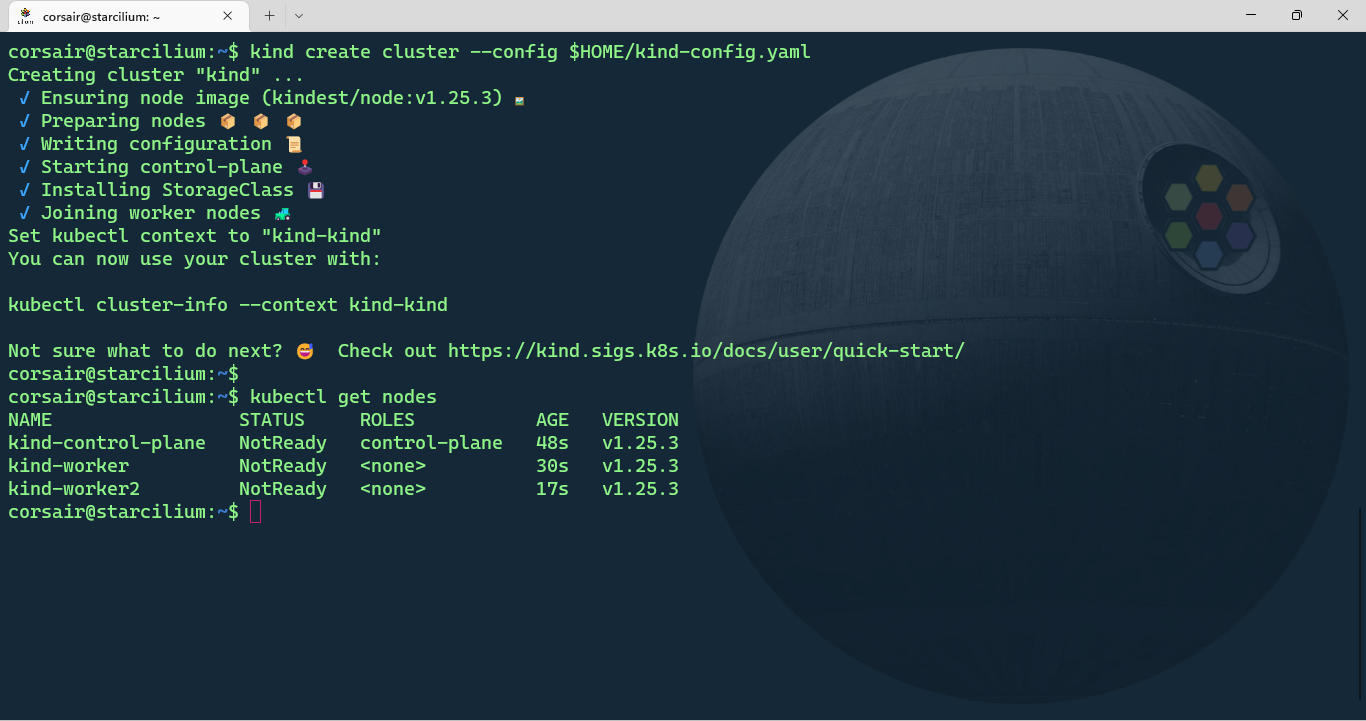
Create the KinD cluster
We’re now ready to create the KinD cluster with the same configuration as in the Lab:
# Create the KinD cluster with the config file
kind create cluster --config $HOME/kind-config.yaml

# Check the nodes status
kubectl get nodes
Checkpoint 1
The first stage is probably one of the easiest, however on the local side we still had to perform some minor extra configuration.
The ratings for this stage are:
System equivalency: 5⁄5
- Both systems are aligned with a KinD cluster composed of 3 nodes without the default CNI.
Configuration: 4⁄5
- The extra mount and the missing
/opt/imagescontent makes already a difference. Hopefully it won’t come back to bite us later (spoiler: it won’t for this Lab).
- The extra mount and the missing
Overall setup: 5⁄5
- From the KinD installation to creating the cluster, there wasn’t any roadblock and we could follow the documentation without any issues.
Stage 2: Load the KinD cluster with Cilium
The second stage of the Lab will guide us on how to install Cilium in our cluster.
Install Cilium CLI
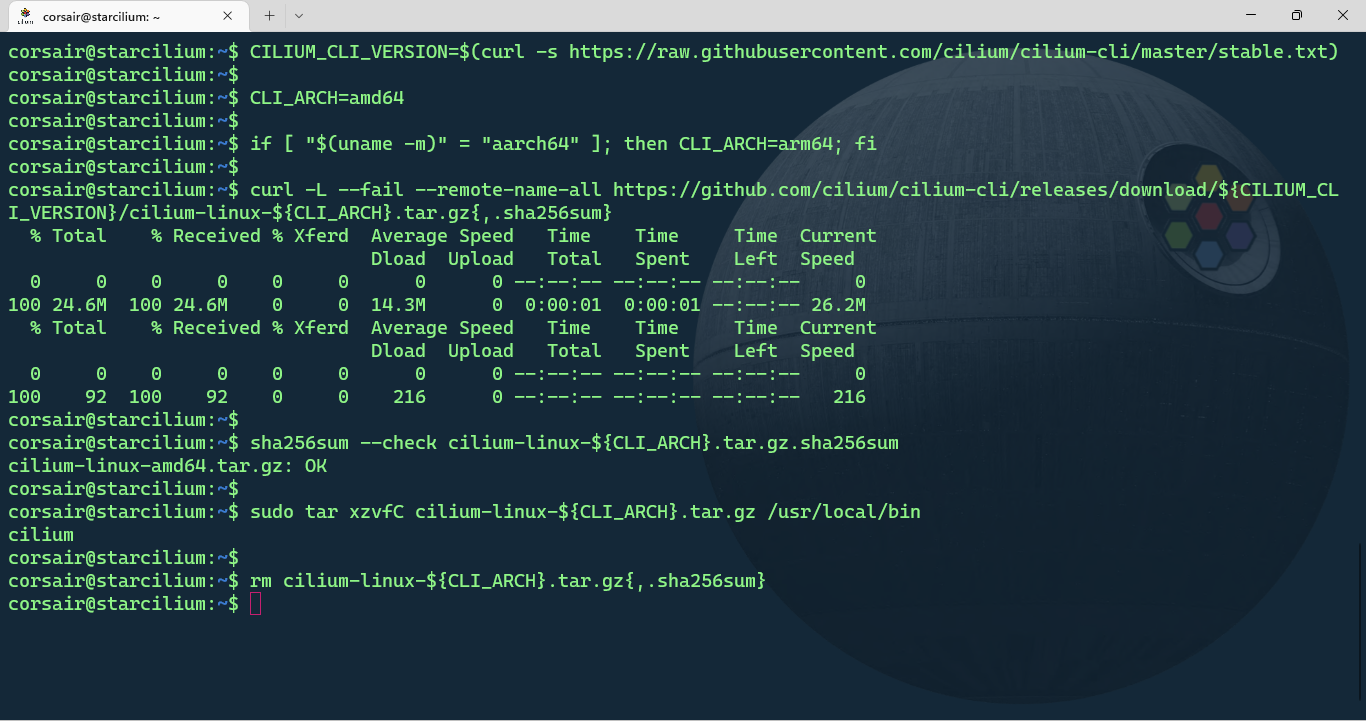
First, we’ll need to install the cilium CLI as described in the docs:
# Install the latest version of Cilium CLI
CILIUM_CLI_VERSION=$(curl -s https://raw.githubusercontent.com/cilium/cilium-cli/master/stable.txt)
CLI_ARCH=amd64
if [ "$(uname -m)" = "aarch64" ]; then CLI_ARCH=arm64; fi
curl -L --fail --remote-name-all https://github.com/cilium/cilium-cli/releases/download/${CILIUM_CLI_VERSION}/cilium-linux-${CLI_ARCH}.tar.gz{,.sha256sum}
sha256sum --check cilium-linux-${CLI_ARCH}.tar.gz.sha256sum
sudo tar xzvfC cilium-linux-${CLI_ARCH}.tar.gz /usr/local/bin
rm cilium-linux-${CLI_ARCH}.tar.gz{,.sha256sum}
Install Cilium
With the Cilium CLI installed and our KinD cluster running, we can install Cilium:
cilium install
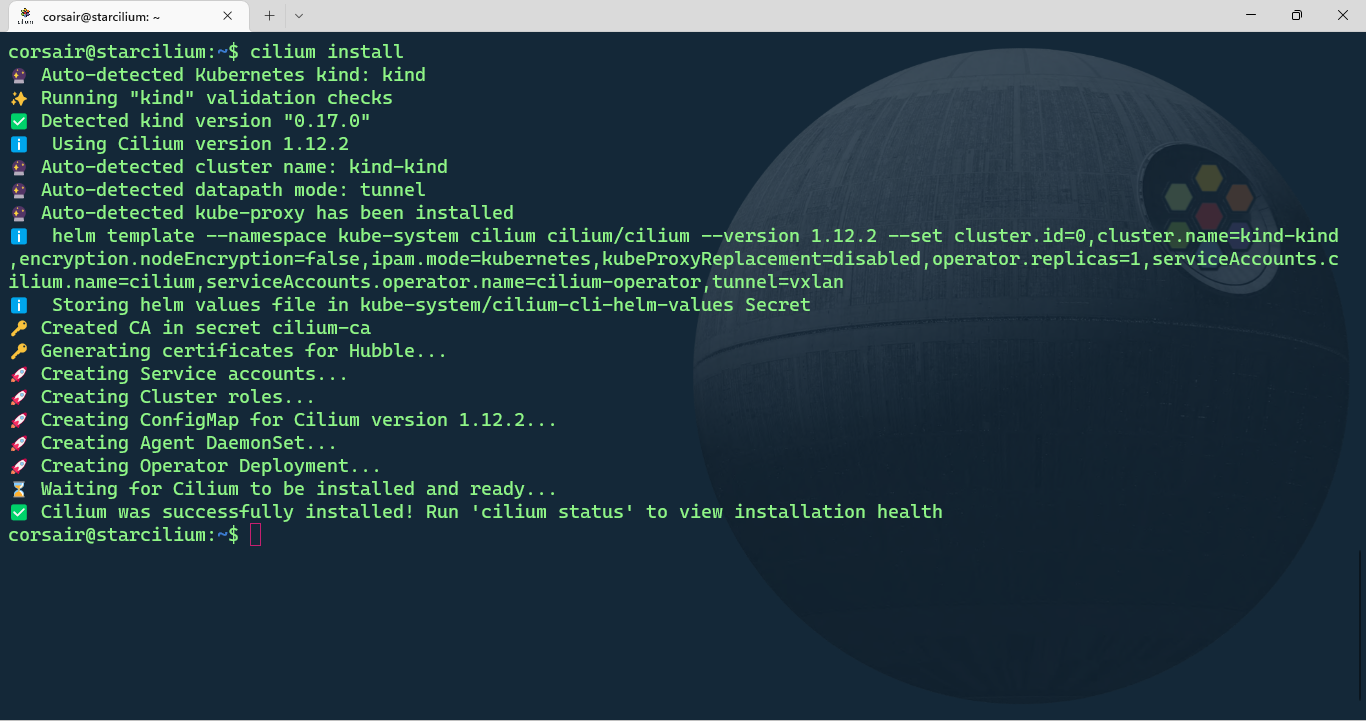
Once the installation is completed, you can check the status:
cilium status
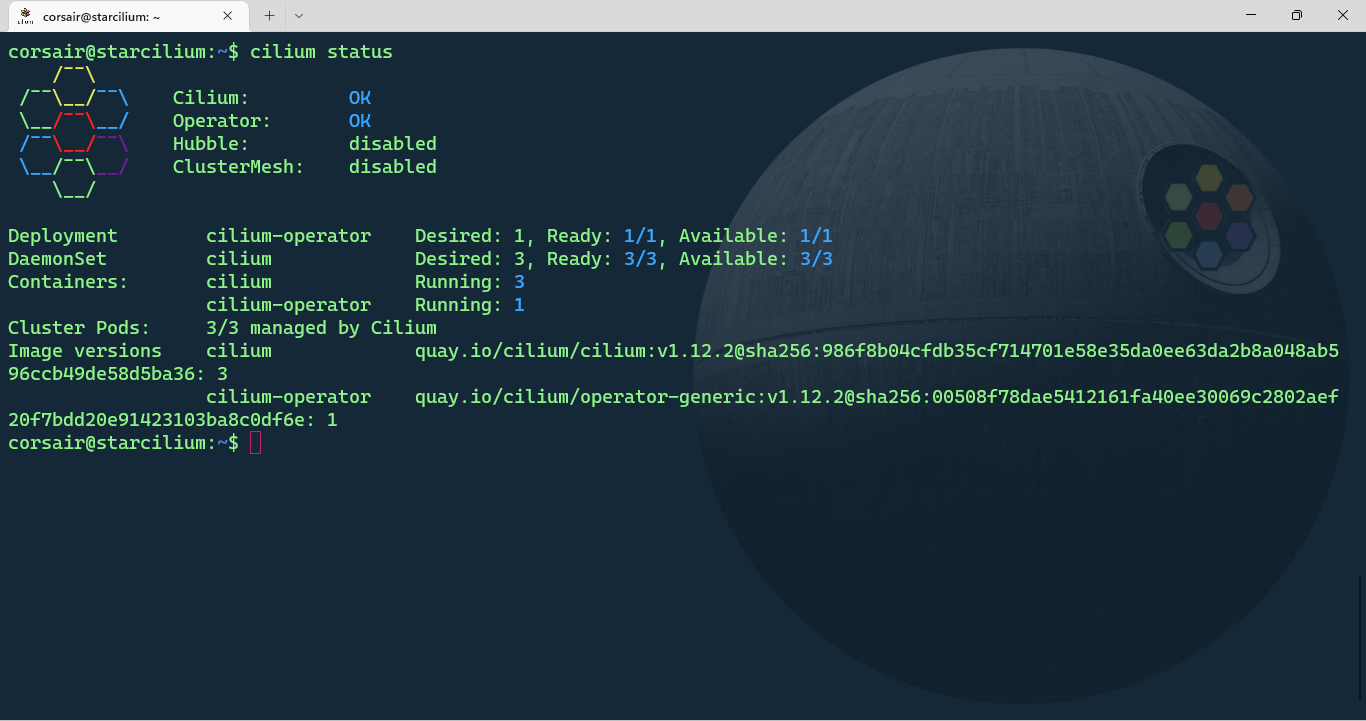
Cilium is now up and running! We can move to the next stage and install our first application.
Checkpoint 2
This stage, while shorter, is probably the most important one as it confirms if our environment is correctly configured and stable. As stated in Stage 0, before we could reach this point, a lot had to be discovered and implemented, so that’s why completing this stage feels probably the most rewarding.
The ratings for this stage are:
Commands equivalency: 5⁄5
- We could follow (read: copy/paste) all the commands from the Lab and the docs to install both the CLI and Cilium in our cluster.
Overall setup: 5⁄5
- Nothing to say, just “it works as expected”.
Stage 3: Deploy the microservices in a galaxy not so far away
This stage can be considered as an interlude (for the music fans out there). We’ll install the microservices used to showcase the power of Cilium capabilities.
And HUGE props to the Isovalent team for choosing the best scenario and make it easier to understand and relate: Star Wars on Kubernetes!
Discover the microservices
While everything is explained in the Lab, and once again why you should do it, it’s important to have a basic understanding of what we’ll install:
There’s 4 resources to be created:
- 1 Service
- 1 Deployment
- 4 Pods
Kubernetes labels are used and will play a major role later on
The Service will load-balance the traffic to pods with certain labels
Deploy the application
To deploy the application, we’ll use the manifest provided in the Lab:
# [Optional] Check if all Cilium components are all deployed and running
kubectl rollout status -n kube-system daemonset/cilium

# Deploy the application
kubectl apply -f https://raw.githubusercontent.com/cilium/cilium/HEAD/examples/minikube/http-sw-app.yaml

# Check if all the resources are running
kubectl get pods,svc

# [Optional] Check the Cilium Endpoints and if the application's pods are listed
kubectl get cep --all-namespaces
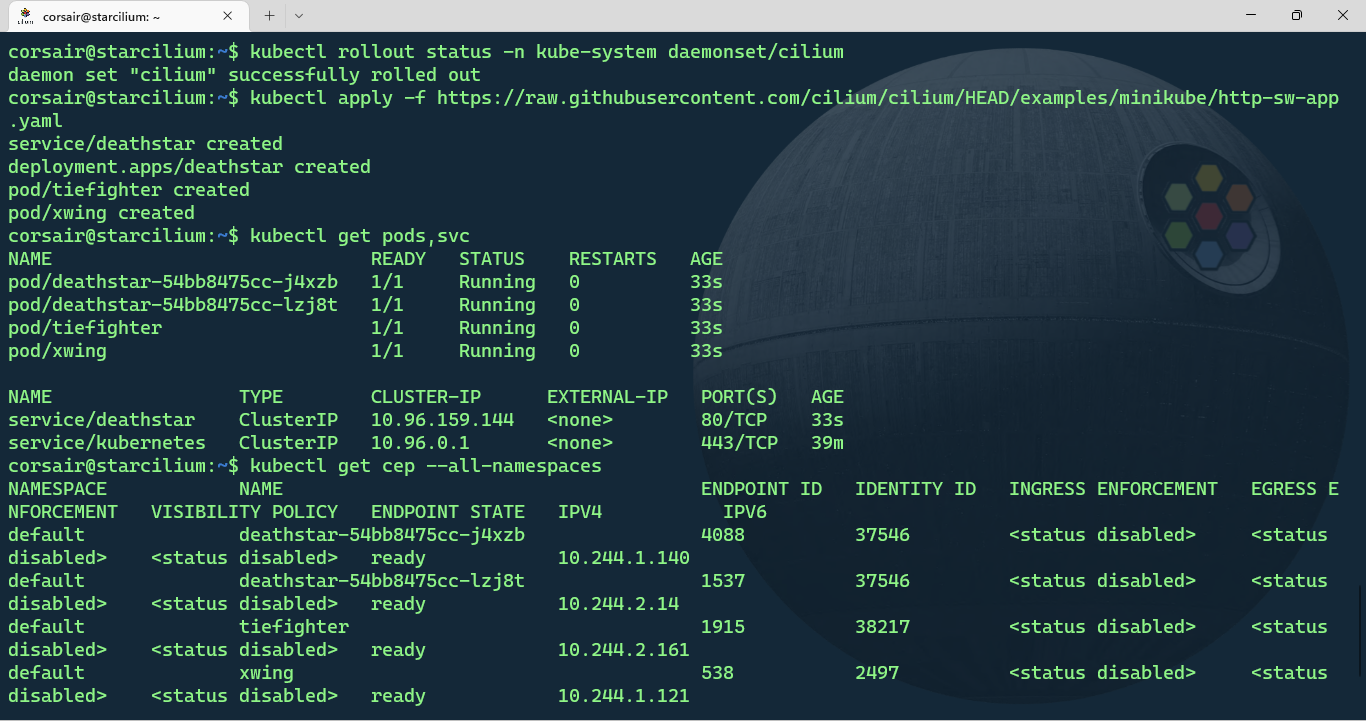
The application is now deployed and it’s time to see how Cilium can help us making it (way) more secure.
Checkpoint 3
As said above, this stage was short and the target was to install an application and see how Cilium’s aware of the applications running in our cluster.
The ratings for this stage are:
Commands equivalency: 5⁄5
- We could follow (read: copy/paste) all the commands from the Lab.
Overall setup: 5⁄5
- Nothing to say, it simply works.
Stage 4: Manage the Deathstar access with Cilium Network Policies
From this stage on, we can consider that we’re starting the “Episode II” of our epic adventure.
To recap, on the previous stages, we built our environment and it ended with an application being deployed (what a cliffhanger, right?!). Next, we’ll see what how the application currently behaves, its current problems and how Cilium will save the day for the Empire.
Understand the environment
While the Lab is based on a “fiction”, the experience it’s based on reality. In this case, the goal is to ensure that specific actions can only be performed by a limited set of resources.
If we take the Star Wars context, the Deathstar access should be granted only to the Empire’s fleet and if a Rebel’s spaceship requests access, then it should be revoked.
Test the application’s behavior
Let’s see how the application behaves after the install, without any further configuration:
# Request access to the Deathstar from the 'tiefighter' pod
kubectl exec tiefighter -- curl -s -XPOST deathstar.default.svc.cluster.local/v1/request-landing

# Request access to the Deathstar from the 'xwing' pod
kubectl exec xwing -- curl -s -XPOST deathstar.default.svc.cluster.local/v1/request-landing
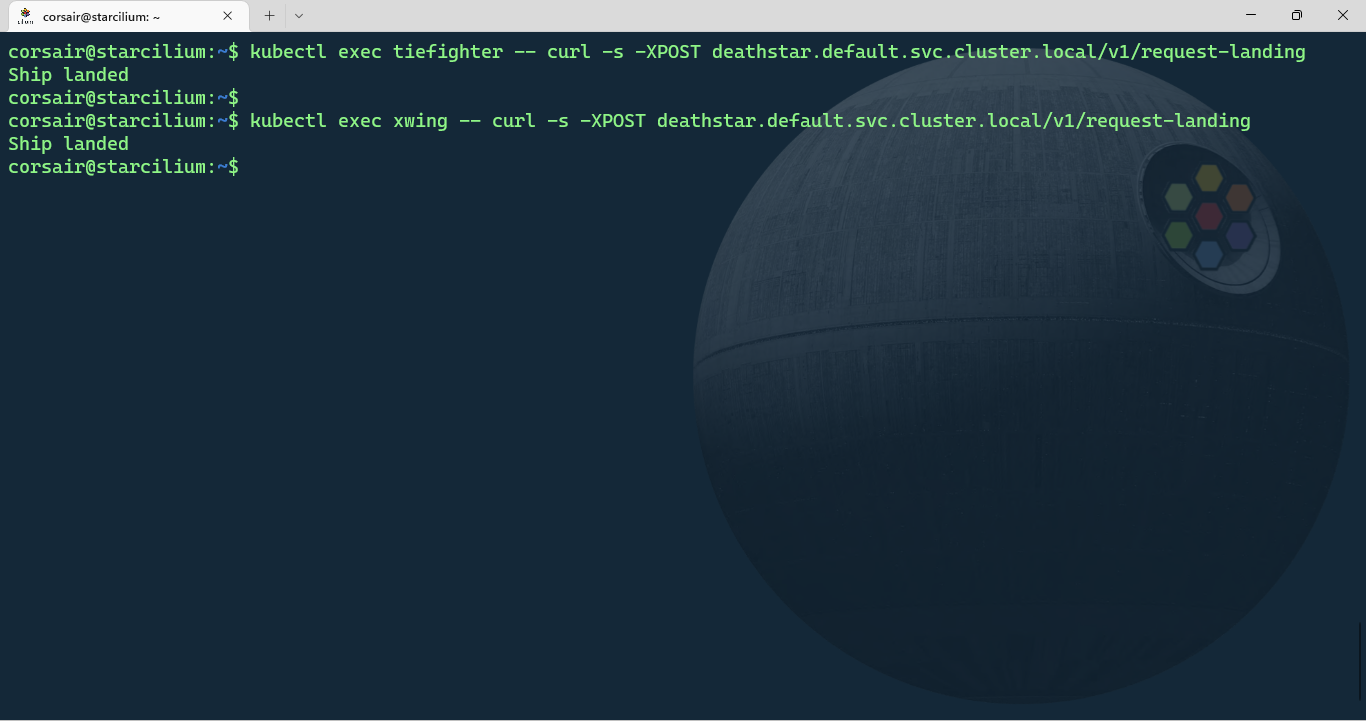
Well, we can see there’s definitively a problem as the access request from a Rebel’s Xwing was granted instead of being revoked.
In Kubernetes terms, this means a security policy is certainly missing and needs to be deployed.
Add a L3-L4 network policy
The first example referenced in the Lab is to create a L3-L4 policy which allows access to the port 80 of our Deathstar service only to the resources with a certain label.
The policy’s manifest is again provided. However the Cilium team understands the (potential) complexity in writing and/or understanding security policies, so they also created the excellent Network Policy Editor. And even more awesome, this interface is public and comes with its own tutorials. Seriously give it a try.
Let’s apply the policy and check once again the application’s behavior:
# Apply the Cilium Network Policy
kubectl apply -f https://raw.githubusercontent.com/cilium/cilium/HEAD/examples/minikube/sw_l3_l4_policy.yaml

# Request access to the Deathstar from the 'tiefighter' pod
kubectl exec tiefighter -- curl -s -XPOST deathstar.default.svc.cluster.local/v1/request-landing

# Request access to the Deathstar from the 'xwing' pod
kubectl exec xwing -- curl -s -XPOST deathstar.default.svc.cluster.local/v1/request-landing

This time, the Rebel’s Xwing access was revoked and only the Empire’s spaceships had the access granted.
However, what happens if a Rebel’s pilot steals an Empire’s spaceship? It will have access and once inside, it might do some harm such as:
# Destroy the Deathstar from the 'tiefighter' pod
kubectl exec tiefighter -- curl -s -XPUT deathstar.default.svc.cluster.local/v1/exhaust-port

# [Optional] Check the pods status
kubectl get pods
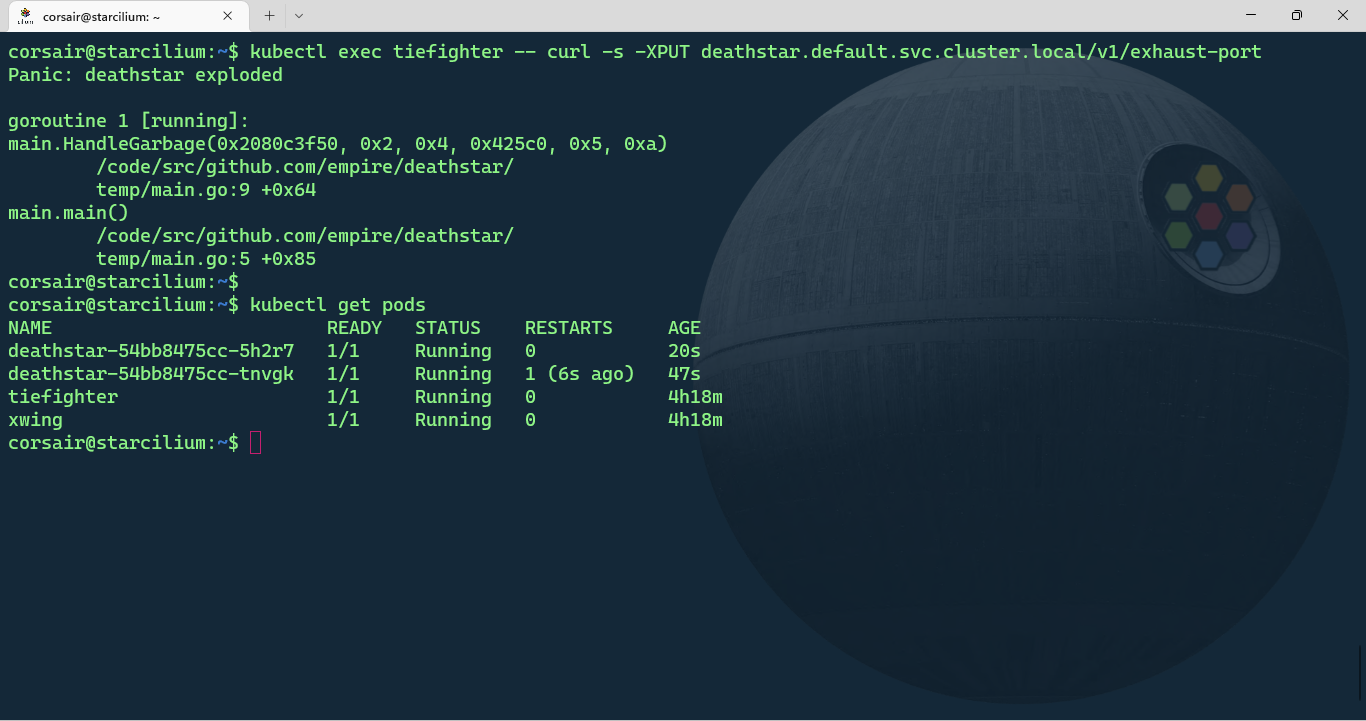
Goodbye Deathstar! Hopefully for us, there’s two replicas so the access to the Deathstar was still available, while degraded.
This example is great to show one of the limitation of the L3-L4 policy and why, in these modern times, we need a policy even more granular.
Add a L7 network policy
The second example referenced in the Lab is to create a L7, or HTTP, network policy. This will complement our existing network policy limiting the Tiefighters to a limited set of actions.
Once again, the Lab provides the policy and if we compare it with the previous L3-L4 policy, we can see that a new set of fields under rules has been added. The fact the policy is created bit by bit, really helps to understand each section and its meaning.
Let’s apply the L7 policy and secure even more our Deathstar:
# Apply the Cilium Network Policy
kubectl apply -f https://raw.githubusercontent.com/cilium/cilium/HEAD/examples/minikube/sw_l3_l4_l7_policy.yaml

# [Optional] Request access to the Deathstar from the 'tiefighter' pod
kubectl exec tiefighter -- curl -s -XPOST deathstar.default.svc.cluster.local/v1/request-landing

# Destroy the Deathstar from the 'tiefighter' pod
kubectl exec tiefighter -- curl -s -XPUT deathstar.default.svc.cluster.local/v1/exhaust-port
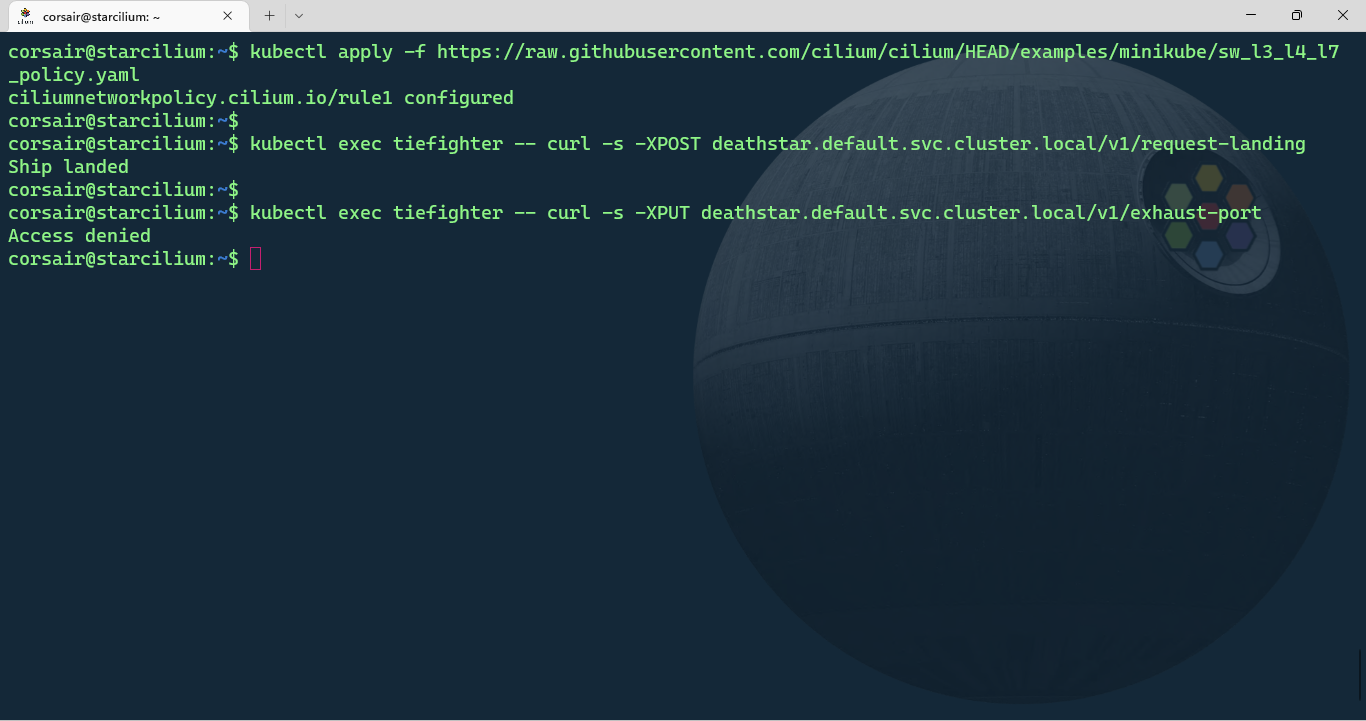
Access denied! As it should be. We have now a more secure Deathstar with proper accesses at the different layers. Come at us Rebels, we’re ready!
Checkpoint 4
For the ones who didn’t do the Lab, this stage is a compression of several steps for a better reading pace and also not recreate the Lab’s exercises as is (read: rip-off). So one last time, run the Lab, look at all the details missing from this blog post and earn a badge while doing so.
As for the stage itself, the learnings were many and we could see how Cilium really helps us securing the existing applications in a modern and intuitive way.
The ratings for this stage are:
Environment behavior: 5⁄5
- The exercises results where identical to the Lab.
Learning: 5⁄5
- The different examples were really well done and the “layered” approach is key for us to understand each step.
Overall setup: 5⁄5
- We learnt a lot, had fun doing so and the environment was stable all along.
Conclusion
What a fun and rewarding way to end this quite crazy year 2022. And hopefully this will motivate you to learn more about Cilium and the overall Cloud Native ecosystem. There’s plenty of trainings out there, given to us for free, and even if you’re on Windows, you can follow along!
To all the readers, I personally want to thank you for your feedback on social media or when we have the chance to meet in person. This gives me the motivation to continue learning and writing about my passion of WSL and the Cloud Native ecosystem. Thank you sincerely from the bottom of my heart.
>>> Nunix out <<<
Bonus 1: The k3d fleet gets Cilium
k3d a tool that creates containerized K3s clusters, so the motivation to have Cilium running on it is very high.
However, the journey to find the right procedure to have a stabilized cluster was by far one of the most challenging I ever faced. The learnings are plenty, but believe me when I say the frustrations were as many.
Luckily, the Force showed the path and here’s a semi-automated way to have a stable k3d cluster with Cilium.
Install k3d
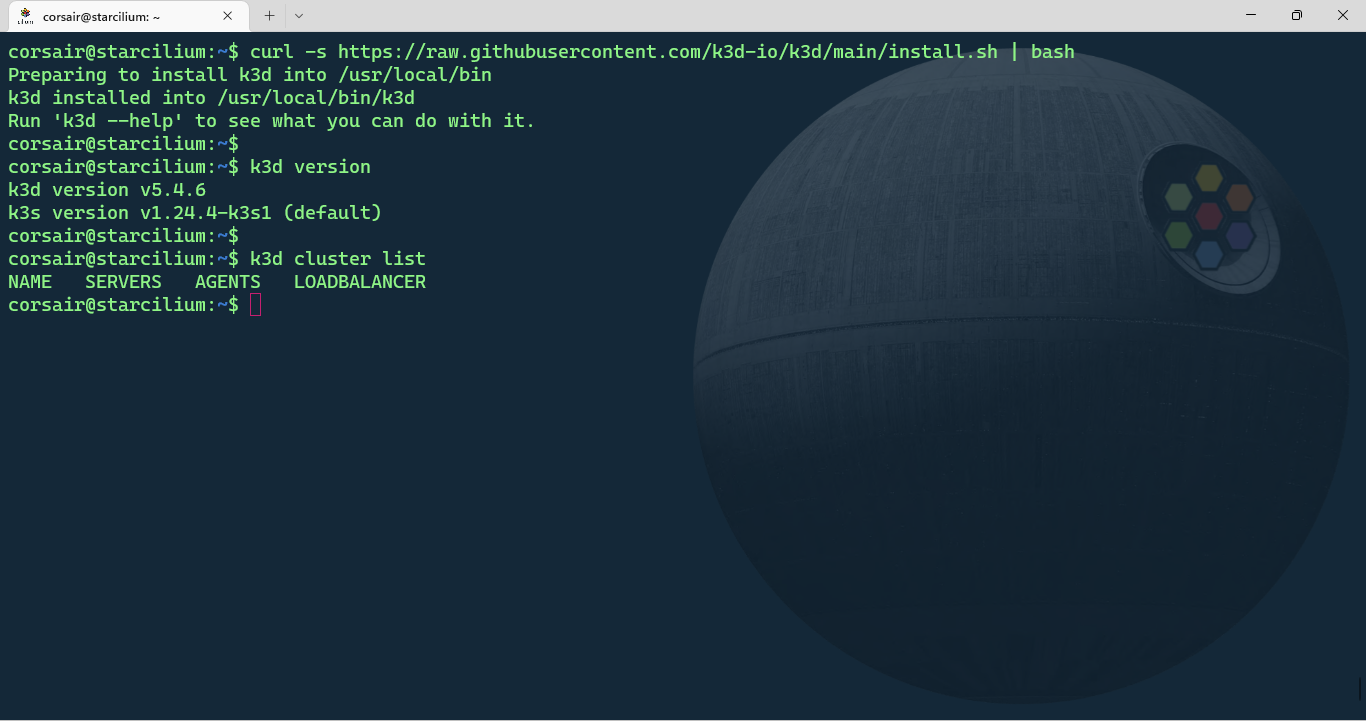
First we need to install k3d. The fastest way is to run the install script with either curl or wget as described in k3d’s homepage:
# Install k3d
curl -s https://raw.githubusercontent.com/k3d-io/k3d/main/install.sh | bash

# Check if k3d was installed correctly
k3d version

# [Optional] Display the list of clusters. The list should be empty
k3d cluster list
Note: as stated already many times in the other blog posts, running a script directly from Internet is as secure as letting your door open. While we can trust the source, still be careful and check the script before running it.
Create the k3d cluster
k3d evolved to be one of the best management tool when it comes to containerized Kubernetes clusters. So it’s strongly recommended to have a look on the options as it with help us create more or less complex clusters.
One difference from KinD for example, is the capability to create a multi-node cluster from the command line directly, without the need of a configuration file.
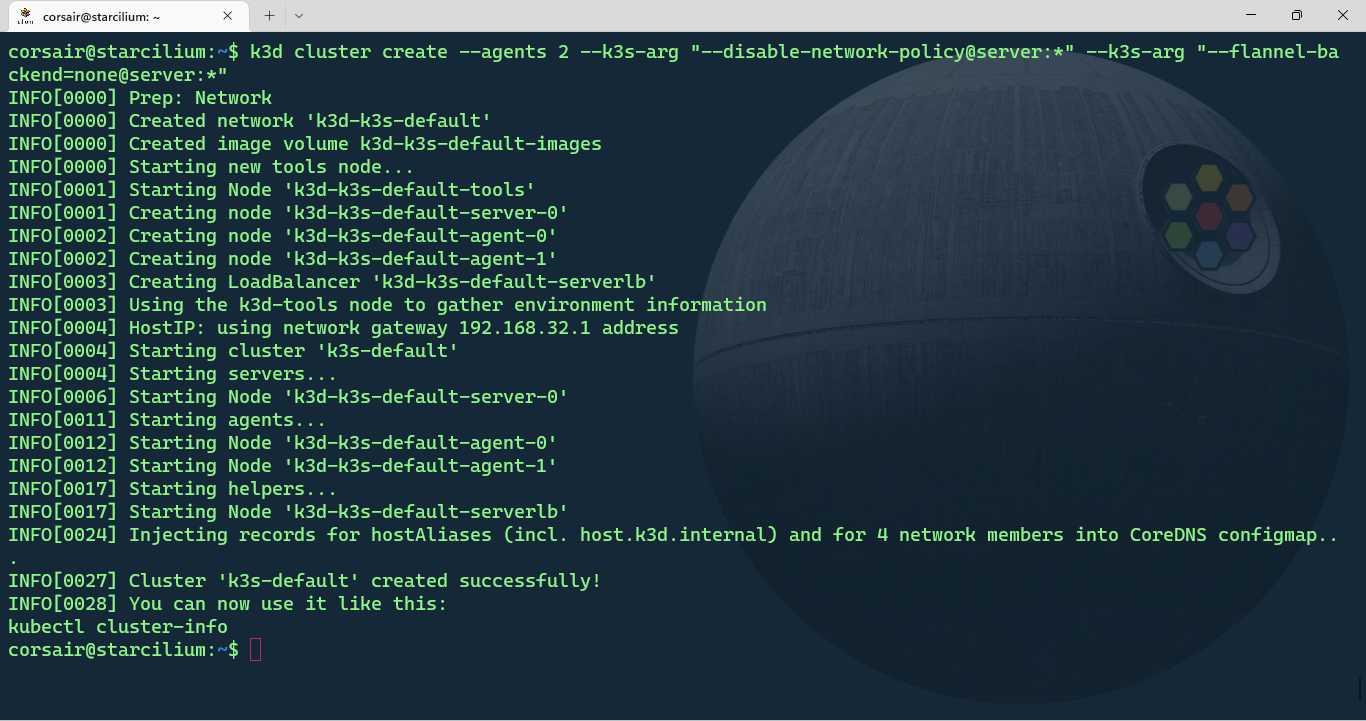
Enough theory, let’s create our k3d cluster and as we did for KinD, the default CNI needs to be disabled:
k3d cluster create --agents 2 --k3s-arg "--disable-network-policy@server:*" --k3s-arg "--flannel-backend=none@server:*"
Once the cluster is created, we can check its status in 2 different ways:
# List the cluster with k3d
k3d cluster list
# List the nodes with k3d
k3d node list
# List the nodes with kubectl
kubectl get nodes
# List all the pods and their status
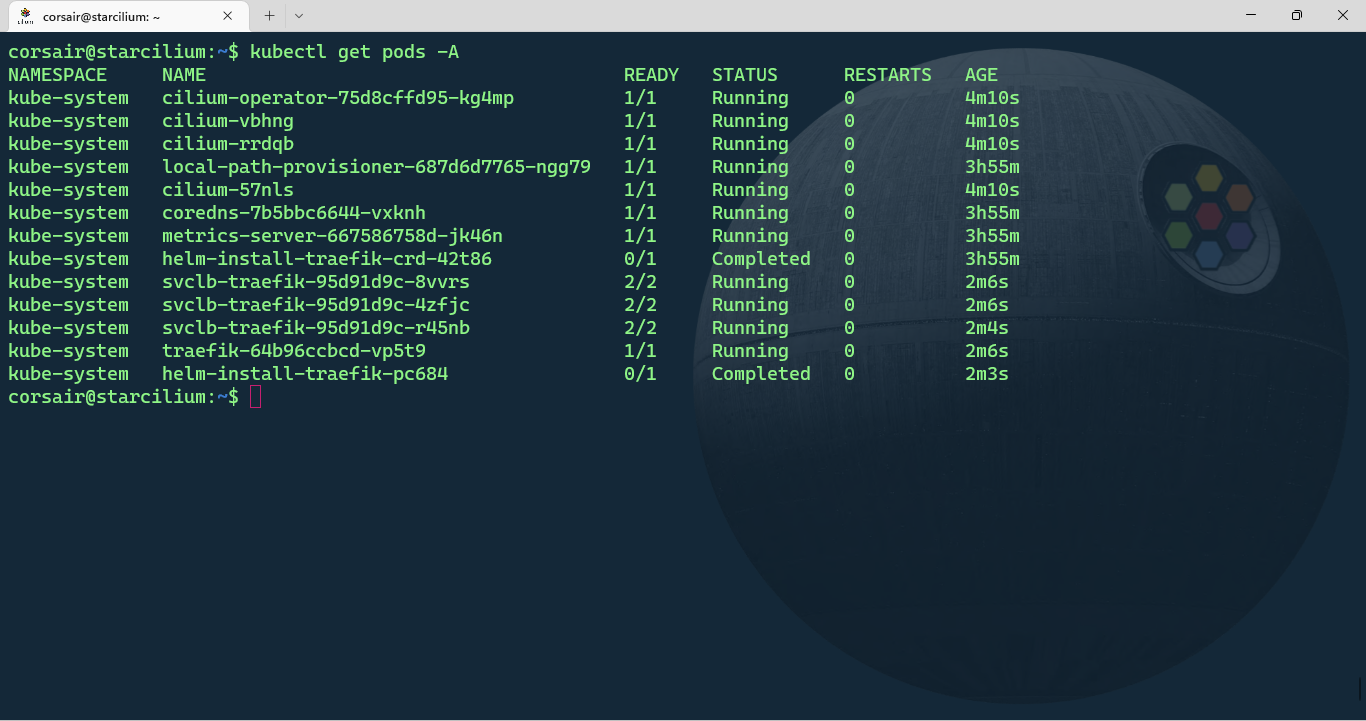
kubectl get pods -A
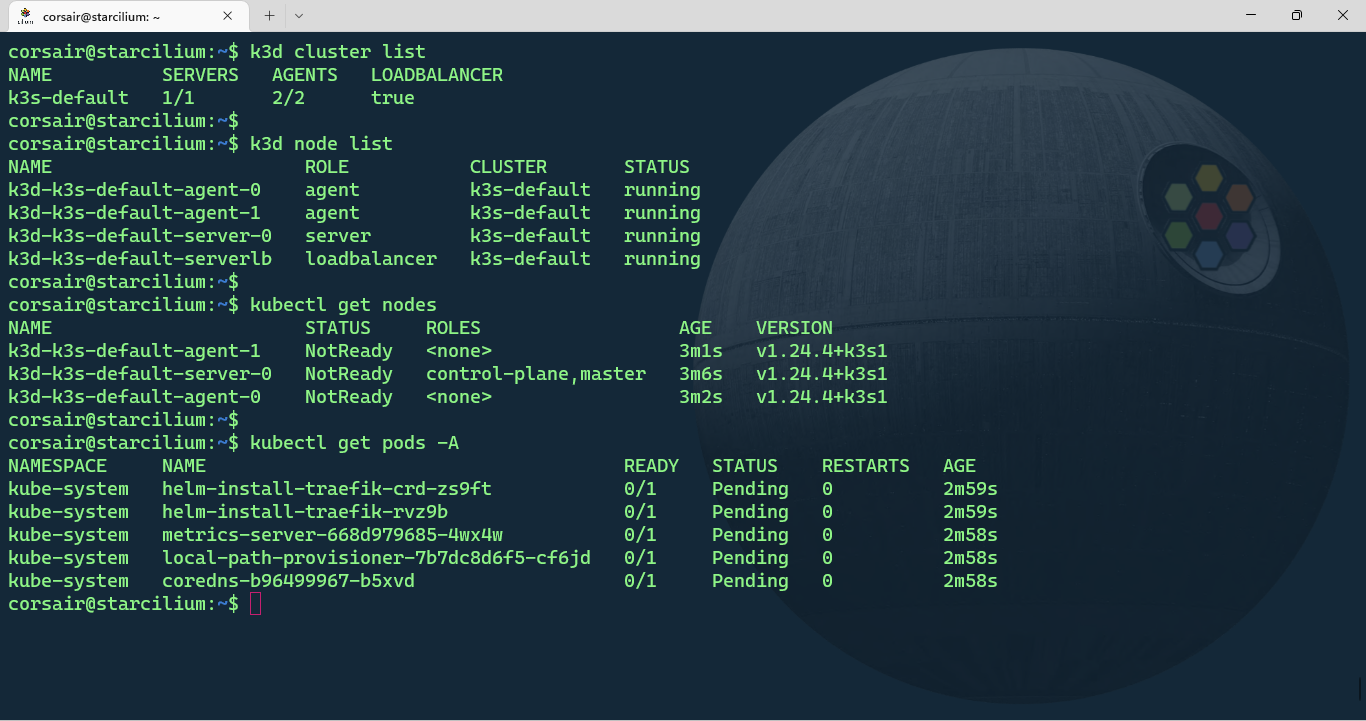
The output can be somewhat confusing if it’s the first time creating a cluster with k3d. While the kubectl command shows our 3 nodes, the k3d command show a 4th node with the load-balancer role.
This node is specific to k3d and can come very handy if our applications need extra ports to be opened. As for the cluster resources, K3s deploys by default CoreDNS, Traefik, local-path-provisioner and a metrics server.
[Optional] Create the k3d cluster with a blueprint
Since the version 5, k3d can also create clusters with a config file.
Here’s the equivalent config file for our multi-node cluster with the default CNI disabled:
# Create the config file
vi $HOME/k3dcilium.yaml

# Add the following content and save the file

# k3d configuration file, saved as e.g. /home/me/myk3dcluster.yaml
apiVersion: k3d.io/v1alpha4 # this will change in the future as we make everything more stable
kind: Simple # internally, we also have a Cluster config, which is not yet available externally
metadata:
  name: k3dcilium # name that you want to give to your cluster (will still be prefixed with `k3d-`)
servers: 1 # same as `--servers 1`
agents: 2 # same as `--agents 2`
kubeAPI:
  hostIP: 0.0.0.0
  hostPort: "6443"
image: rancher/k3s:v1.24.9-k3s1 # same as `--image rancher/k3s:v1.20.4-k3s1`
token: TheEmpireUsesCilium # same as `--token superSecretToken`
ports:
  - port: 8080:80 # same as `--port '8080:80@loadbalancer'`
    nodeFilters:
      - loadbalancer
  - port: 8443:443 # same as `--port '8080:80@loadbalancer'`
    nodeFilters:
      - loadbalancer
options:
  k3d: # k3d runtime settings
    wait: true # wait for cluster to be usable before returining; same as `--wait` (default: true)
    timeout: "6m0s" # wait timeout before aborting; same as `--timeout 60s`
    disableLoadbalancer: false # same as `--no-lb`
    disableImageVolume: false # same as `--no-image-volume`
    disableRollback: false # same as `--no-Rollback`
  k3s: # options passed on to K3s itself
    extraArgs: # additional arguments passed to the `k3s server|agent` command; same as `--k3s-arg`
      - arg: --tls-san=127.0.0.1
        nodeFilters:
          - server:*
      - arg: --disable-network-policy
        nodeFilters:
          - server:*
      - arg: --flannel-backend=none
        nodeFilters:
          - server:*
  kubeconfig:
    updateDefaultKubeconfig: true # add new cluster to your default Kubeconfig; same as `--kubeconfig-update-default` (default: true)
    switchCurrentContext: true # also set current-context to the new cluster's context; same as `--kubeconfig-switch-context` (default: true)
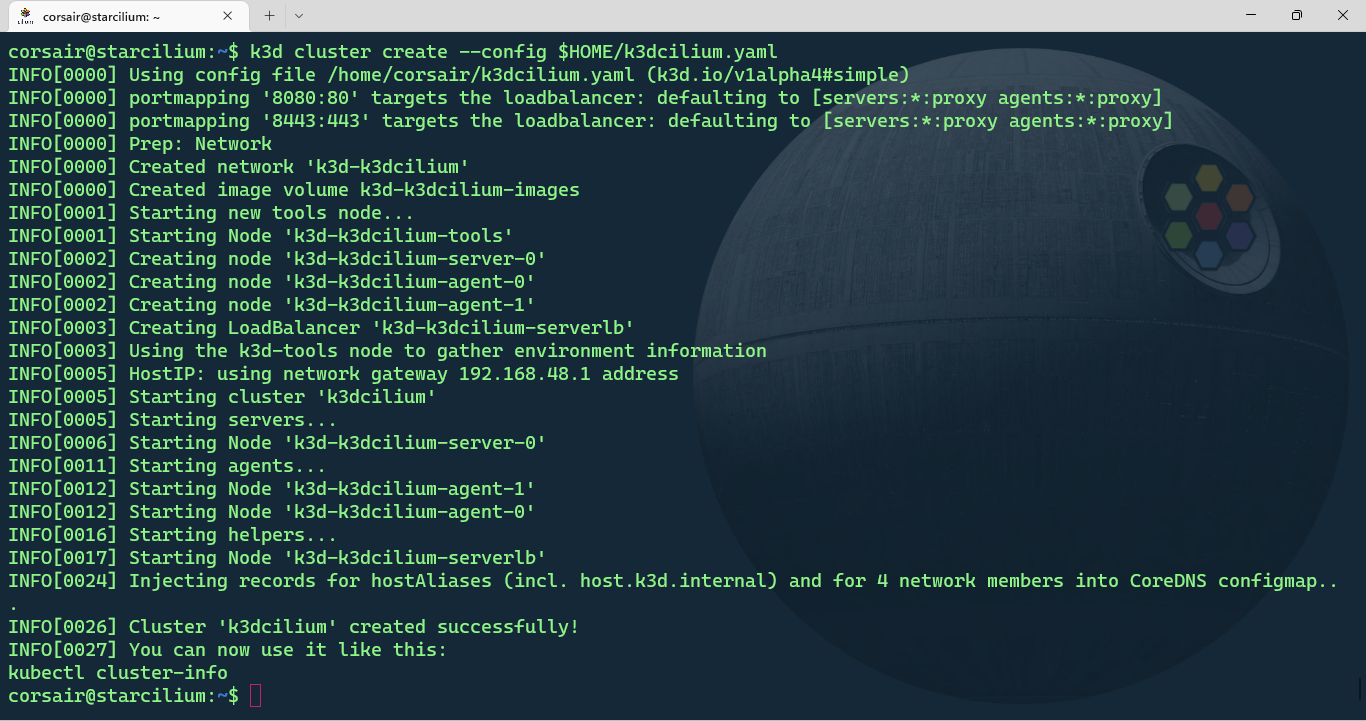
Create a new k3d cluster with the config file:
k3d cluster create --config k3dcilium.yaml
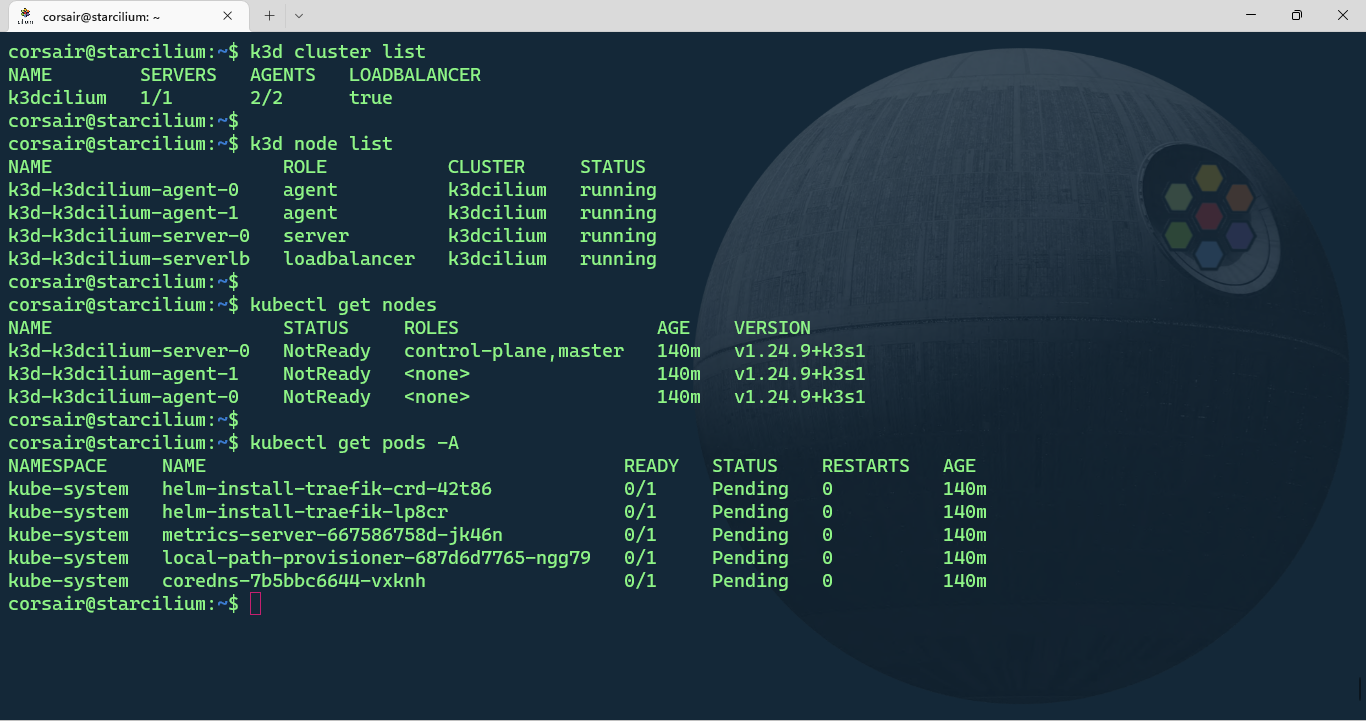
Once the cluster is created, we can check its status in 2 different ways:
# List the cluster with k3d
k3d cluster list

# List the nodes with k3d
k3d node list

# List the nodes with kubectl
kubectl get nodes

# List all the pods and their status
kubectl get pods -A
Prepare the nodes
Before we can install Cilium on our k3d cluster, we need to perform a task on “containerized OS”. This task is automatically done with KinD containers thanks to the OS base image used for by KinD.
KinD is based on Ubuntu 22.04, and k3d is based in a “mix” of Alpine and the “scratch” image. The k3d base image is very minimal and serves only the purpose of running K3s. While this is considered as the right way to create an image, it also applies some/several limitations for extended use-cases.
Still, the good news is that we can add the missing part(s).
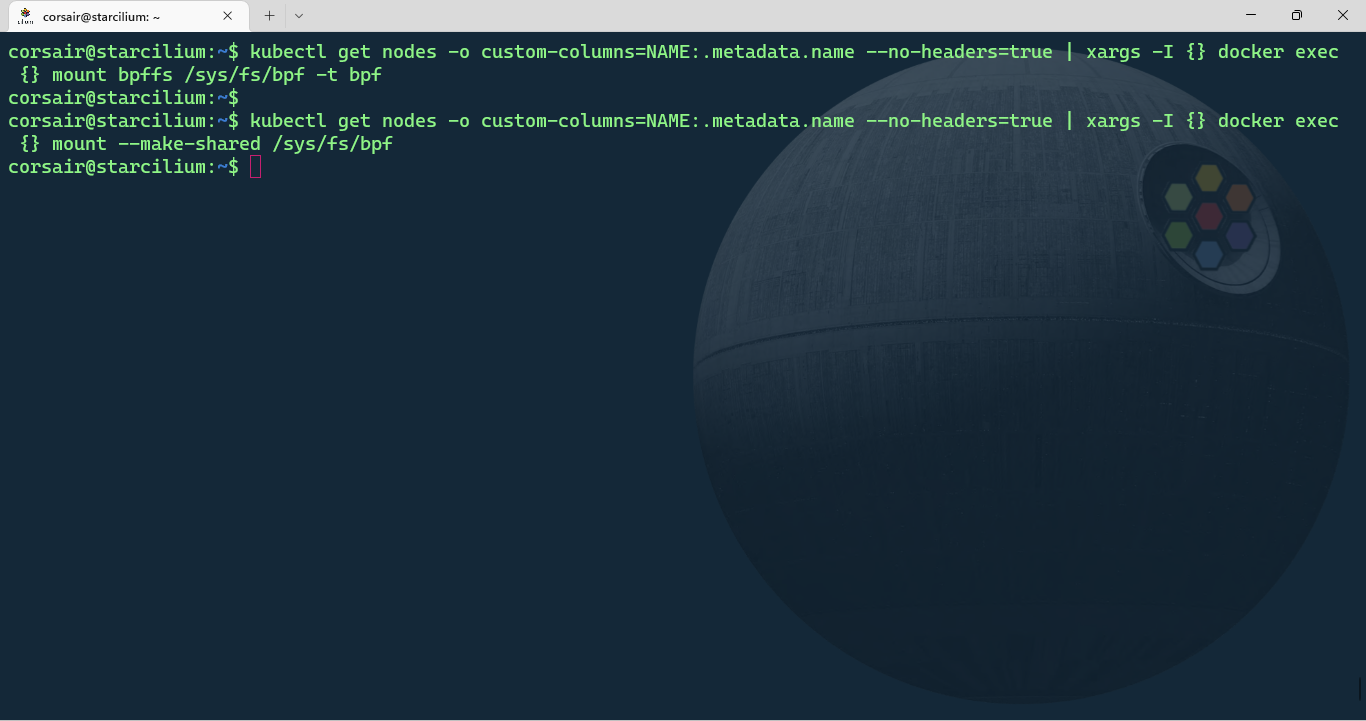
The first part is to mount bpf filesystem and change the mount point to a shared mount:
# Mount the bpf filesystem in all nodes
kubectl get nodes -o custom-columns=NAME:.metadata.name --no-headers=true | xargs -I {} docker exec {} mount bpffs /sys/fs/bpf -t bpf

# Change the bpf mount point to a shared mount
kubectl get nodes -o custom-columns=NAME:.metadata.name --no-headers=true | xargs -I {} docker exec {} mount --make-shared /sys/fs/bpf
Note: as described above, k3d deploys a load-balancer node for its own use, so to avoid listing it with
k3d node list,kubectl get nodesseems more logic as it will get only the nodes Kubernetes “sees”, and the output can be customized to only display the data we need.
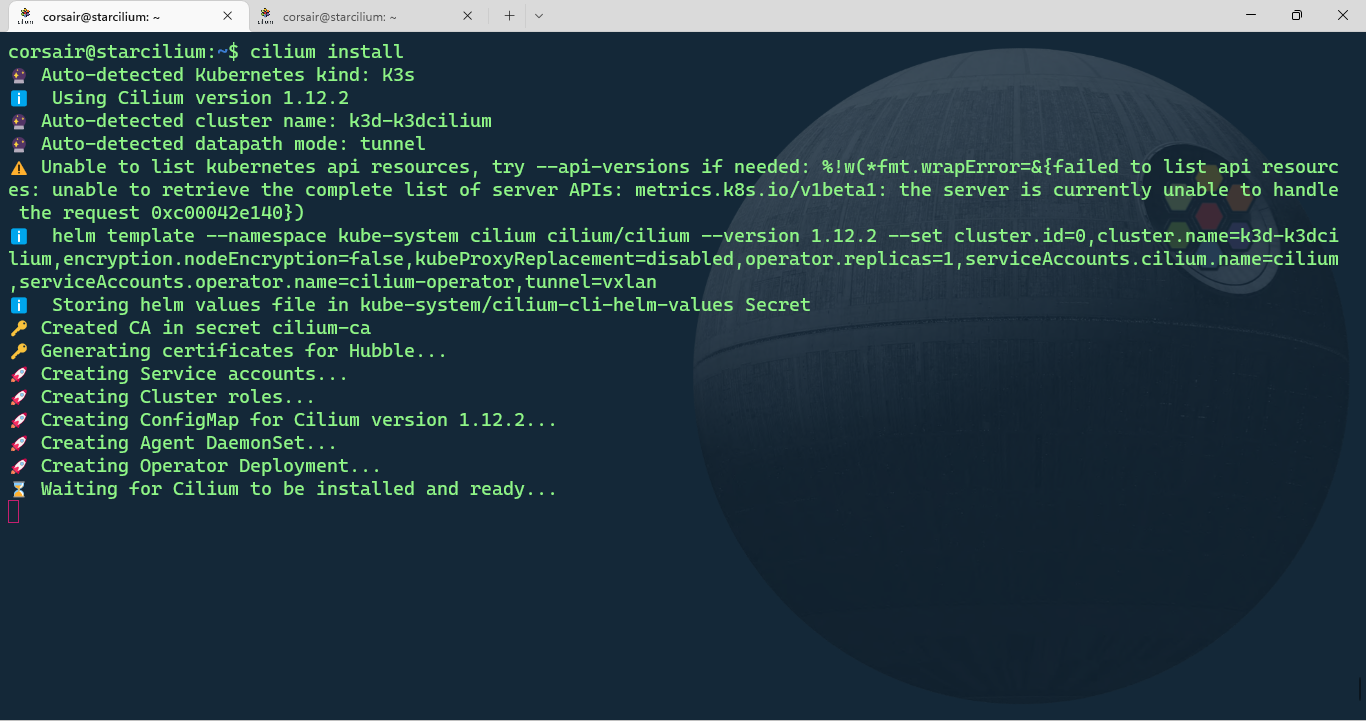
Install cilium
The nodes are now ready and we can install Cilium:
cilium install
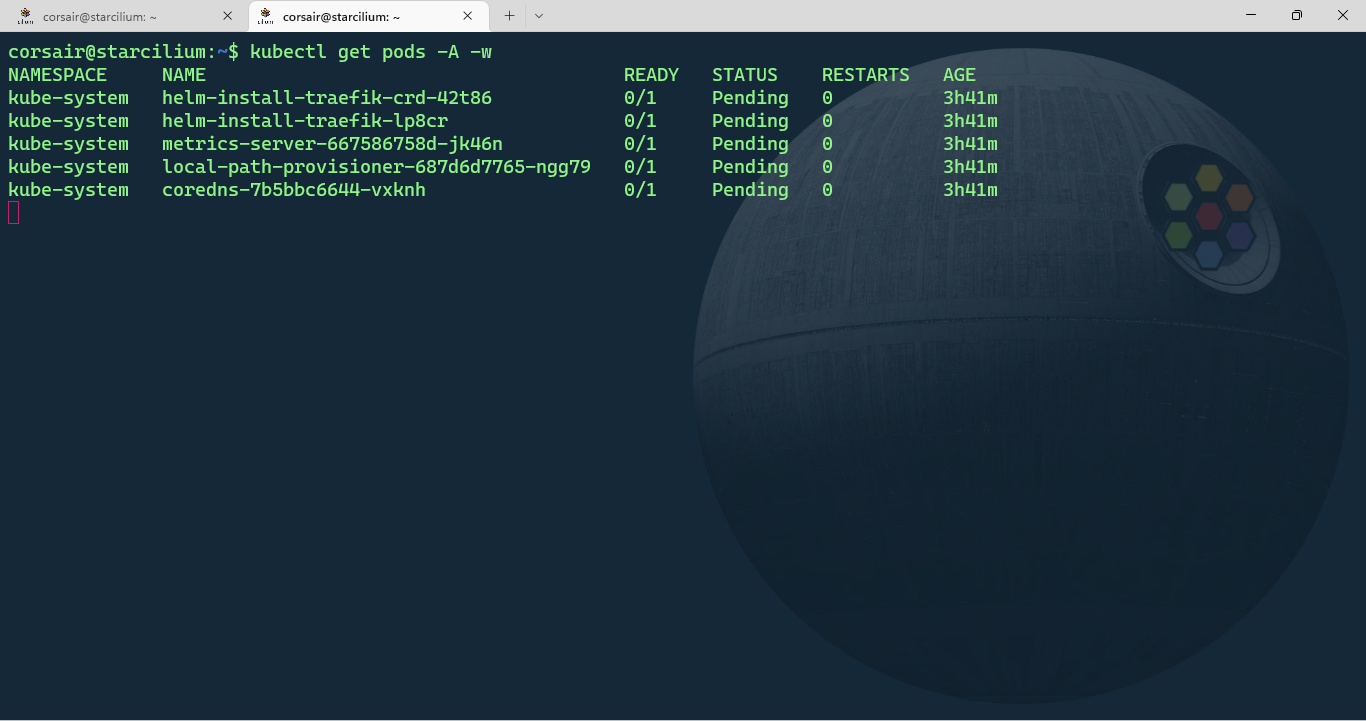
Open another shell session and monitor the pods
kubectl get pods -A -w
After few seconds, the Cilium pods status will be “CreateContainerError”. In another shell session, change the /run/cilium/cgroupv2 mount point to a shared mount:
kubectl get nodes -o custom-columns=NAME:.metadata.name --no-headers=true | xargs -I {} docker exec {} mount --make-shared /run/cilium/cgroupv2
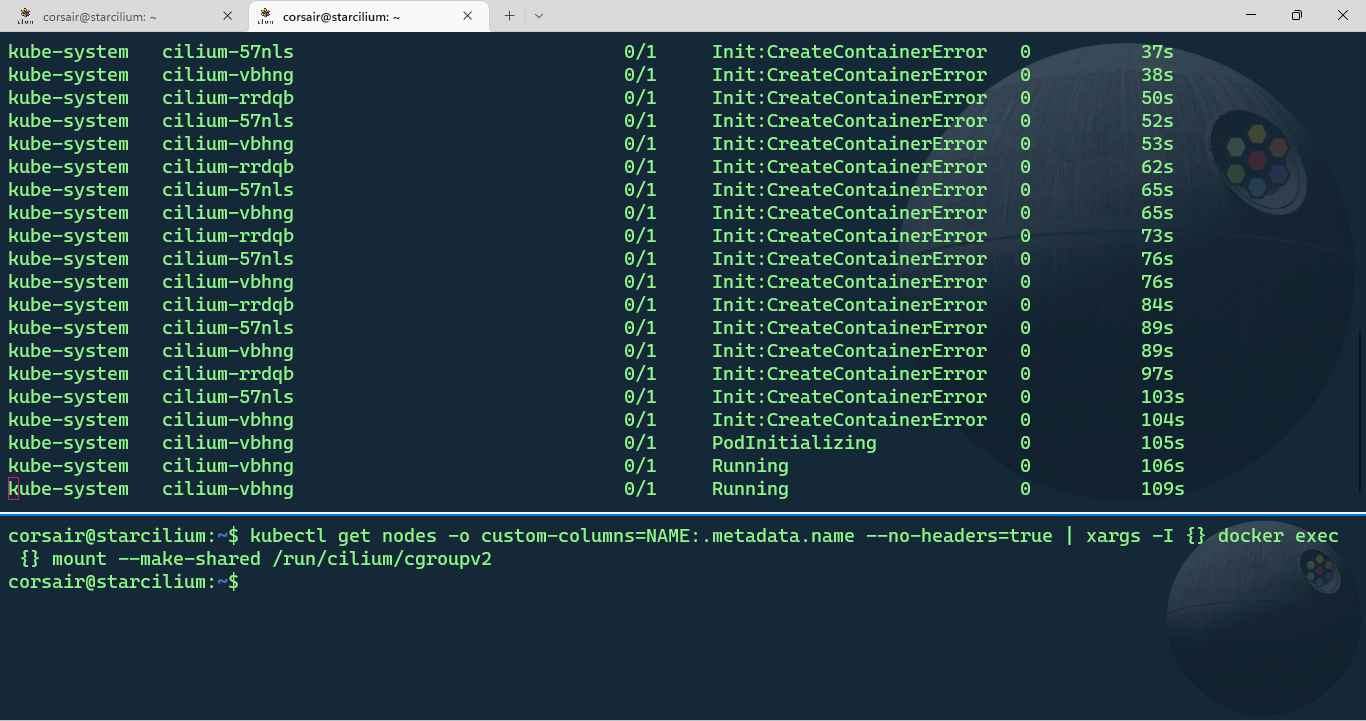
When we switch back to the pod monitoring shell session, we’ll see the Cilium pods being created and after some time all the other pods should now have the status “Running”:
kubectl get pods -A
Finally we can check the status with Cilium:
cilium status

Bonus-ception
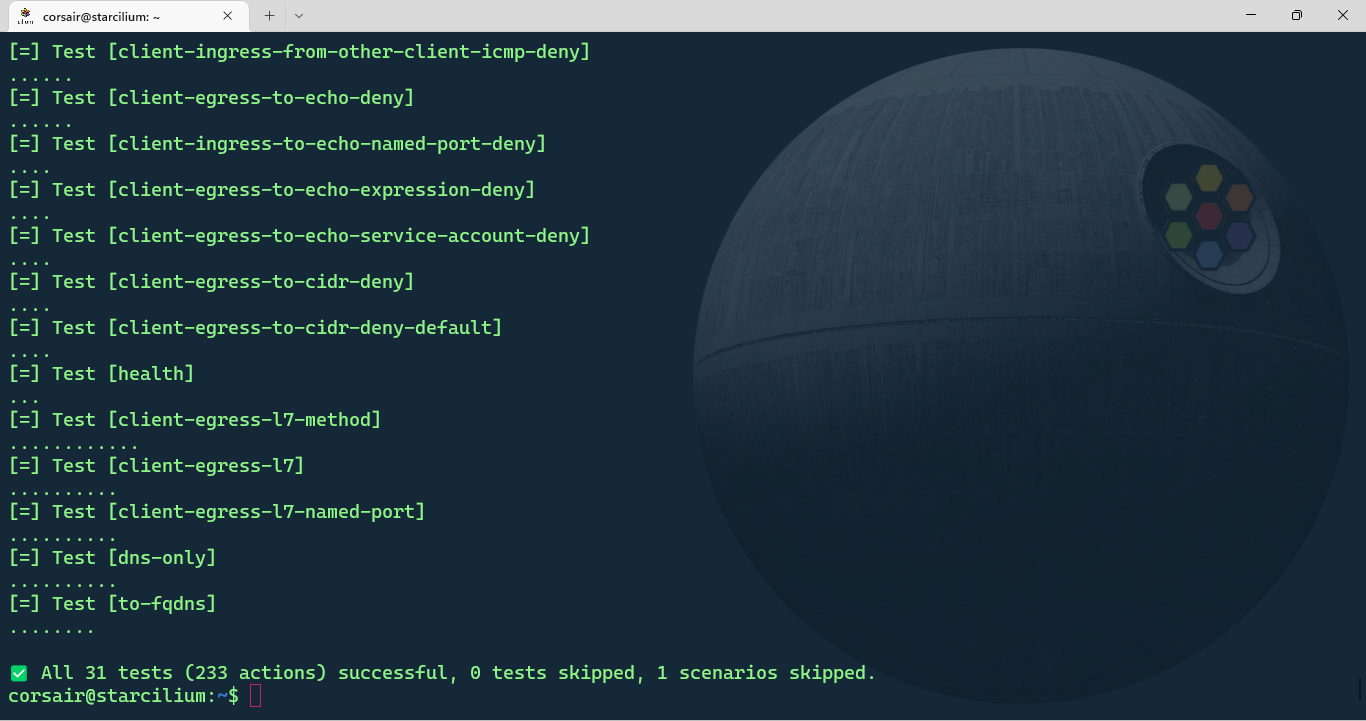
In the first part with KinD, we didn’t use the Cilium connectivity tool, so let’s use it now and see the (very) good results:
cilium connectivity test
Checkpoint Bonus 1
Let’s be honest, this solution feels a bit incomplete and even hard to automate due to the extra mounts and commands we need to run at a specific point in the installation process.
That’s why in the Bonus introduction, the solution is described as semi-automated. And I would love to see the power of the Cloud Native community and see how we could automate it completly.
Here’s couple notes based on the try&fail (multiple) attempts:
This solution was built only on WSL2, so I would like to see if it behaves the same on Linux bare metal/VM
The first several tries were with the bpf and cgroupv2 filesystems mounted as volumes. This caused a lot of errors either on the Cilium pods or the K3s resources pods
And to finish on the bright side, here’s a fun test I did while searching how to stabilize the cluster:
- Installed K3s “locally” as the control plane, installed Cilium on the single node = OK
- Then created 2 nodes with k3d and added them to the cluster. Run the mount tasks as explained above = OK
I was sincerely impressed to see it “worked as intended” and the new nodes had the Cilium pods deployed and the nodes connected without any network issues.
Huge props to k3d and Cilium teams.