WSL2+RHEL8: The Whale with the Red Hat
Introduction
When looking at the current WSL distributions in the Microsoft Store, anyone with even the smallest knowledge of Linux will remark a big absent from the list: Red Hat.
To no other sources than some posts on Twitter, we currently don’t really know who’s pushing back and for what exact reasons. One thing almost for granted is that WSL was/is not part of the partnership between both companies.
Still, this blog is really not about companies politics, so let’s focus on the good parts. And those are that, even if not “supported”, there’s nothing blocking us to actually bring Red Hat as a WSL Distro.
So let our Corsair hearts run wild and “steal” this so precious gem.
Prerequisites
First and foremost, for keeping this blog to the “technology” aspect, it will not describe how to browse Red Hat customer portal.
Still, when needed, the page name or “location” will be provided as an helper.
That being said, here is the list of components needed to follow this blog:
- OS: Windows 10 Professional version 2004 - channel: Insiders dev
Initial WSL OS: Ubuntu 20.04 from the Windows Store
- WSL version: 2
Docker: installed on WSL2 distro
- Version: 20.10.2
- User type: anonymous
[Optional] Terminal: Windows Terminal
- Version: 1.5.3242.0
Red Hat account: login menu
- Account type: free developer
A developer’s Red Hat
Before we start, as stated in the prerequisites, we will need a Red Hat subscription.
Red Hat is a company that sells services around Linux (duh) and Cloud. In order to use Red Hat Linux, we need a subscription. In our case, if we don’t already have one from our company, Red Hat has a very handy (and let’s say it: cool) developer subscription.
And while we will be using our subscription for development purposes, there’s an even nicer update on the developer subscription applicability.
Now we are ready to go.
Moby likes RHEL
The easiest way to create a new WSL distro, is to import a container export file. In order to get the Red Hat Enterprise Linux (RHEL) container images, we need to pull it from Red Hat’s own registry
Strangely enough, when searching for the RHEL base images, there’s only RHEL6 and RHEL7 fully featured images. However, when searching the build images, and if we pick GO for example, there will be a RHEL8 image.
Let’s create a container with the GO RHEL8 image. Please note we will not run any command, so the container will be created and will directly exit. However that’s the behaviour we are looking for as we will export the container to a file:
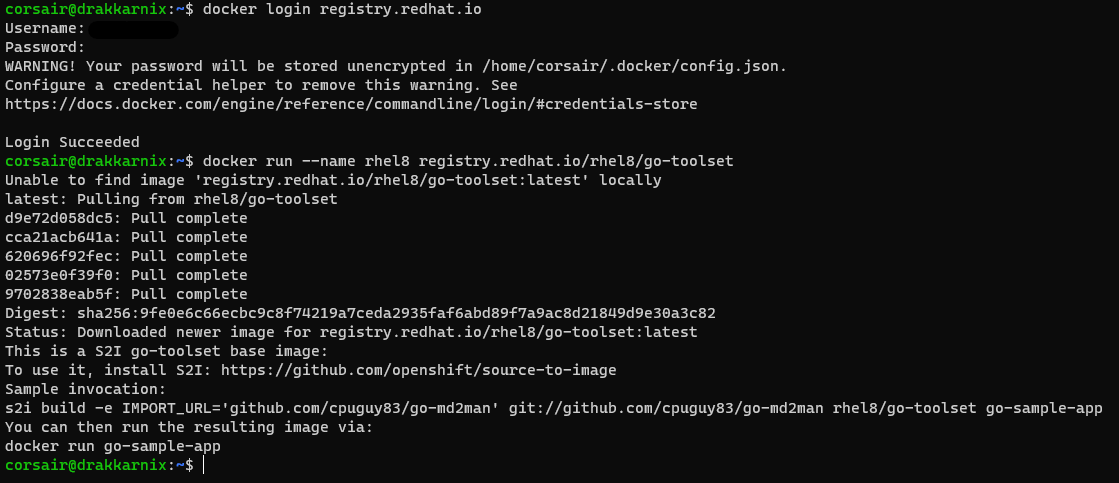
# Login to the Red Hat registry
# Enter the Red Hat account username and password
docker login registry.redhat.io

# Pull the GO image with the RHEL8 base image
docker run --name rhel8 registry.redhat.io/rhel8/go-toolset
Once we created the container, we can now export it as an archive file. However, as we will need to import it into WSL2 as a distro with the wsl command, we need to export it to a directory inside the Windows filesystem (read: /mnt/c):
# Export the container to an archive file
# Prior to the export, a directory has been created: c:\wslsources
# Command help:
# - base command: docker export
# - option to output to a file: -o /mnt/c/wslsources/rhel8.tar.gz
# - name of the container to be exported: rhel8
docker export -o /mnt/c/wslsources/rhel8.tar.gz rhel8

# Check if the export has been successful
ll /mnt/c/wslsources/rhel8.tar.gz

We have now the file, containing an image of RHEL8, to be imported as a new WSL2 distro.
A new distro is born
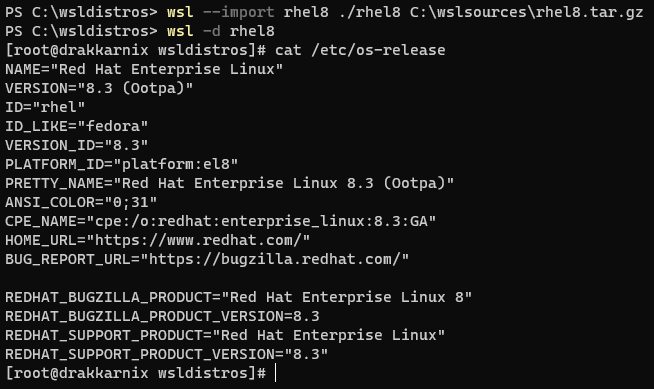
If the terminal used is the Windows Terminal, we will open a new Powershell tab and import the RHEL8 container file into WSL:
# Create a new directory for containing the WSL custom distros, or move into it if already created
mkdir c:\wsldistros
cd c:\wsldistros

# Import the container file as a WSL v2 distro
# Command help:
# - base command: wsl --import
# - name of the distro: rhel8
# - location of the distro files: ./rhel8
# - path of the container file: c:\wslsources\rhel8.tar.gz
wsl --import rhel8 ./rhel8 c:\wslsources\rhel8.tar.gz

# Launch the new distro
wsl -d rhel8

# Check with version is installed
cat /etc/os-release
Note: the command above assumes that WSL is set to have the v2 versions by default. If there’s an uncertainty about which version is actually setup, the following option can be added to the command:
--version 2
Once we have RHEL, it’s time to start the configuration. But first, let’s register it.
A registration to awesomeness
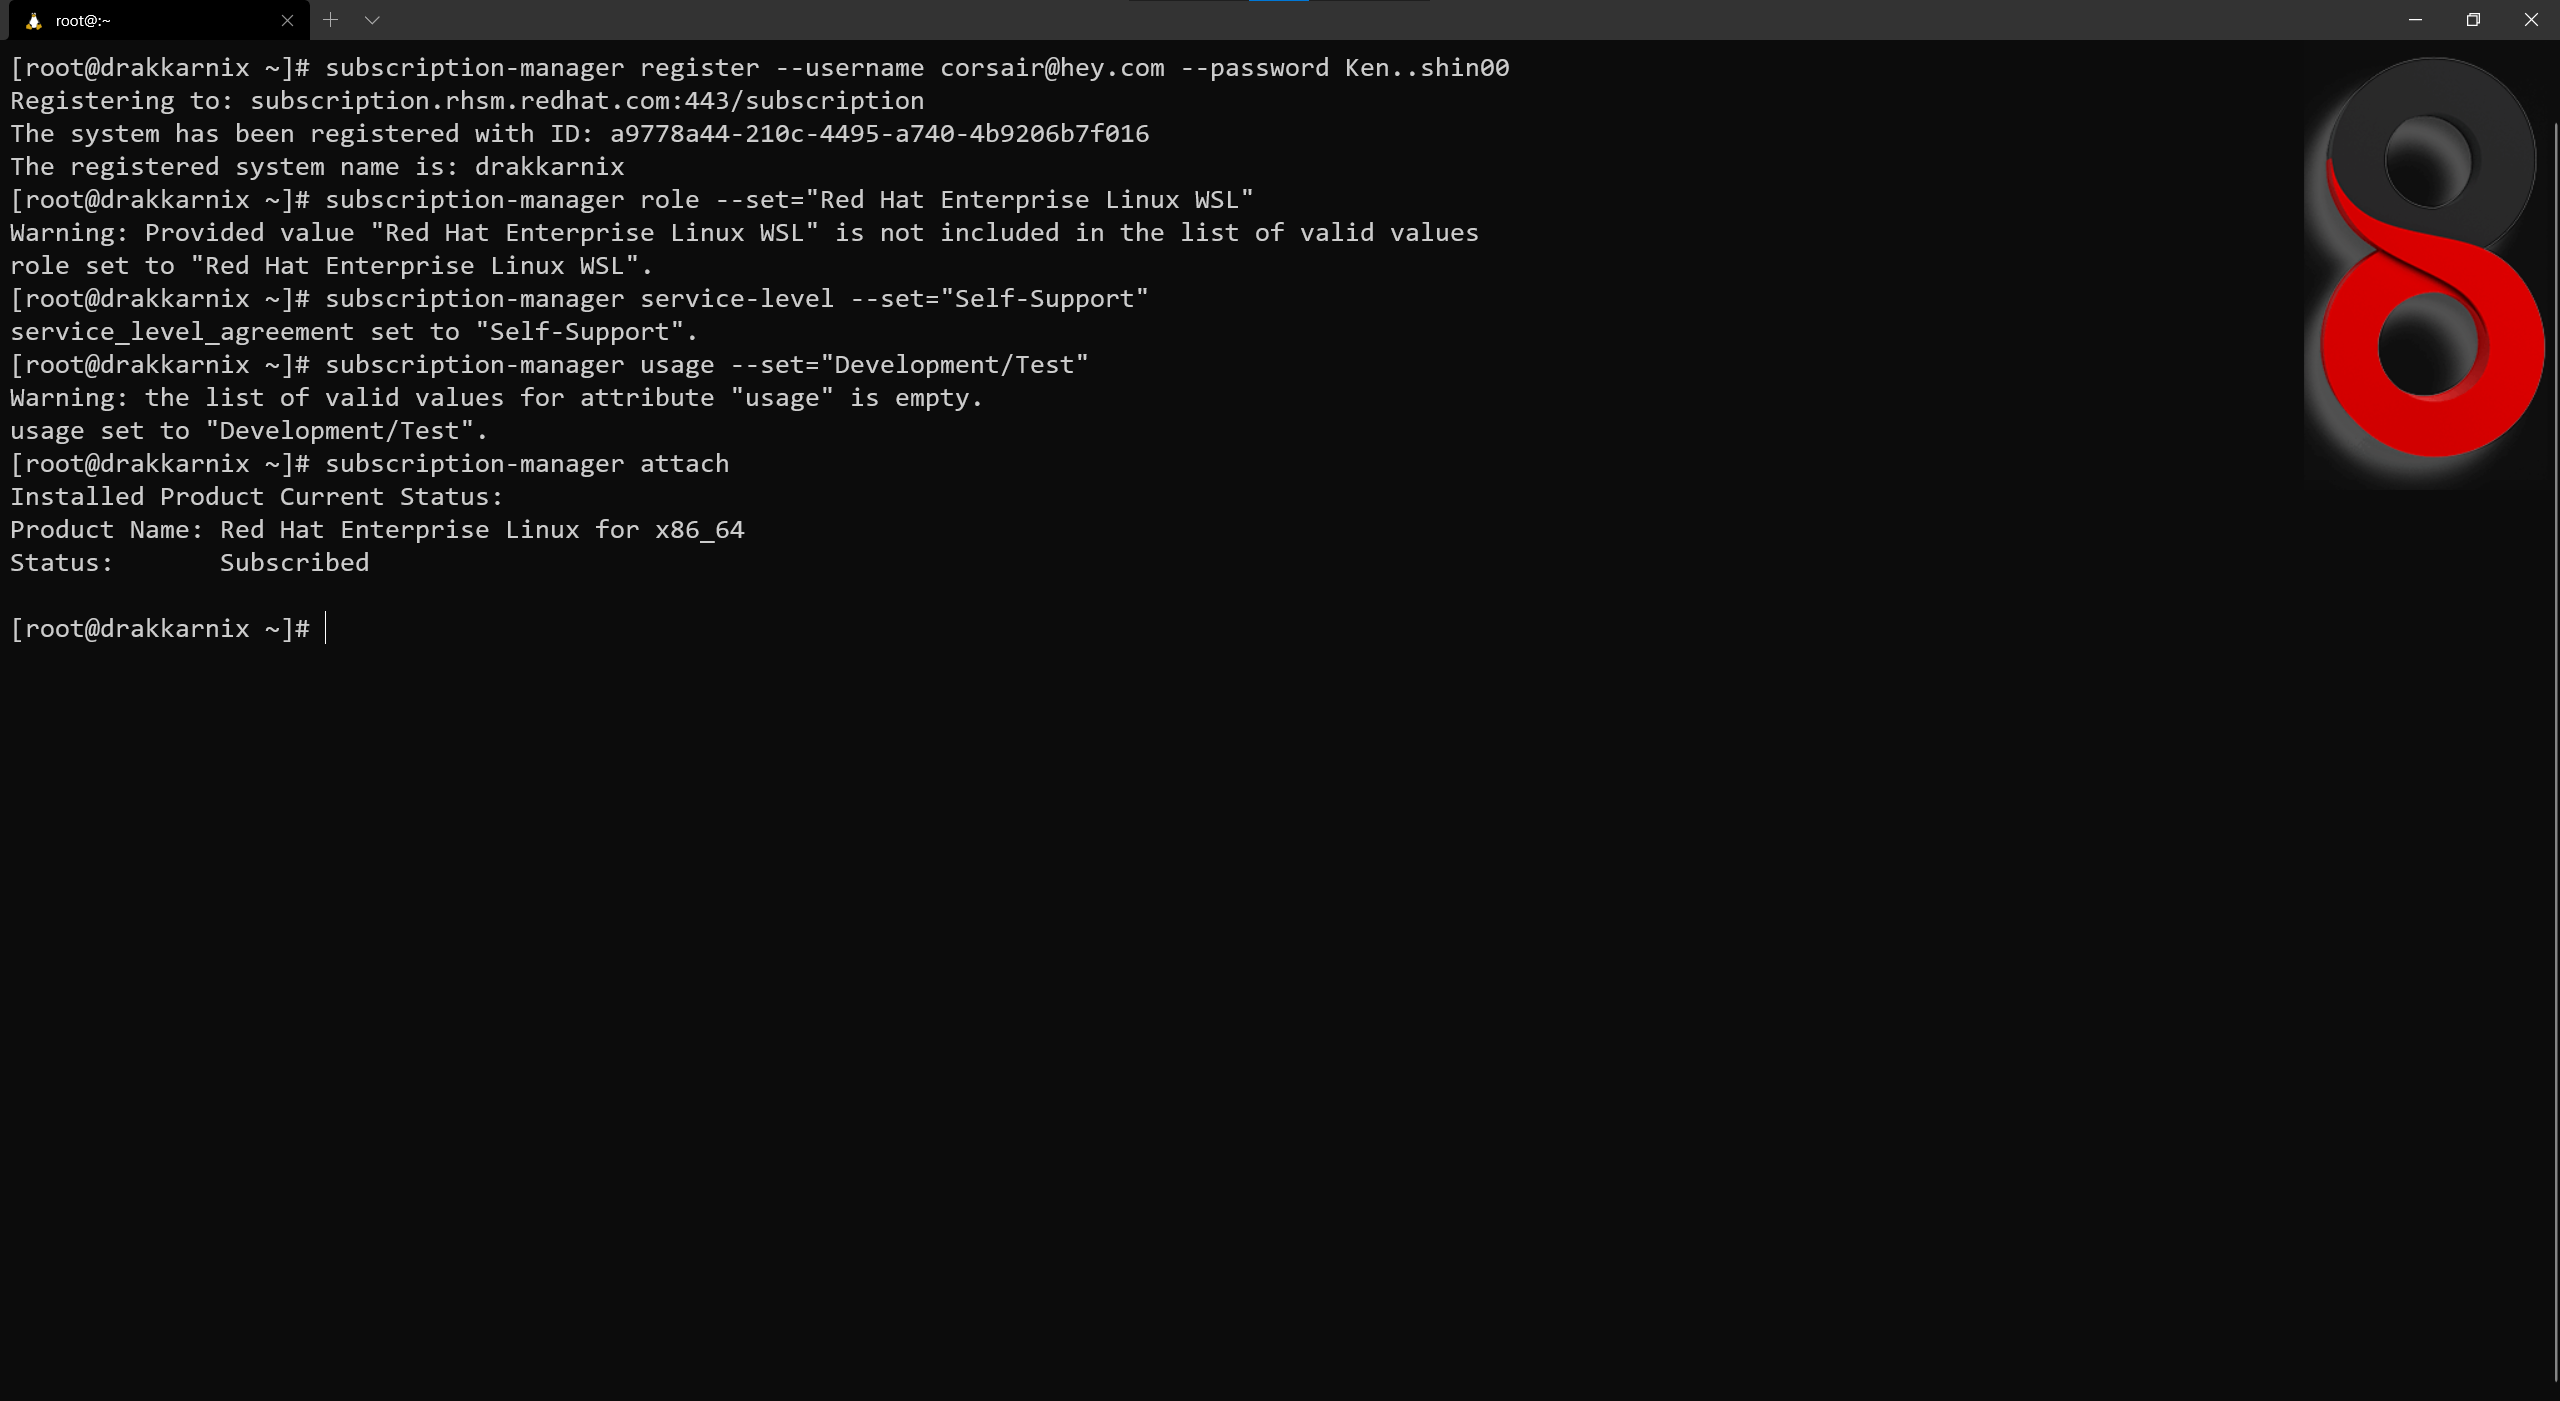
In order to help us with the registration, Red Hat has the Registration Assistant. We will need to answer few questions and based on the answers, it will provide with the commands below:
# Register the system with our Red Hat username and password
subscription-manager register --username <username> --password <password>

# Set a role to the System
# It can be one suggested by Red Hat, or in our case, let's have "some fun", and set it to WSL
subscription-manager role --set="Red Hat Enterprise Linux WSL"

# Set a support level
# In our case, remember we have a free Developer license and the only valid support is "Self-Support"
subscription-manager service-level --set="Self-Support"

# Set a usage (read: purpose) to the System
# We will pick "Development/Test" for this first try
subscription-manager usage --set="Development/Test"

# Once everything is set, we can attach the system to our Red Hat subscription
subscription-manager attach
[Optional] We can confirm if the system has been correctly subscribed in the Red Hat Customer Portal by clicking in our Subscription and picking the “Systems” tab:

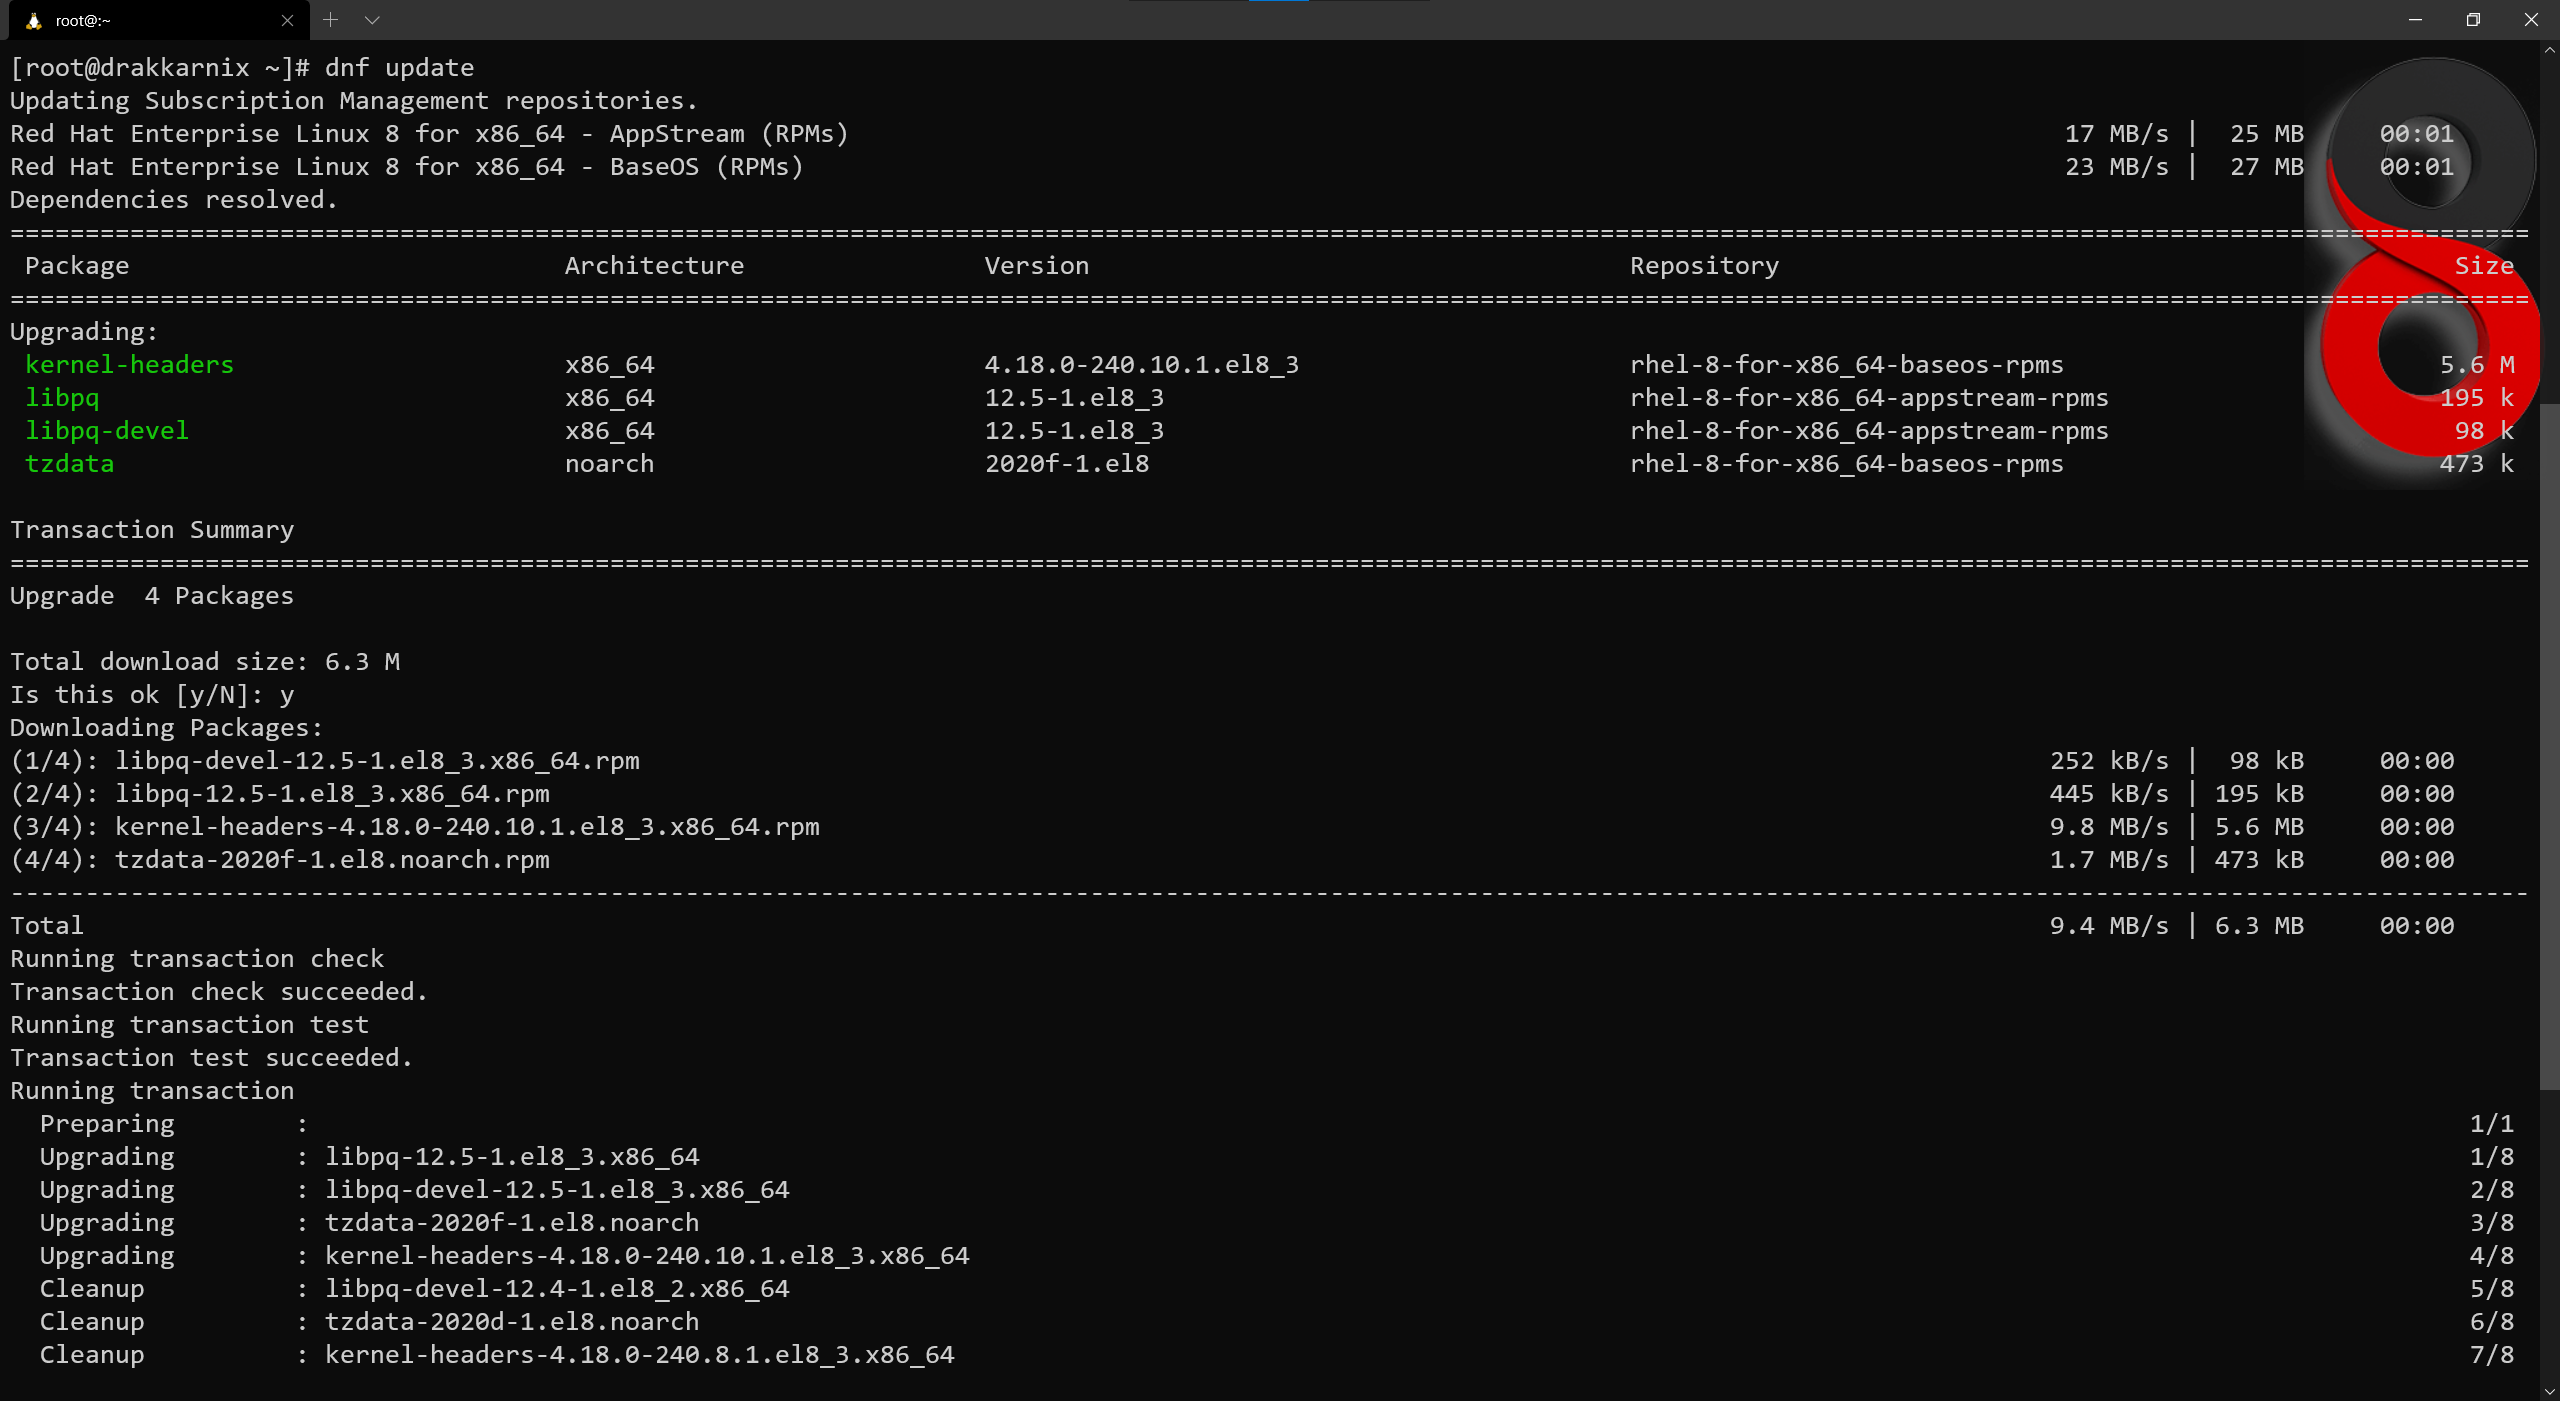
Finally, once the system is fully registered, we can update our RHEL on WSL distro:
# Update the system
dnf update
And here we have, a full blown RHEL8 ready to be customized.
Customizing a distro the WSL way
At first glance, what we can tell is that the shell prompt is not “that pretty” and also the default user is root. So in order to have a more “Linux-y” experience, we will need to add applications and configuration files.
The main goal here is to ensure we enjoy our distro and can work in a way that is the closest to a real Linux system and still have the advantages of the WSL interoperability.
For the sake of clarity, we will perform the customization in three different phases. So let’s start with the first phase.
Adding packages and a new User
The first phase is all about the configuration needed to start using our own user and not root.
We will start by adding few needed and optional packages:
# Add sudo, zsh and cracklib-dicts
dnf install -y sudo zsh cracklib-dicts
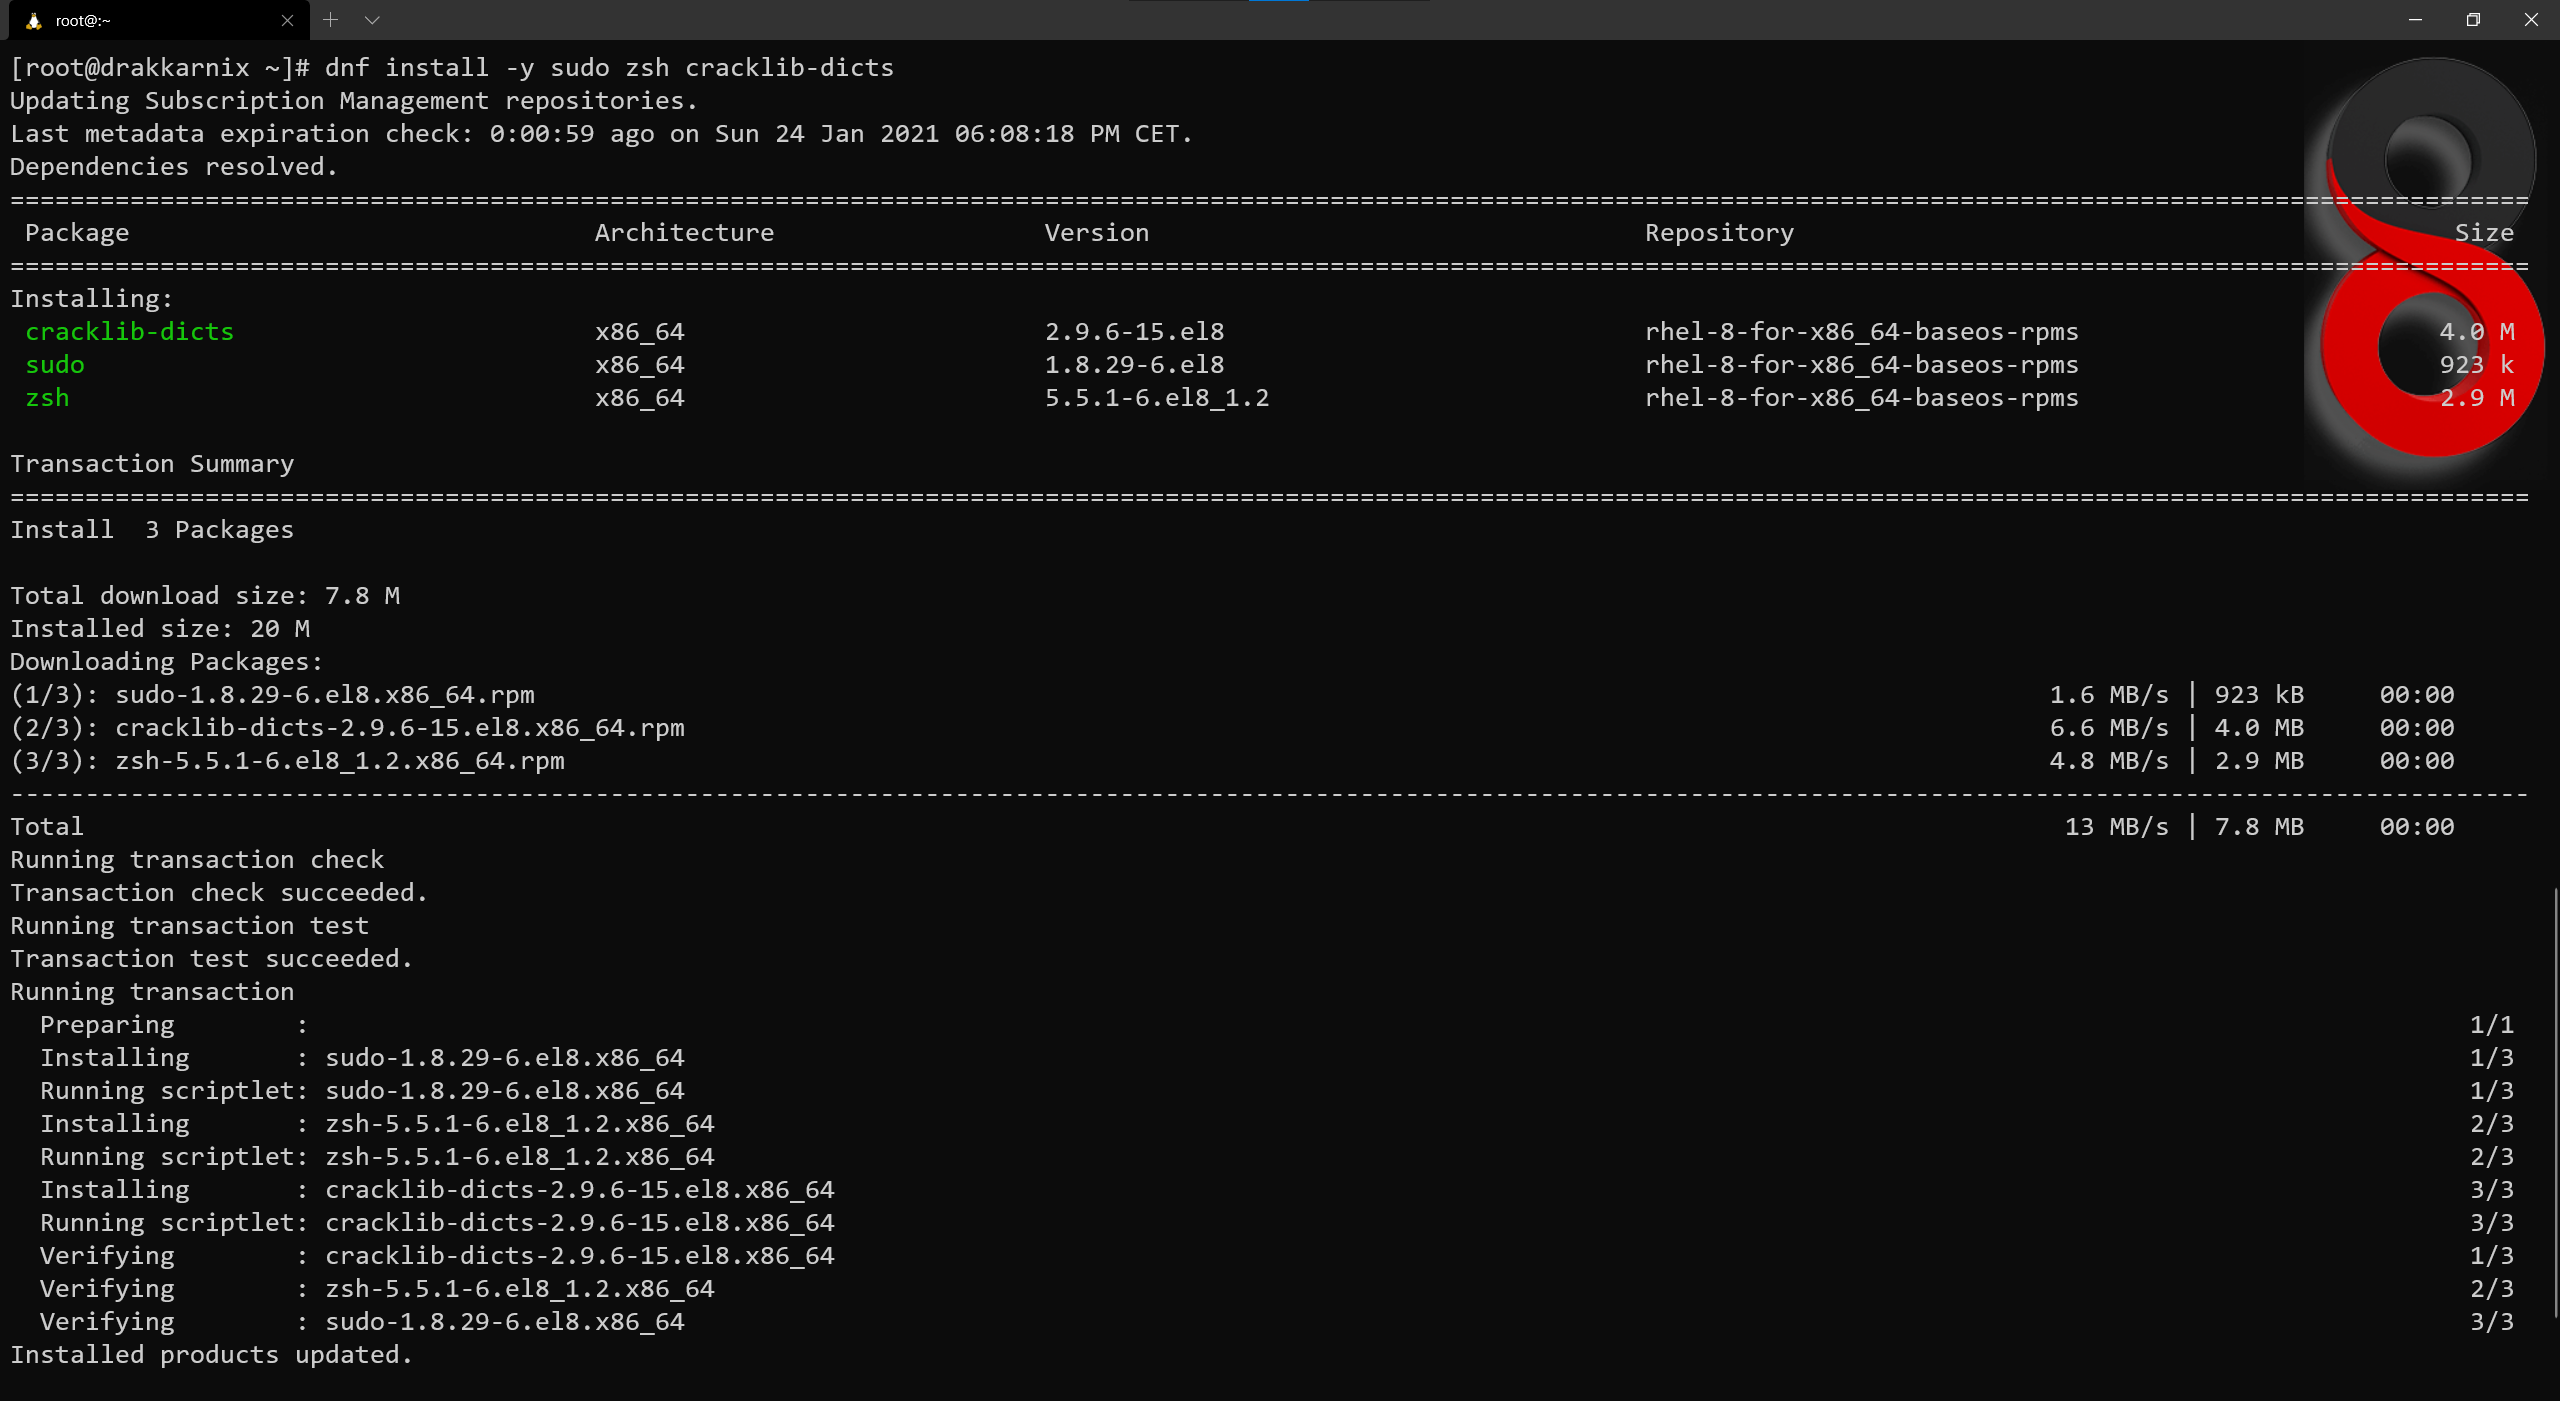
Note: while
sudoandzshare two applications well known from Linux users,cracklib-dictsis a package used by the commandpasswdfor resetting passwords. By default, the package is not present in the container image. Adding the package will avoid displaying a warning every time we change a password for any user.
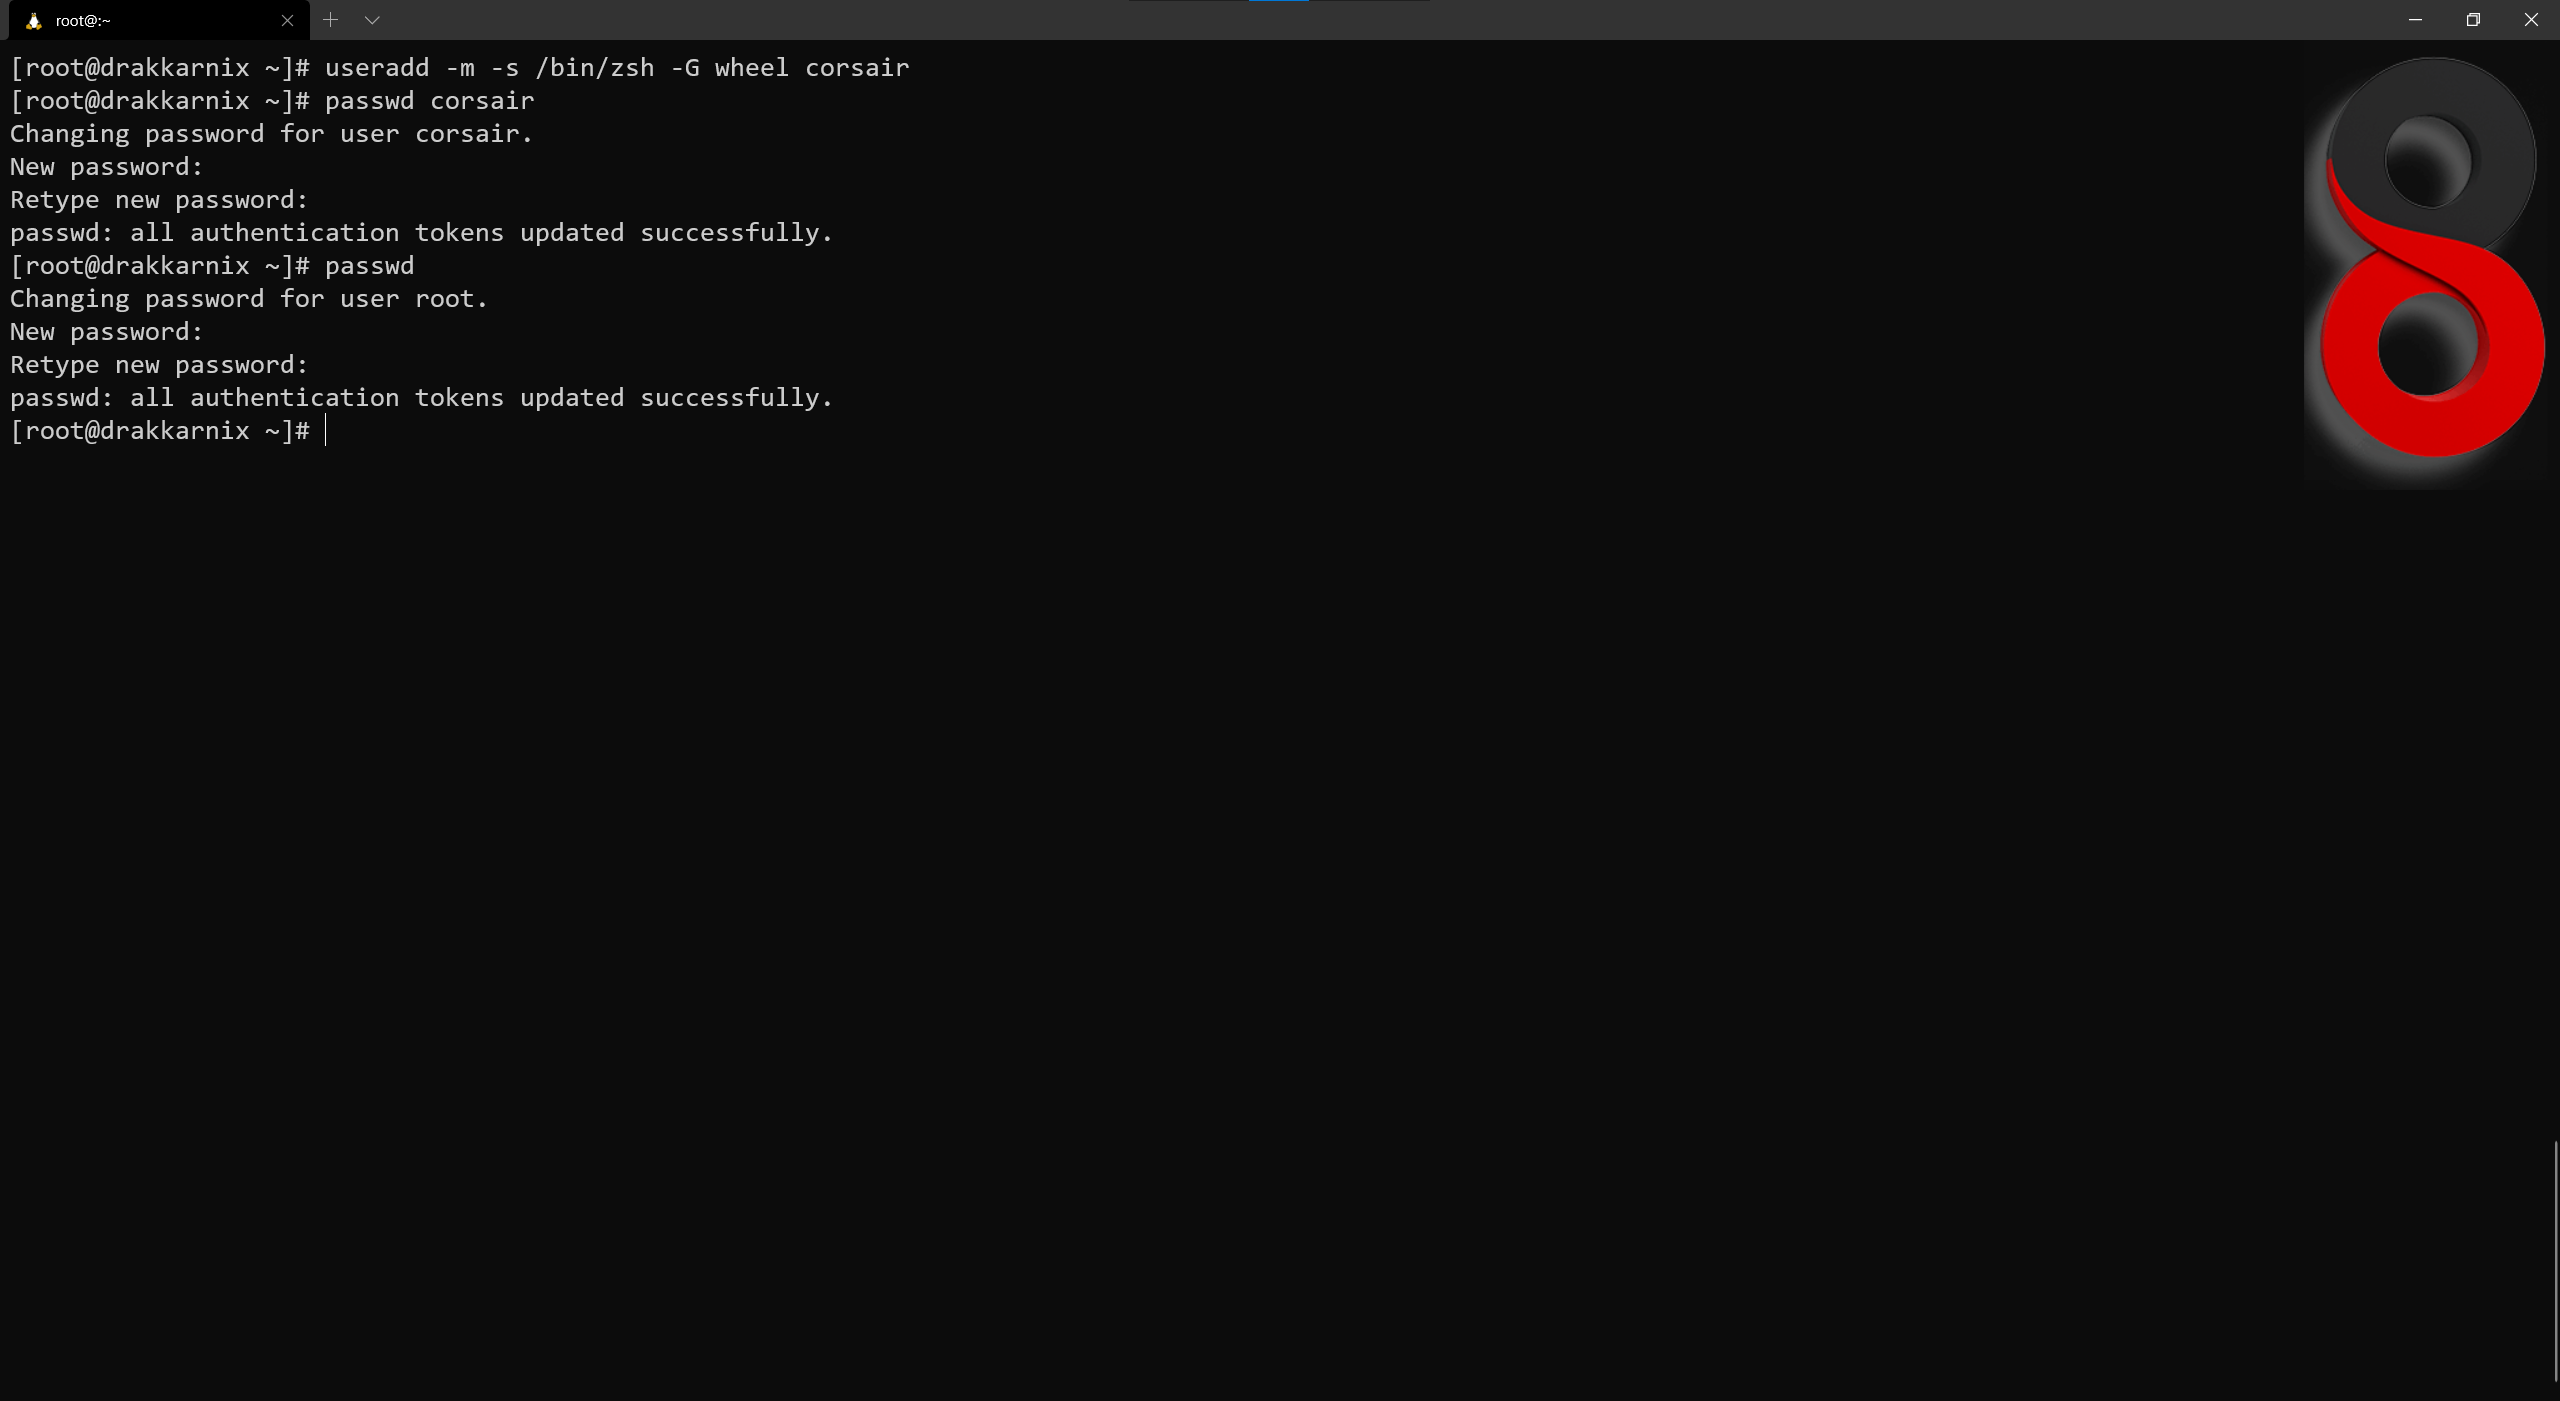
With packages installed, we can create our main user:
# Create a new user with the desired username
# Command help:
# base command: useradd
# create the home directory: -m
# set ZSH as the default shell: -s /bin/zsh
# add the user to the group 'wheel' which is defined in the 'sudoers' file: -G wheel
# username desired: corsair
useradd -m -s /bin/zsh -G wheel corsair

# Set a password for the user created
passwd corsair

# Set a password for the 'root' user
passwd
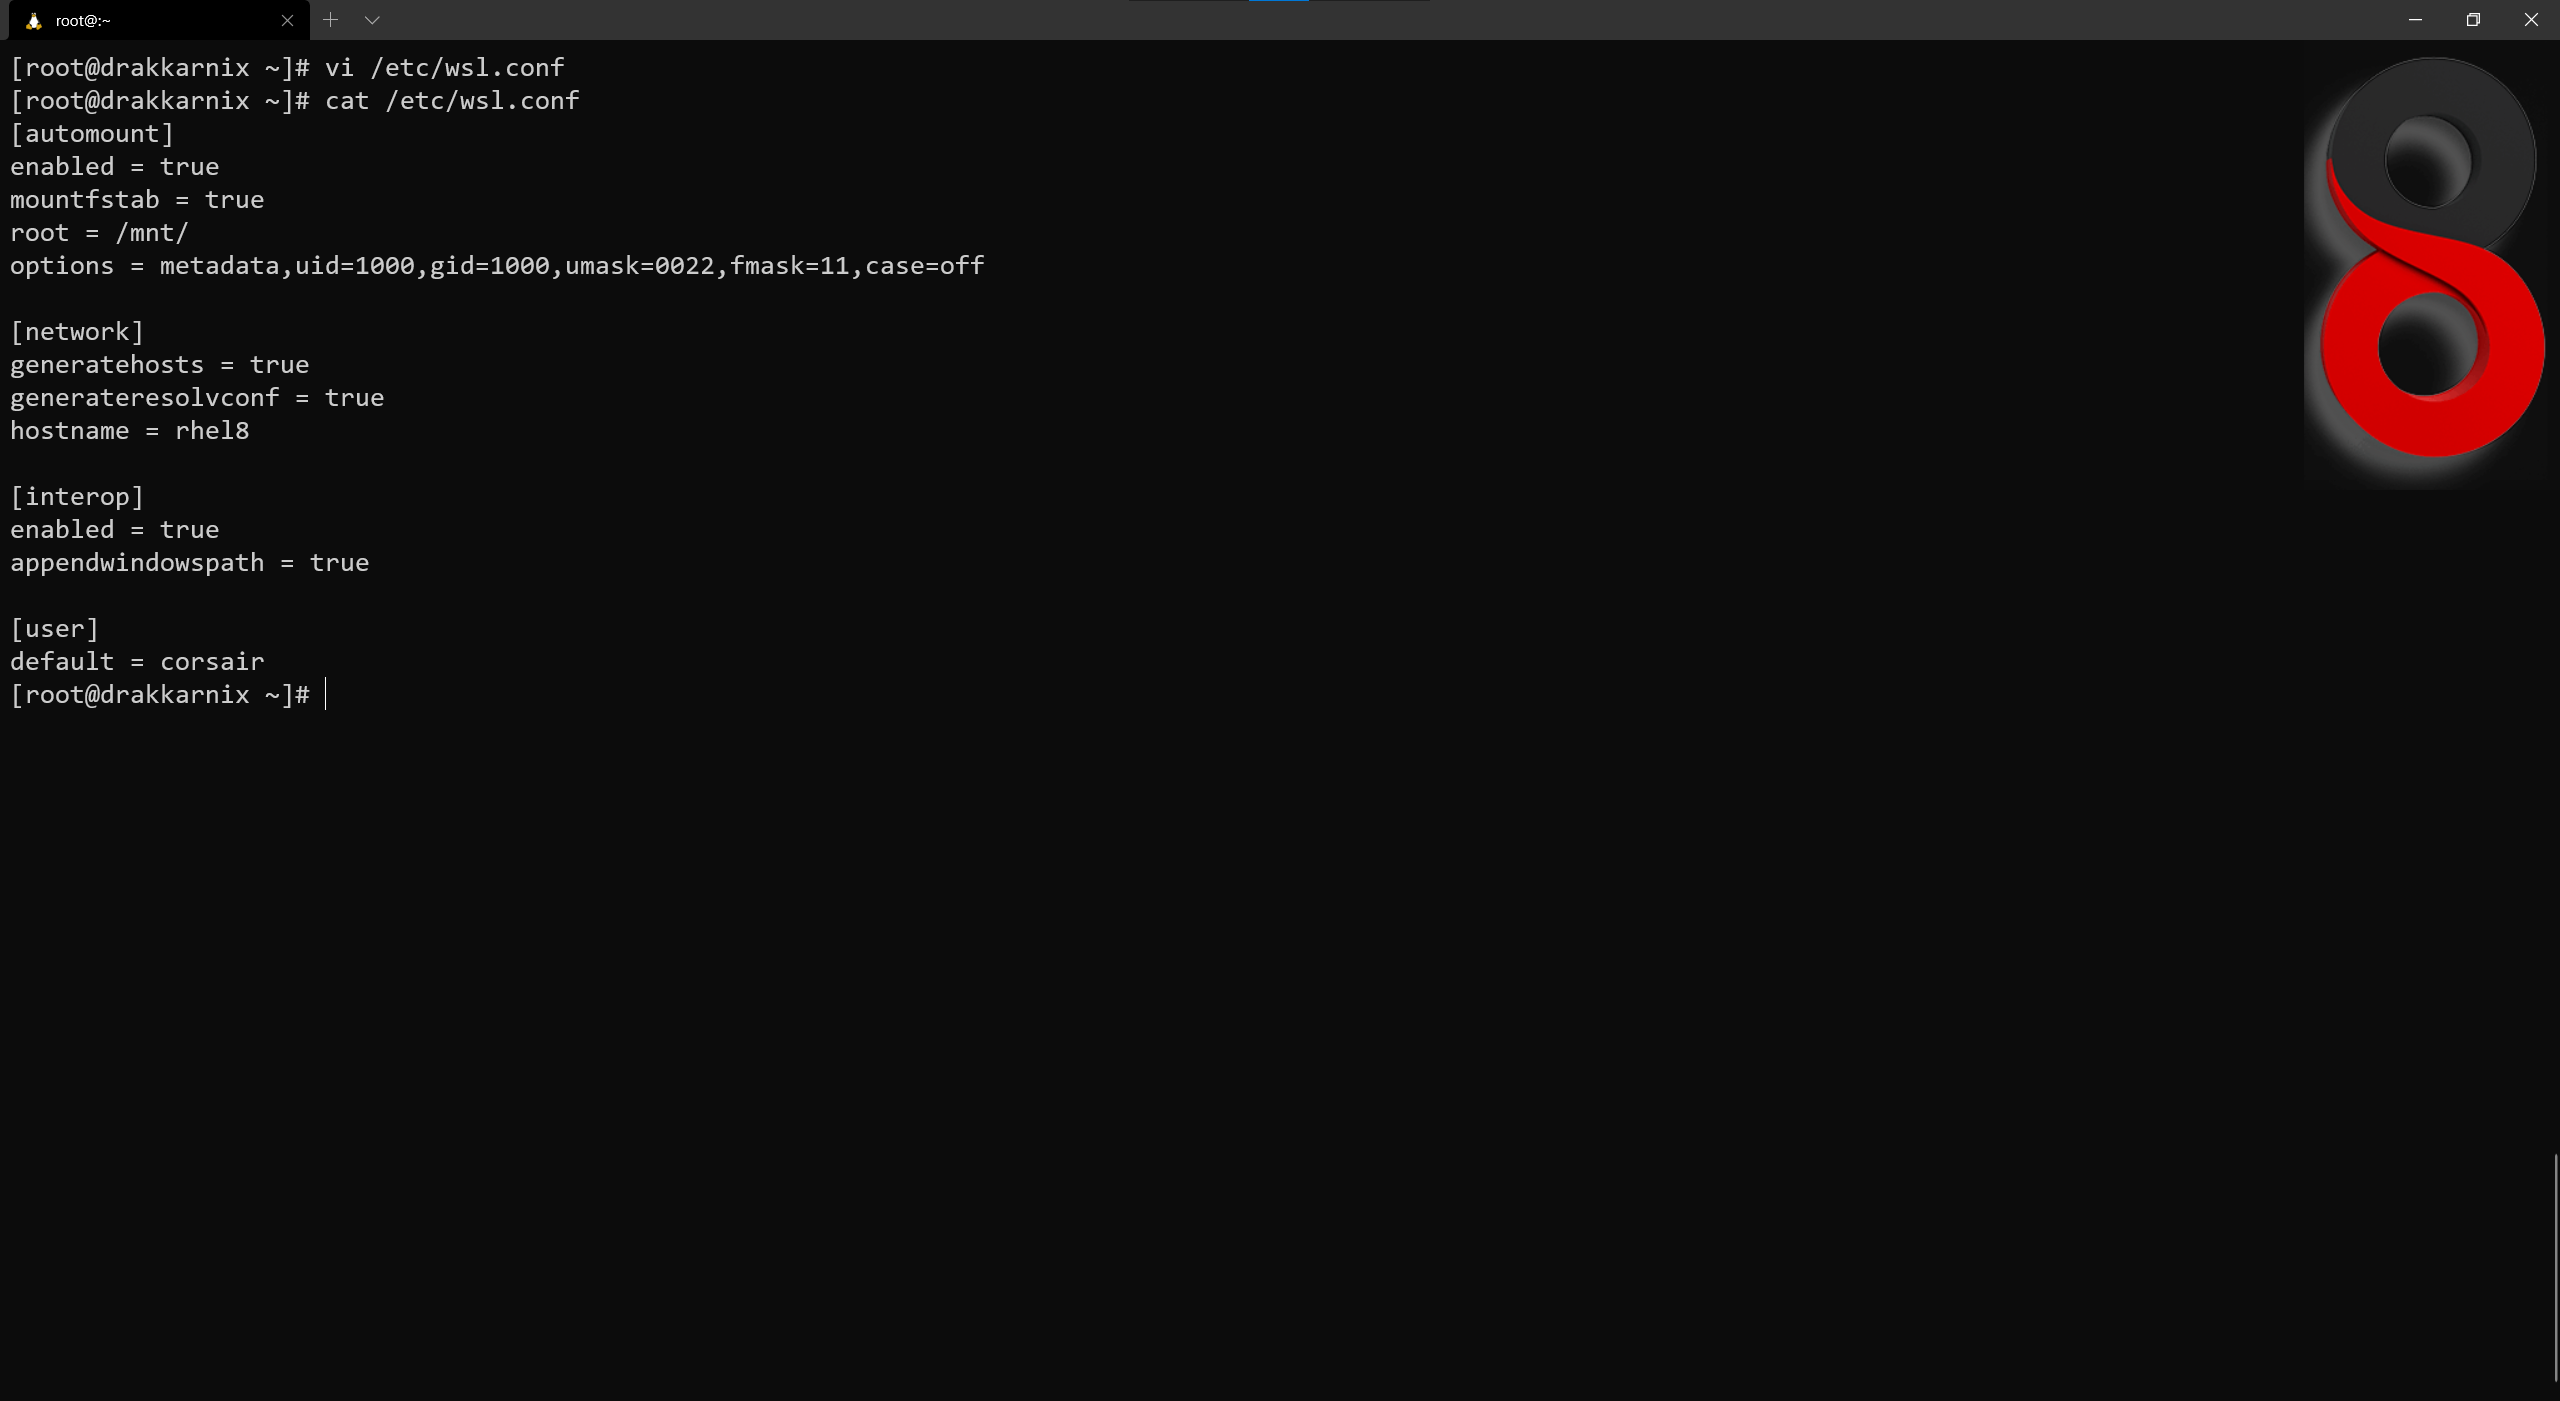
The last configuration that should be done is for wsl directly. We will create a configuration file for the “interoperability” of our new custom distro.
This configuration file is on “the wsl side” and it means that it impacts only the distro it’s in:
# Create the configuration file with a preferred text editor
vi /etc/wsl.conf

## This is the file content
## Replace the username
## Source for the options: https://docs.microsoft.com/en-us/windows/wsl/wsl-config#configure-per-distro-launch-settings-with-wslconf
[automount]
enabled = true
mountfstab = true
root = /mnt/
options = metadata,uid=1000,gid=1000,umask=0022,fmask=11,case=off

[network]
generatehosts = true
generateresolvconf = true
hostname = rhel8

[interop]
enabled = true
appendwindowspath = true

[user]
default = corsair

# [Optional] Check if the file has been correctly created
cat /etc/wsl.conf
With everything ready, we can finally exit the session and stop the distro from powershell:
# Stop the custom distro only
wsl --terminate rhel8

Now when we launch again the distro, our user is the one logged in by default and we can test if sudo is working as intended:
# Check which user is currently logged in
id

# Update the system with our user
sudo dnf update
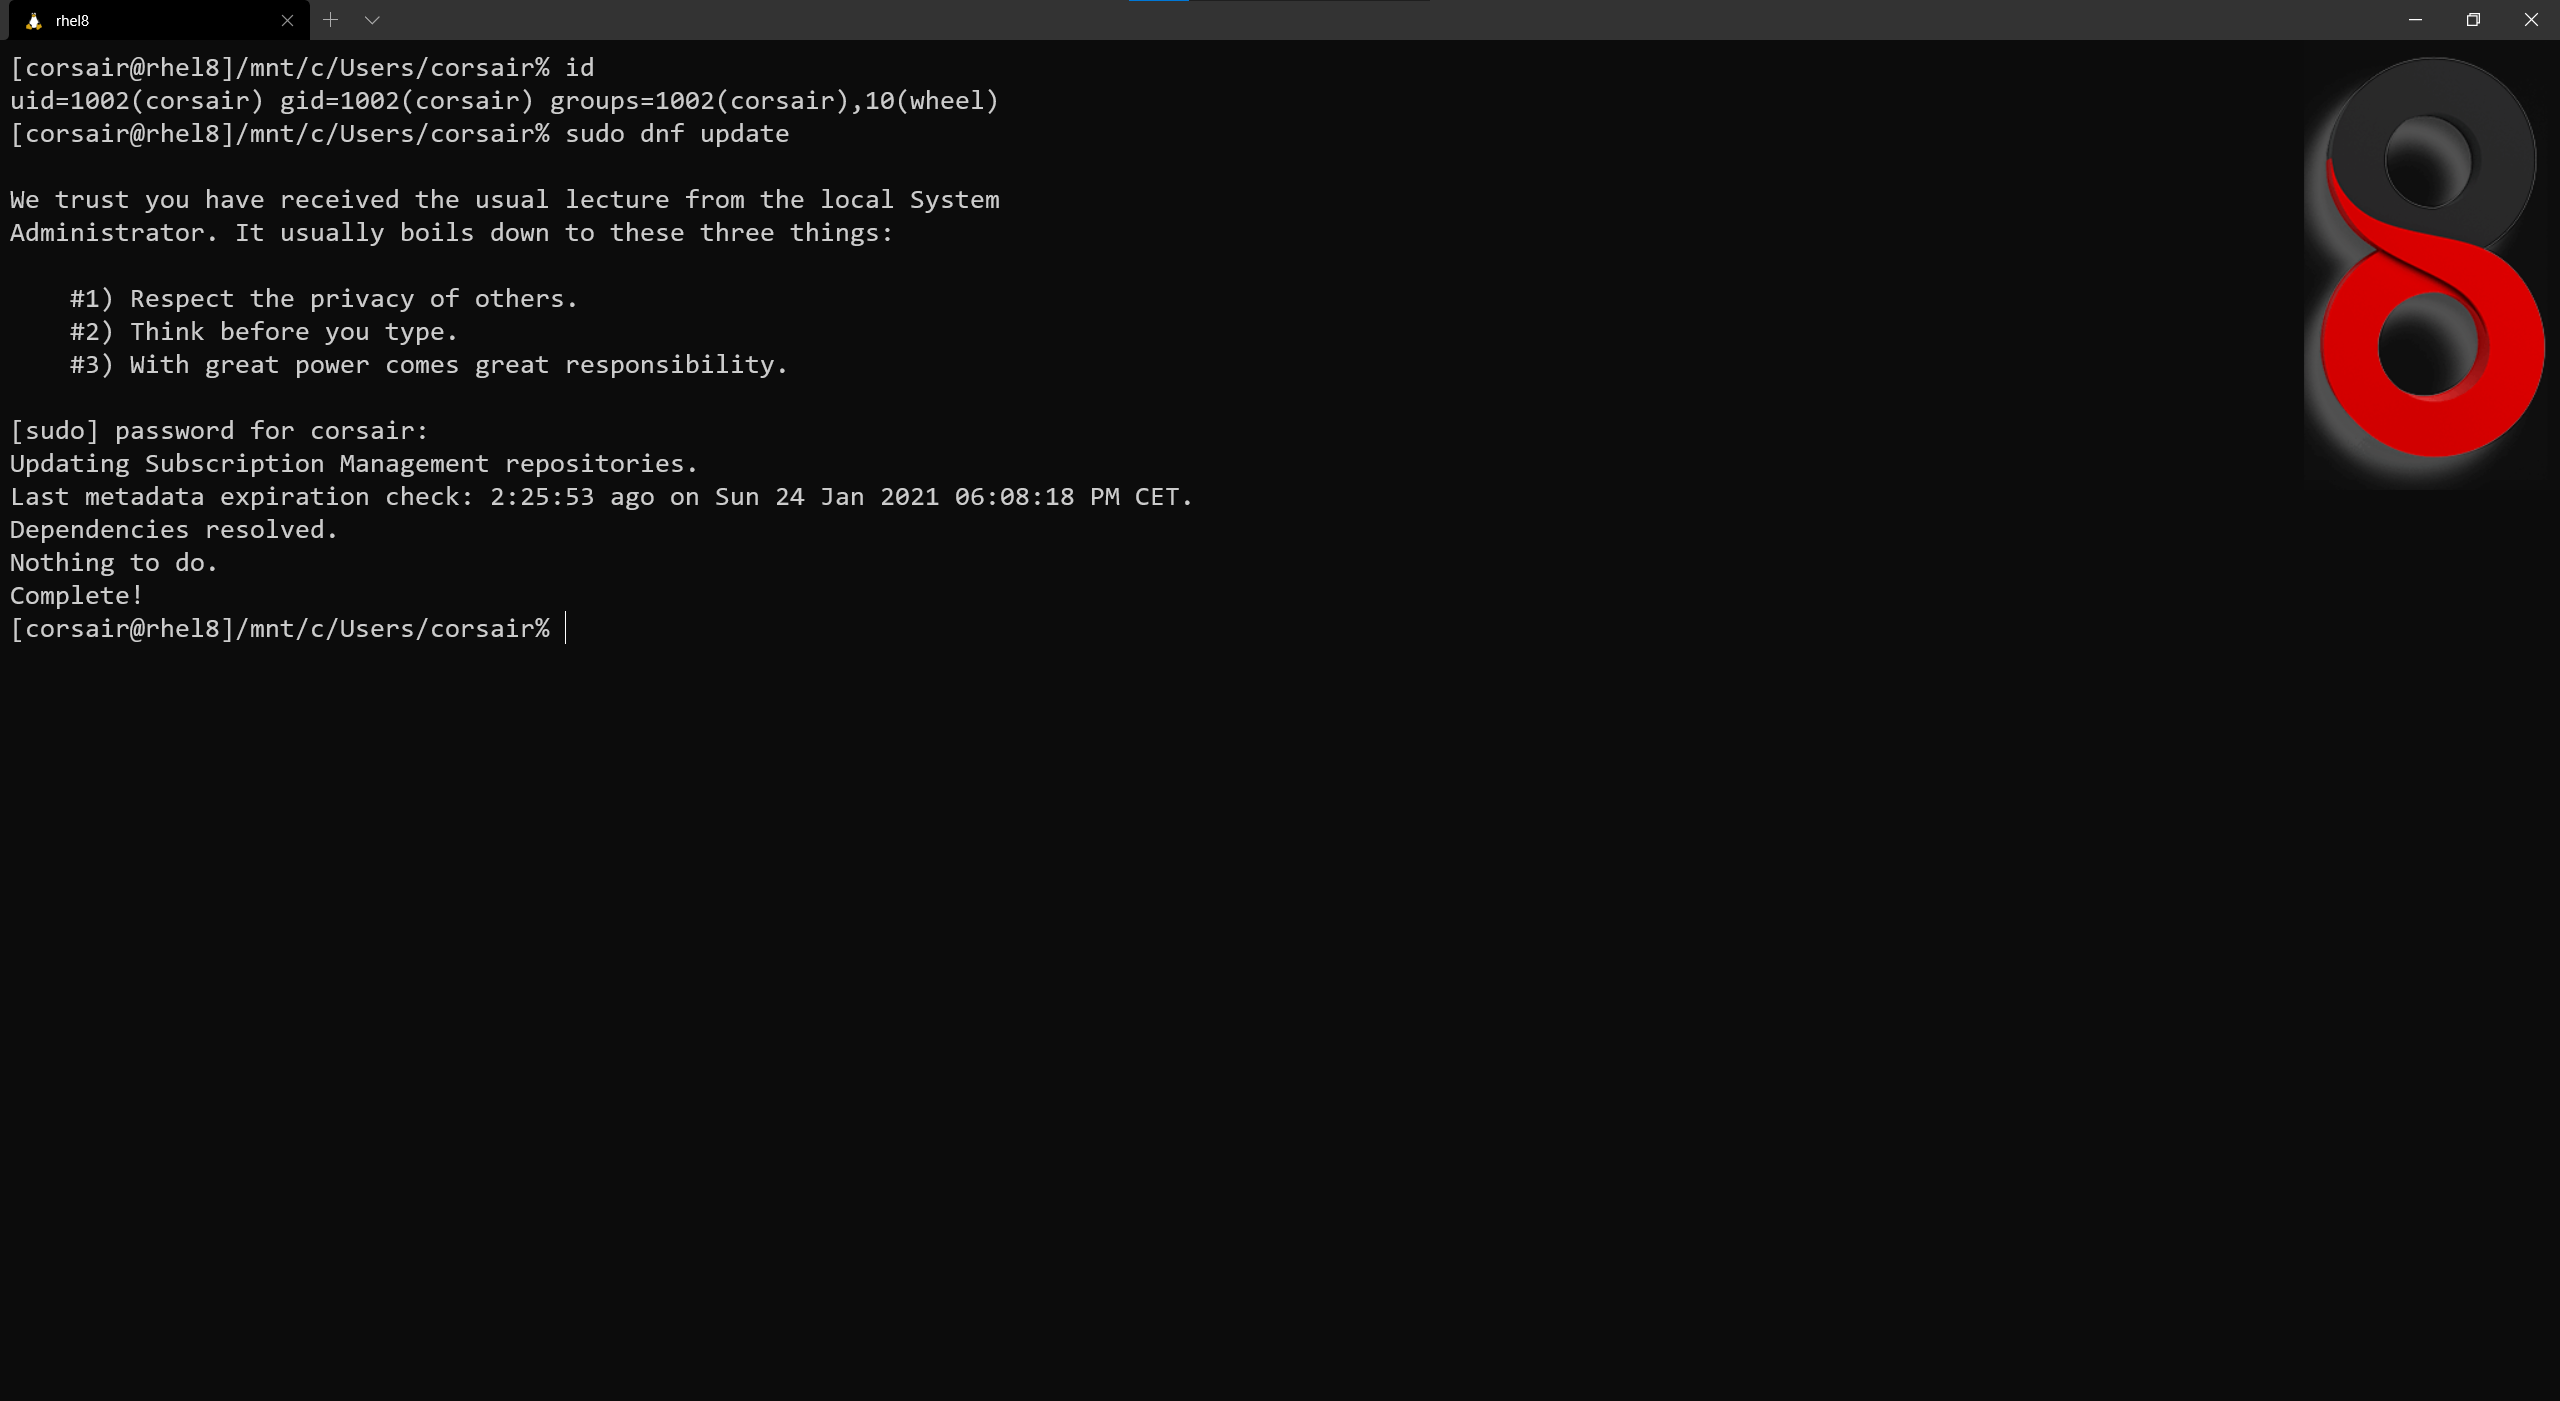
We have now a fully working user, no need of root account and, while optional, we have a modern shell with zsh.
Which brings us to the next customization and if the default shell is still bash, simply skip it.
[Optional] Enterprise Linux likes to look nice
When we speak about shell customization and zsh, almost by default we hear about oh my zsh. Of course, there’s other frameworks to configure/customize our shell prompt, however oh my zsh is one of (if not the) most famous one.
This means it will also have plenty of themes and help from the community.
We will install it and pick a specific theme. Finally we will customize it a bit with some environment variables that can be really helpful:
# Install oh my zsh
sh -c "$(curl -fsSL https://raw.githubusercontent.com/ohmyzsh/ohmyzsh/master/tools/install.sh)"
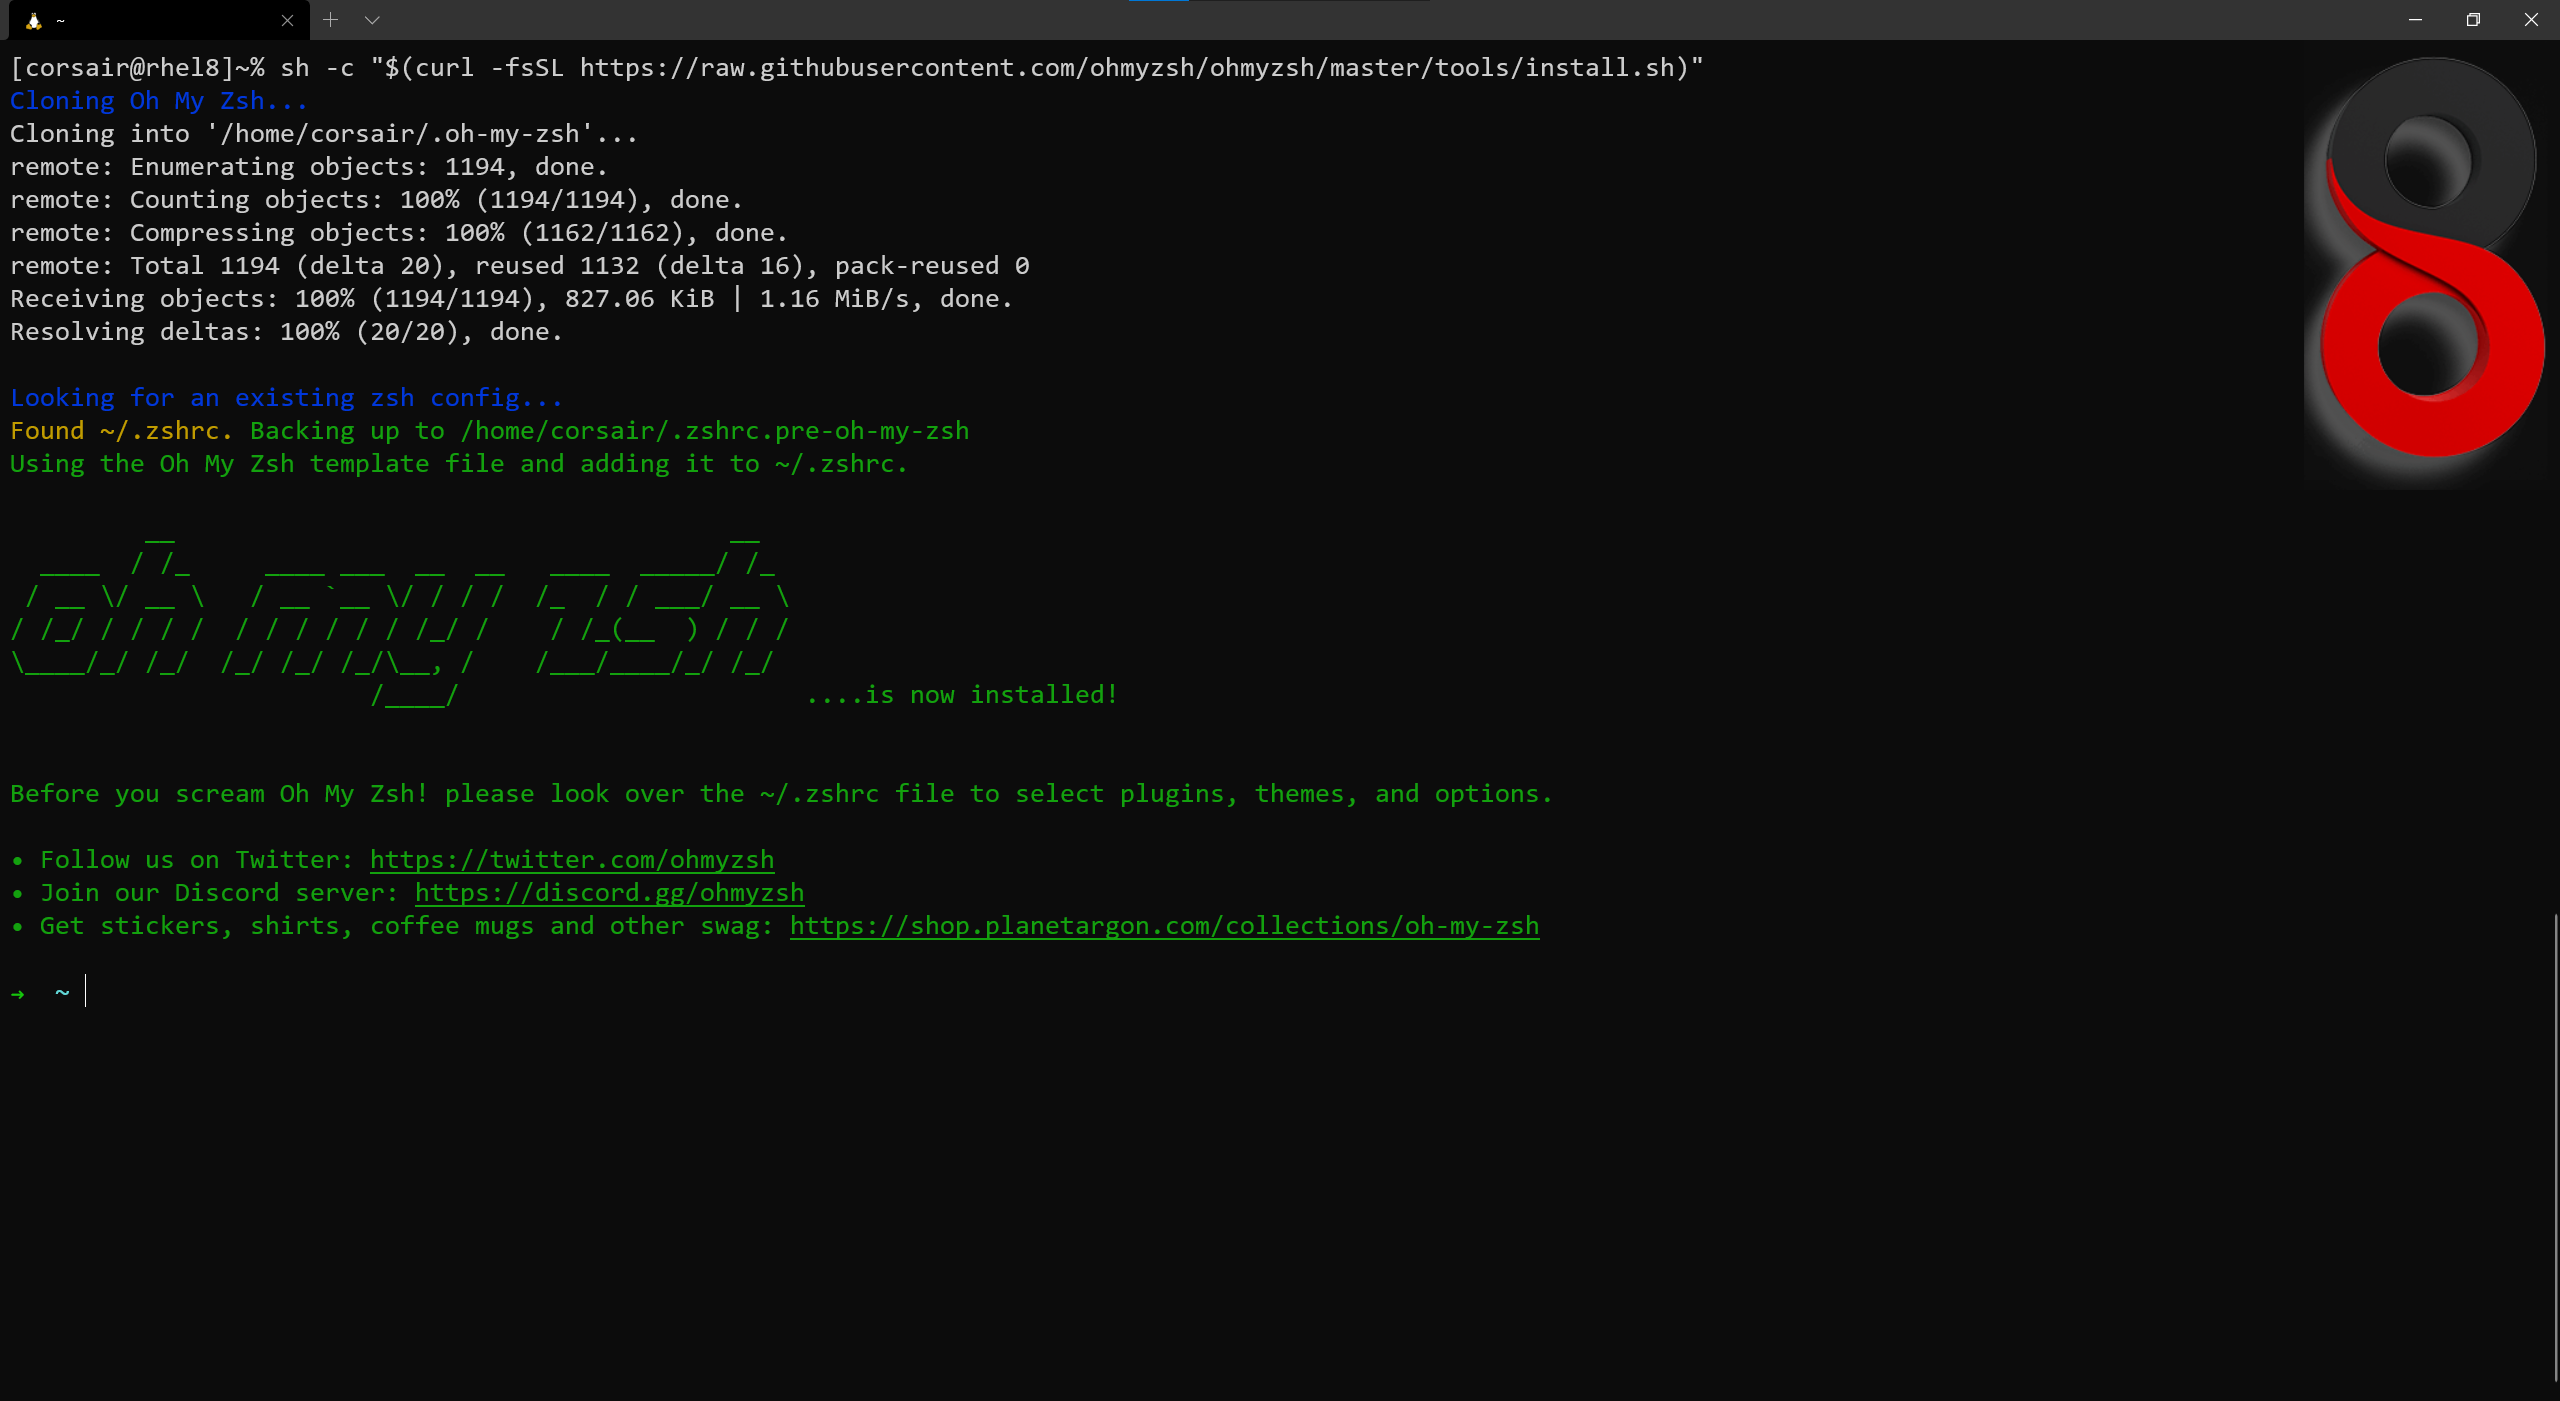
Attention: running an online script is a big security no-no! While hosted in GitHub and with the source visible, an online script should always be reviewed before being launched.
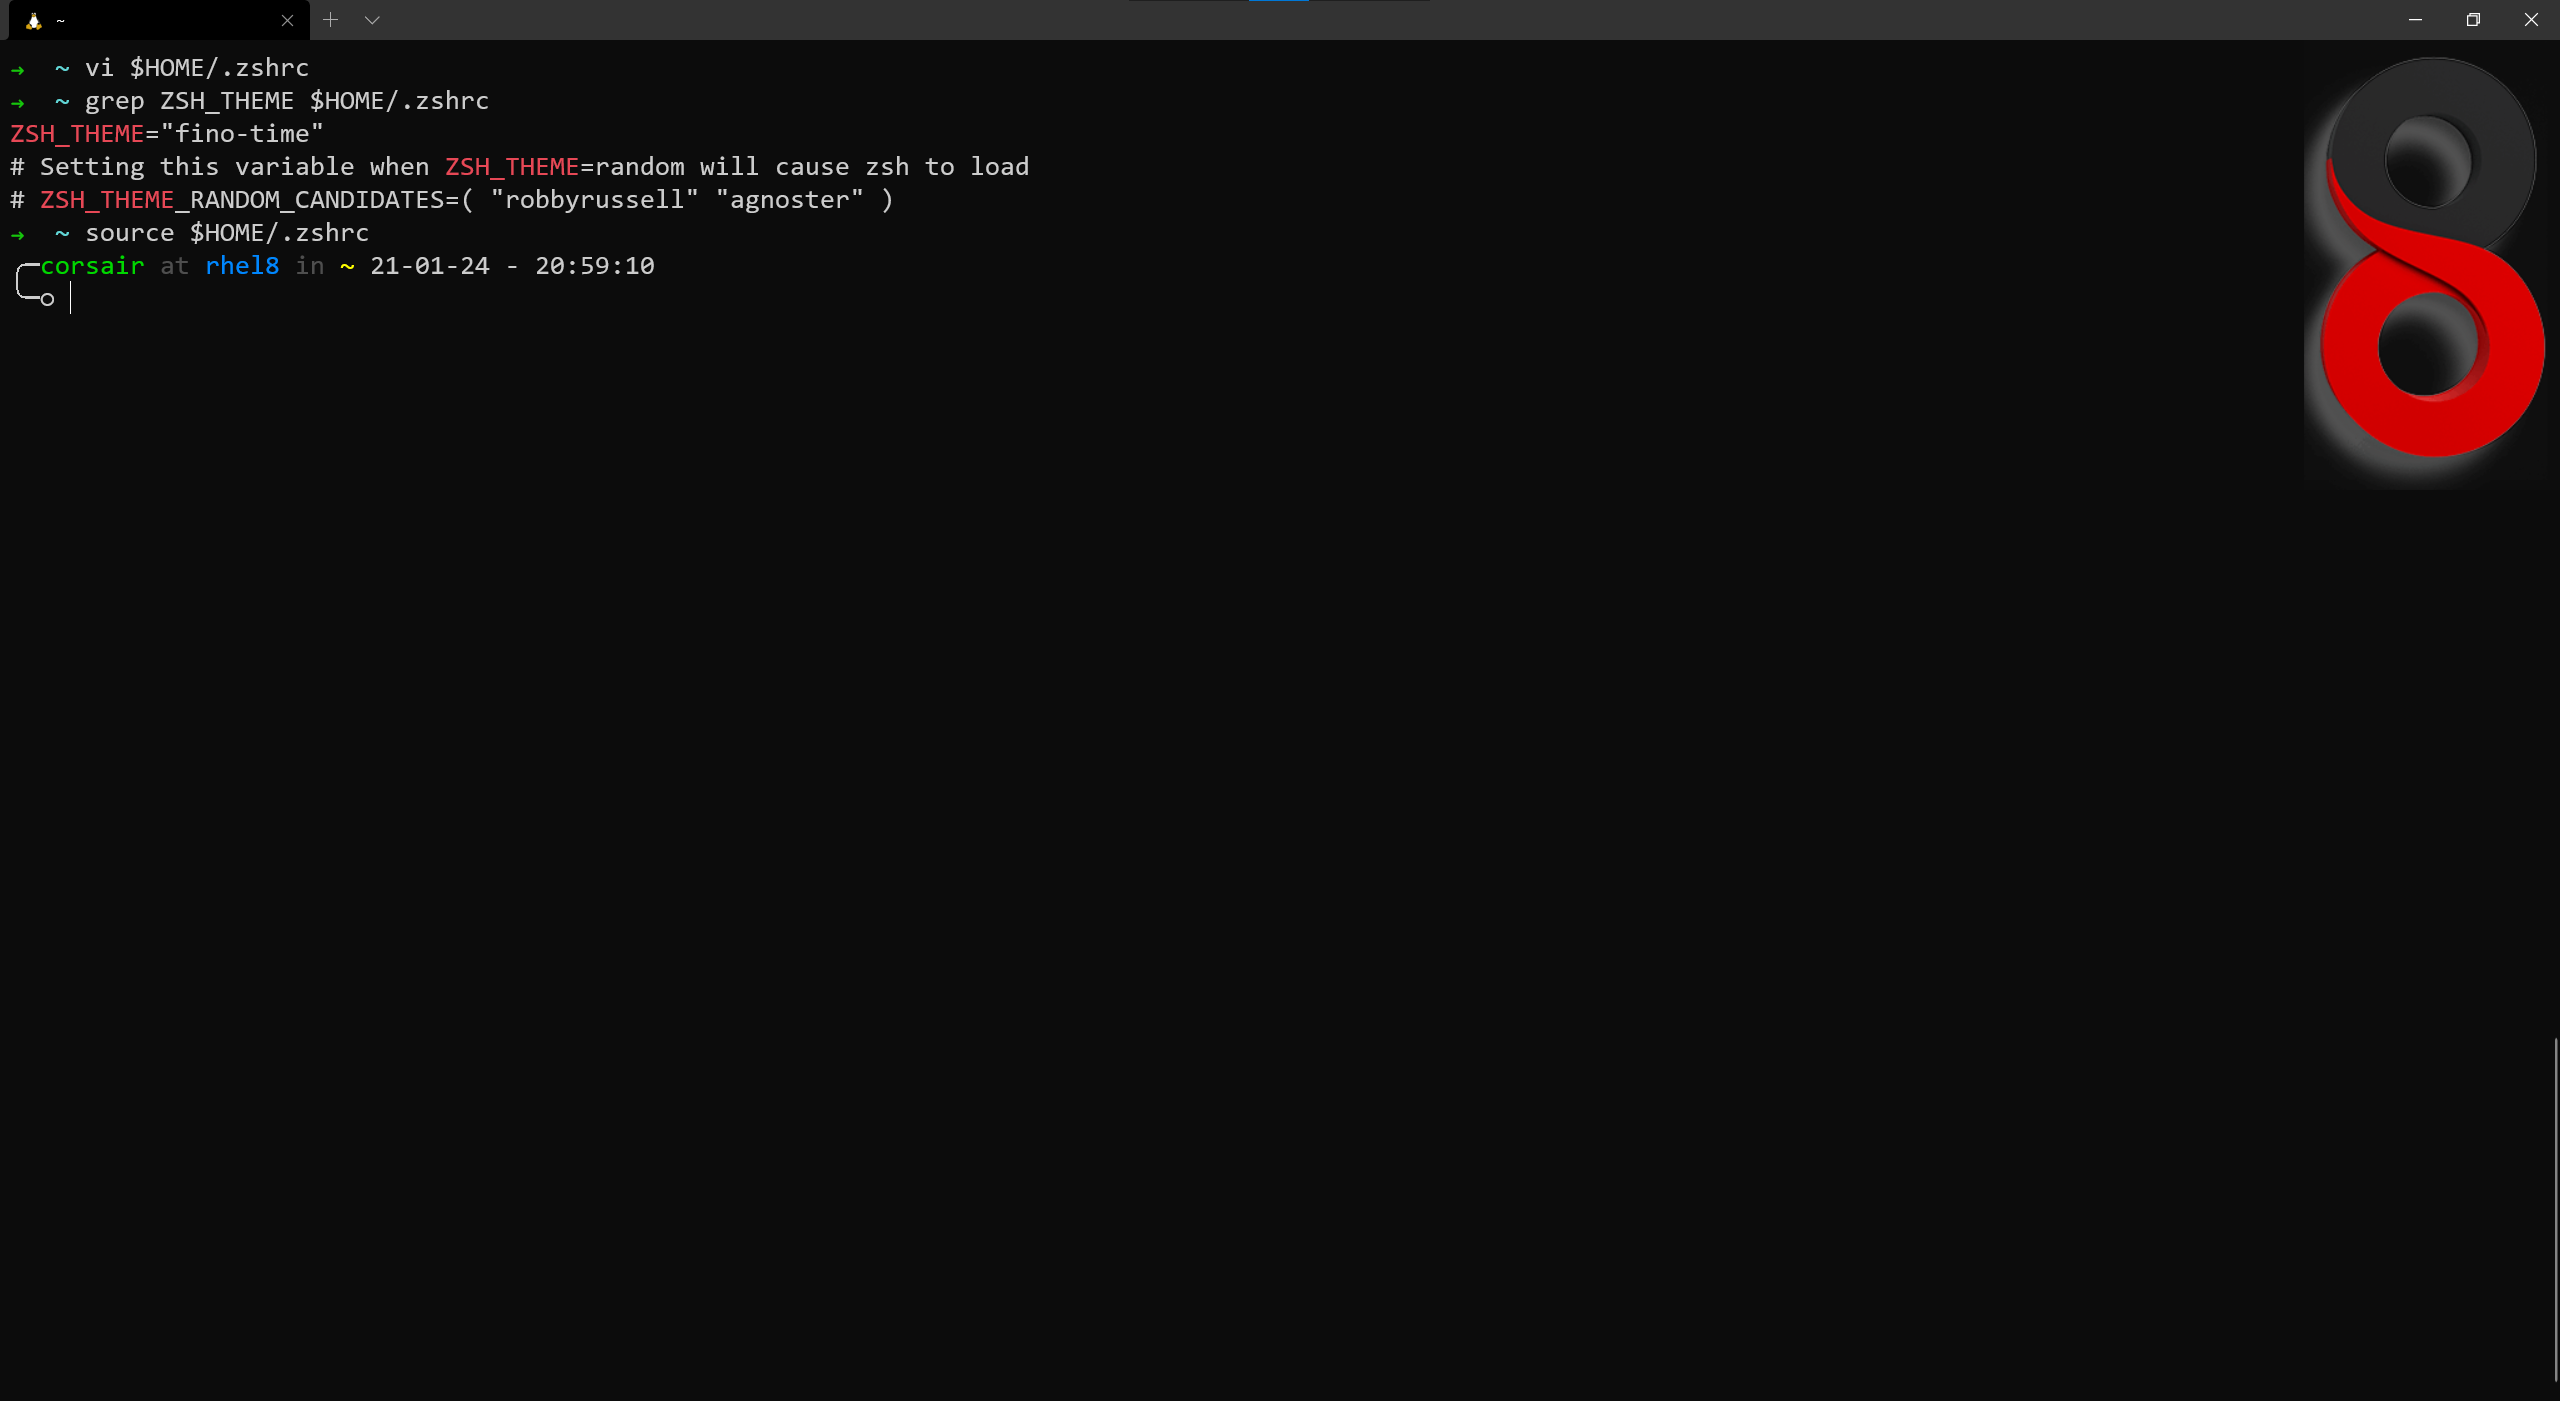
As written in the installation message, we can now change the zsh config file. We will, for now, only change the theme:
# Edit the zsh config file with a preferred text editor
vi $HOME/.zshrc

## Locate the ZSH_THEME option and change it to a preferred theme
ZSH_THEME="fino-time"

# [Optional] Check if the theme value has been correctly saved
grep ZSH_THEME $HOME/.zshrc

# Reload the zsh configuration file
source $HOME/.zshrc
Note: in this configuration, the theme “fino-time” has been chosen for it’s default options and the two lines display
As stated above, let’s add some “WSL oriented” variables so it will help us visually to know which distro we have launched and which Linux kernel we are using:
# Edit the selected theme
vi $HOME/.oh-my-zsh/themes/fino-time.zsh-theme

## Locate the PROMPT variable and add the two variables
PROMPT="╭─%{$FG[040]%}%n%{$reset_color%} %{$FG[239]%}at%{$reset_color%} %{$FG[033]%}$(box_name) (WSL: $WSL_DISTRO_NAME | kernel: $(uname -r))%{$reset_color%} %{$FG[239]%}in%{$reset_color%} %{$terminfo[bold]$FG[226]%}%~%{$reset_color%}\$(git_prompt_info)\$(ruby_prompt_info)
╰─ %* \$(virtualenv_info)\$(prompt_char) "

# Reload the zsh configuration file, it will also reload the oh my zsh theme
source $HOME/.zshrc
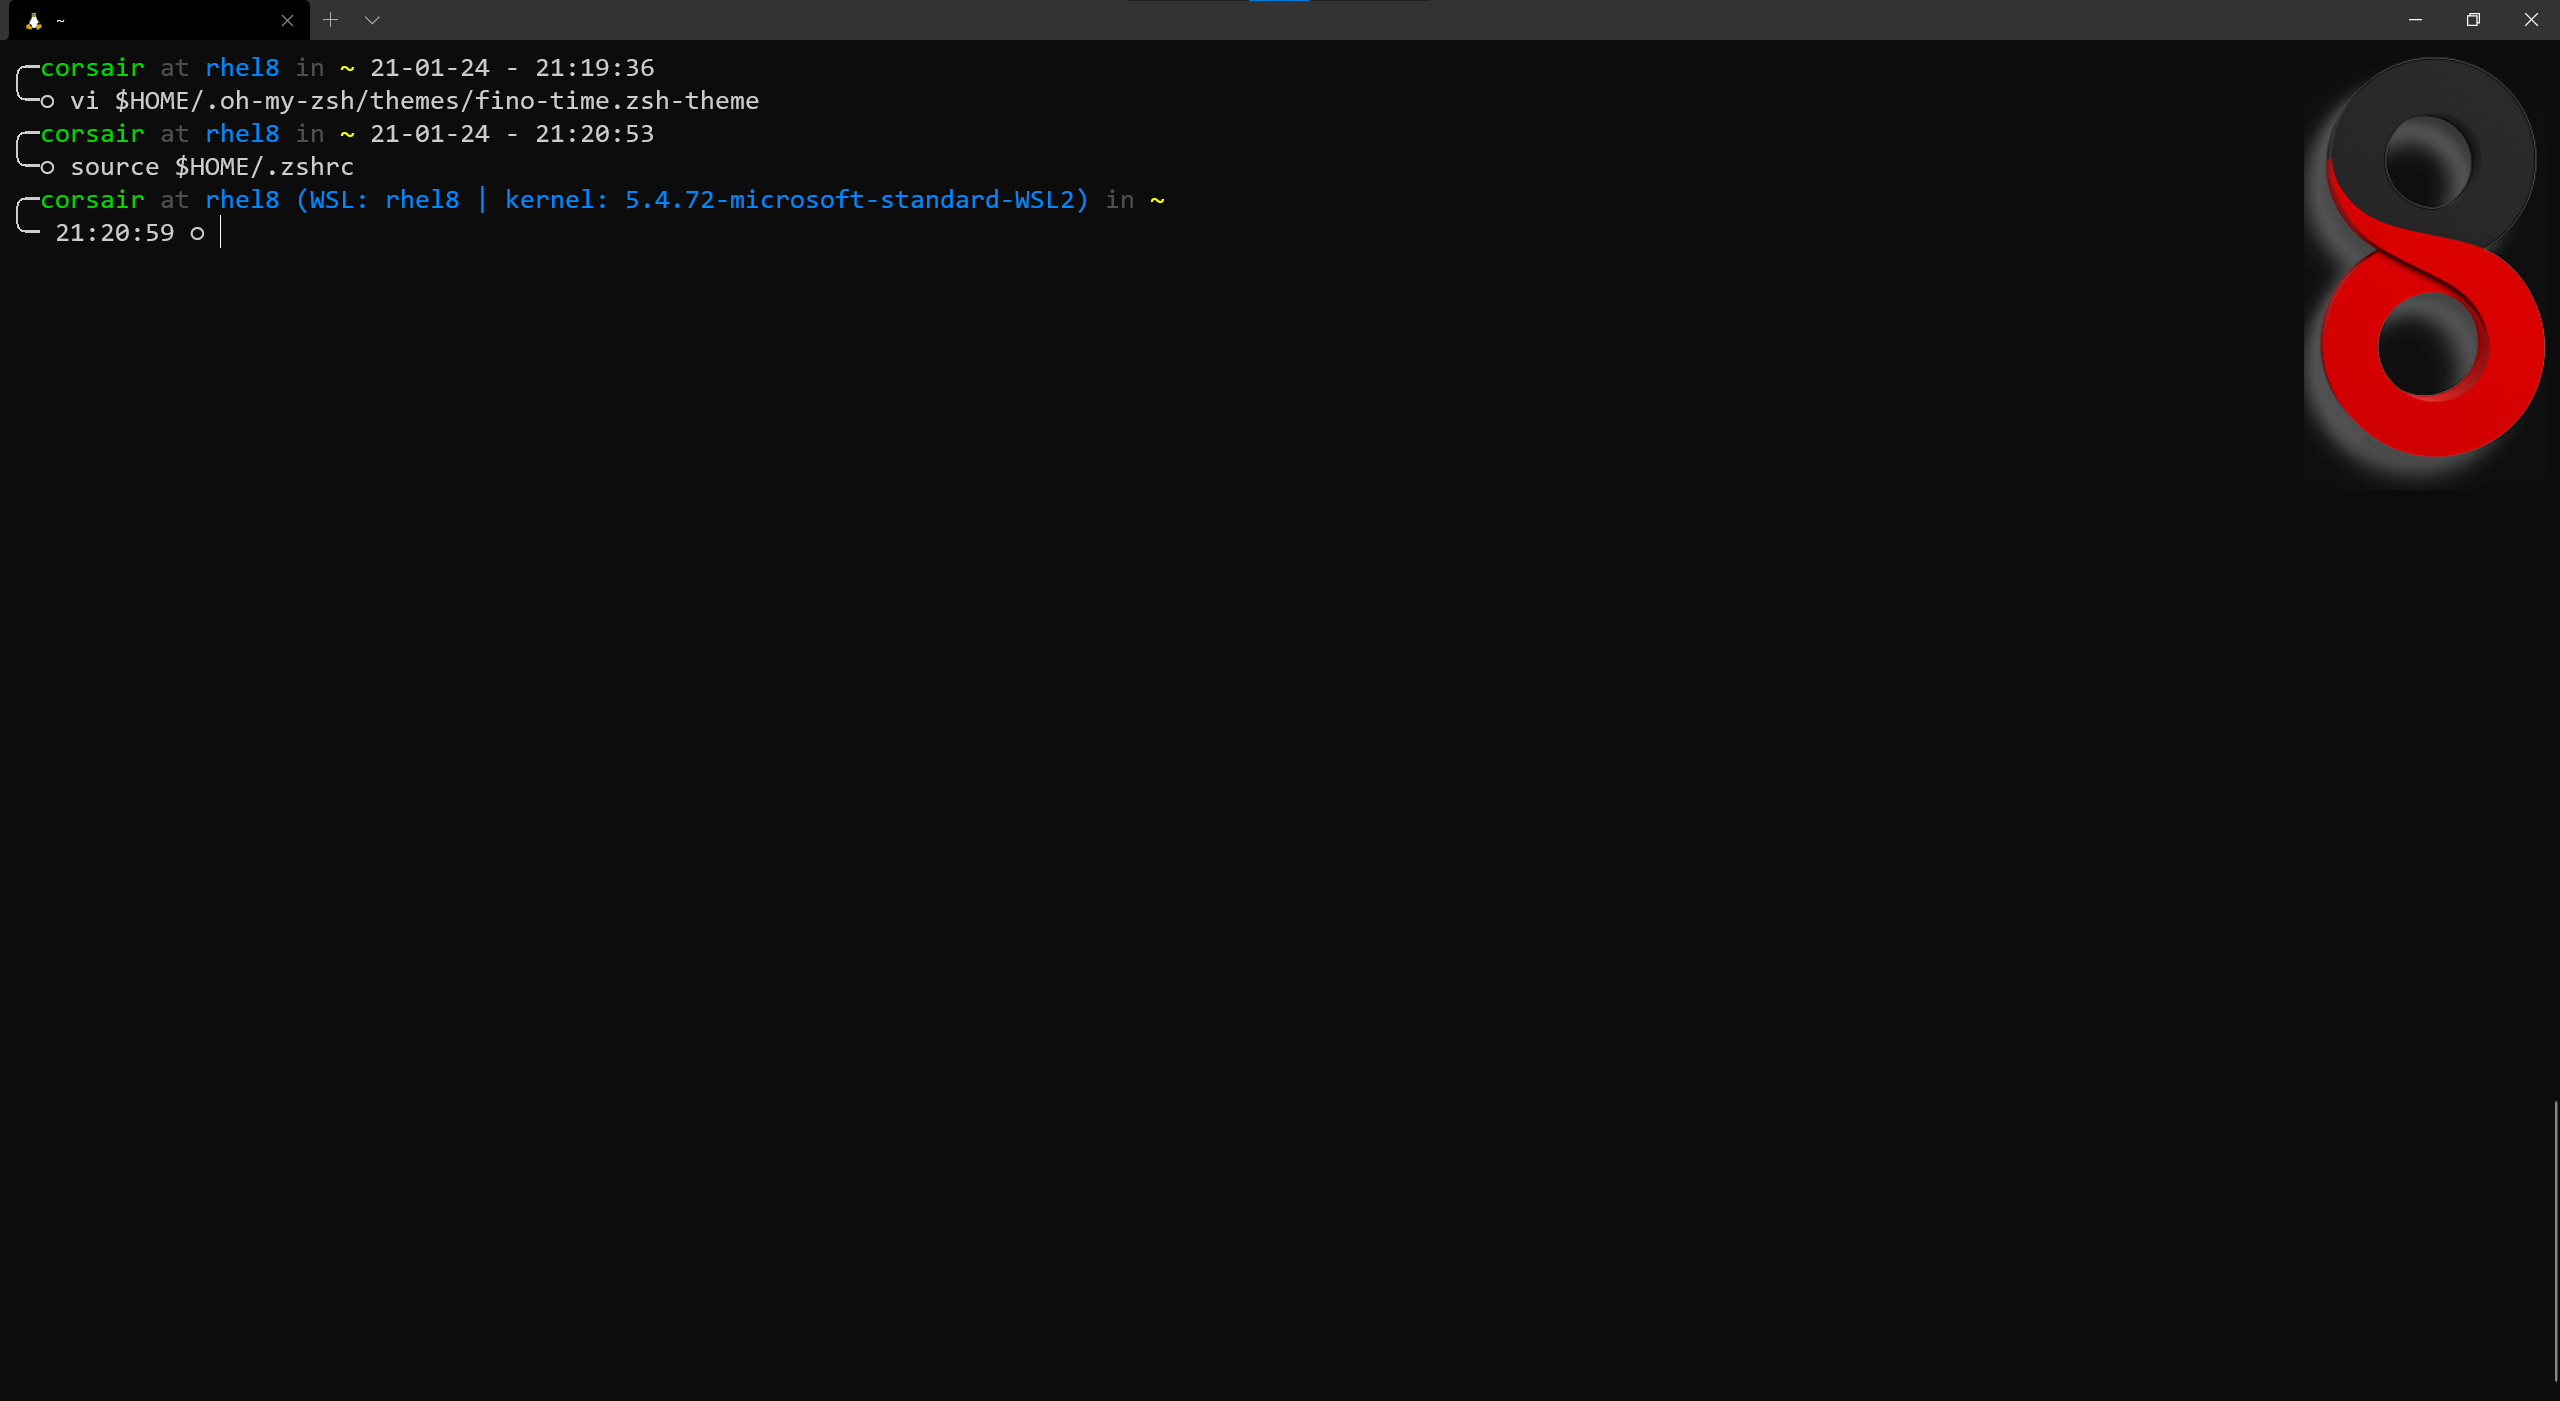
This is a “minimal” change in configuration, however it already feels more personal.
Now let’s jump into a bigger change that will enhance our WSL distro greatly.
A distro needs a manager
When we look at the gaps of WSL distros compared to a full blown Linux distro is the lack of service manager. This is currently the default due to the customized init process that allows all the interoperability.
However, since some time now, Daniel from the WSL community found a scripted way to launch SystemD in a WSL distro.
Fast forward to the Windows 10 Insiders Dev channel build 21286, we have now an option, in our wsl configuration file, to run a command at boot time (of the distro). This change allows to a very more clean and efficient way of starting SystemD:
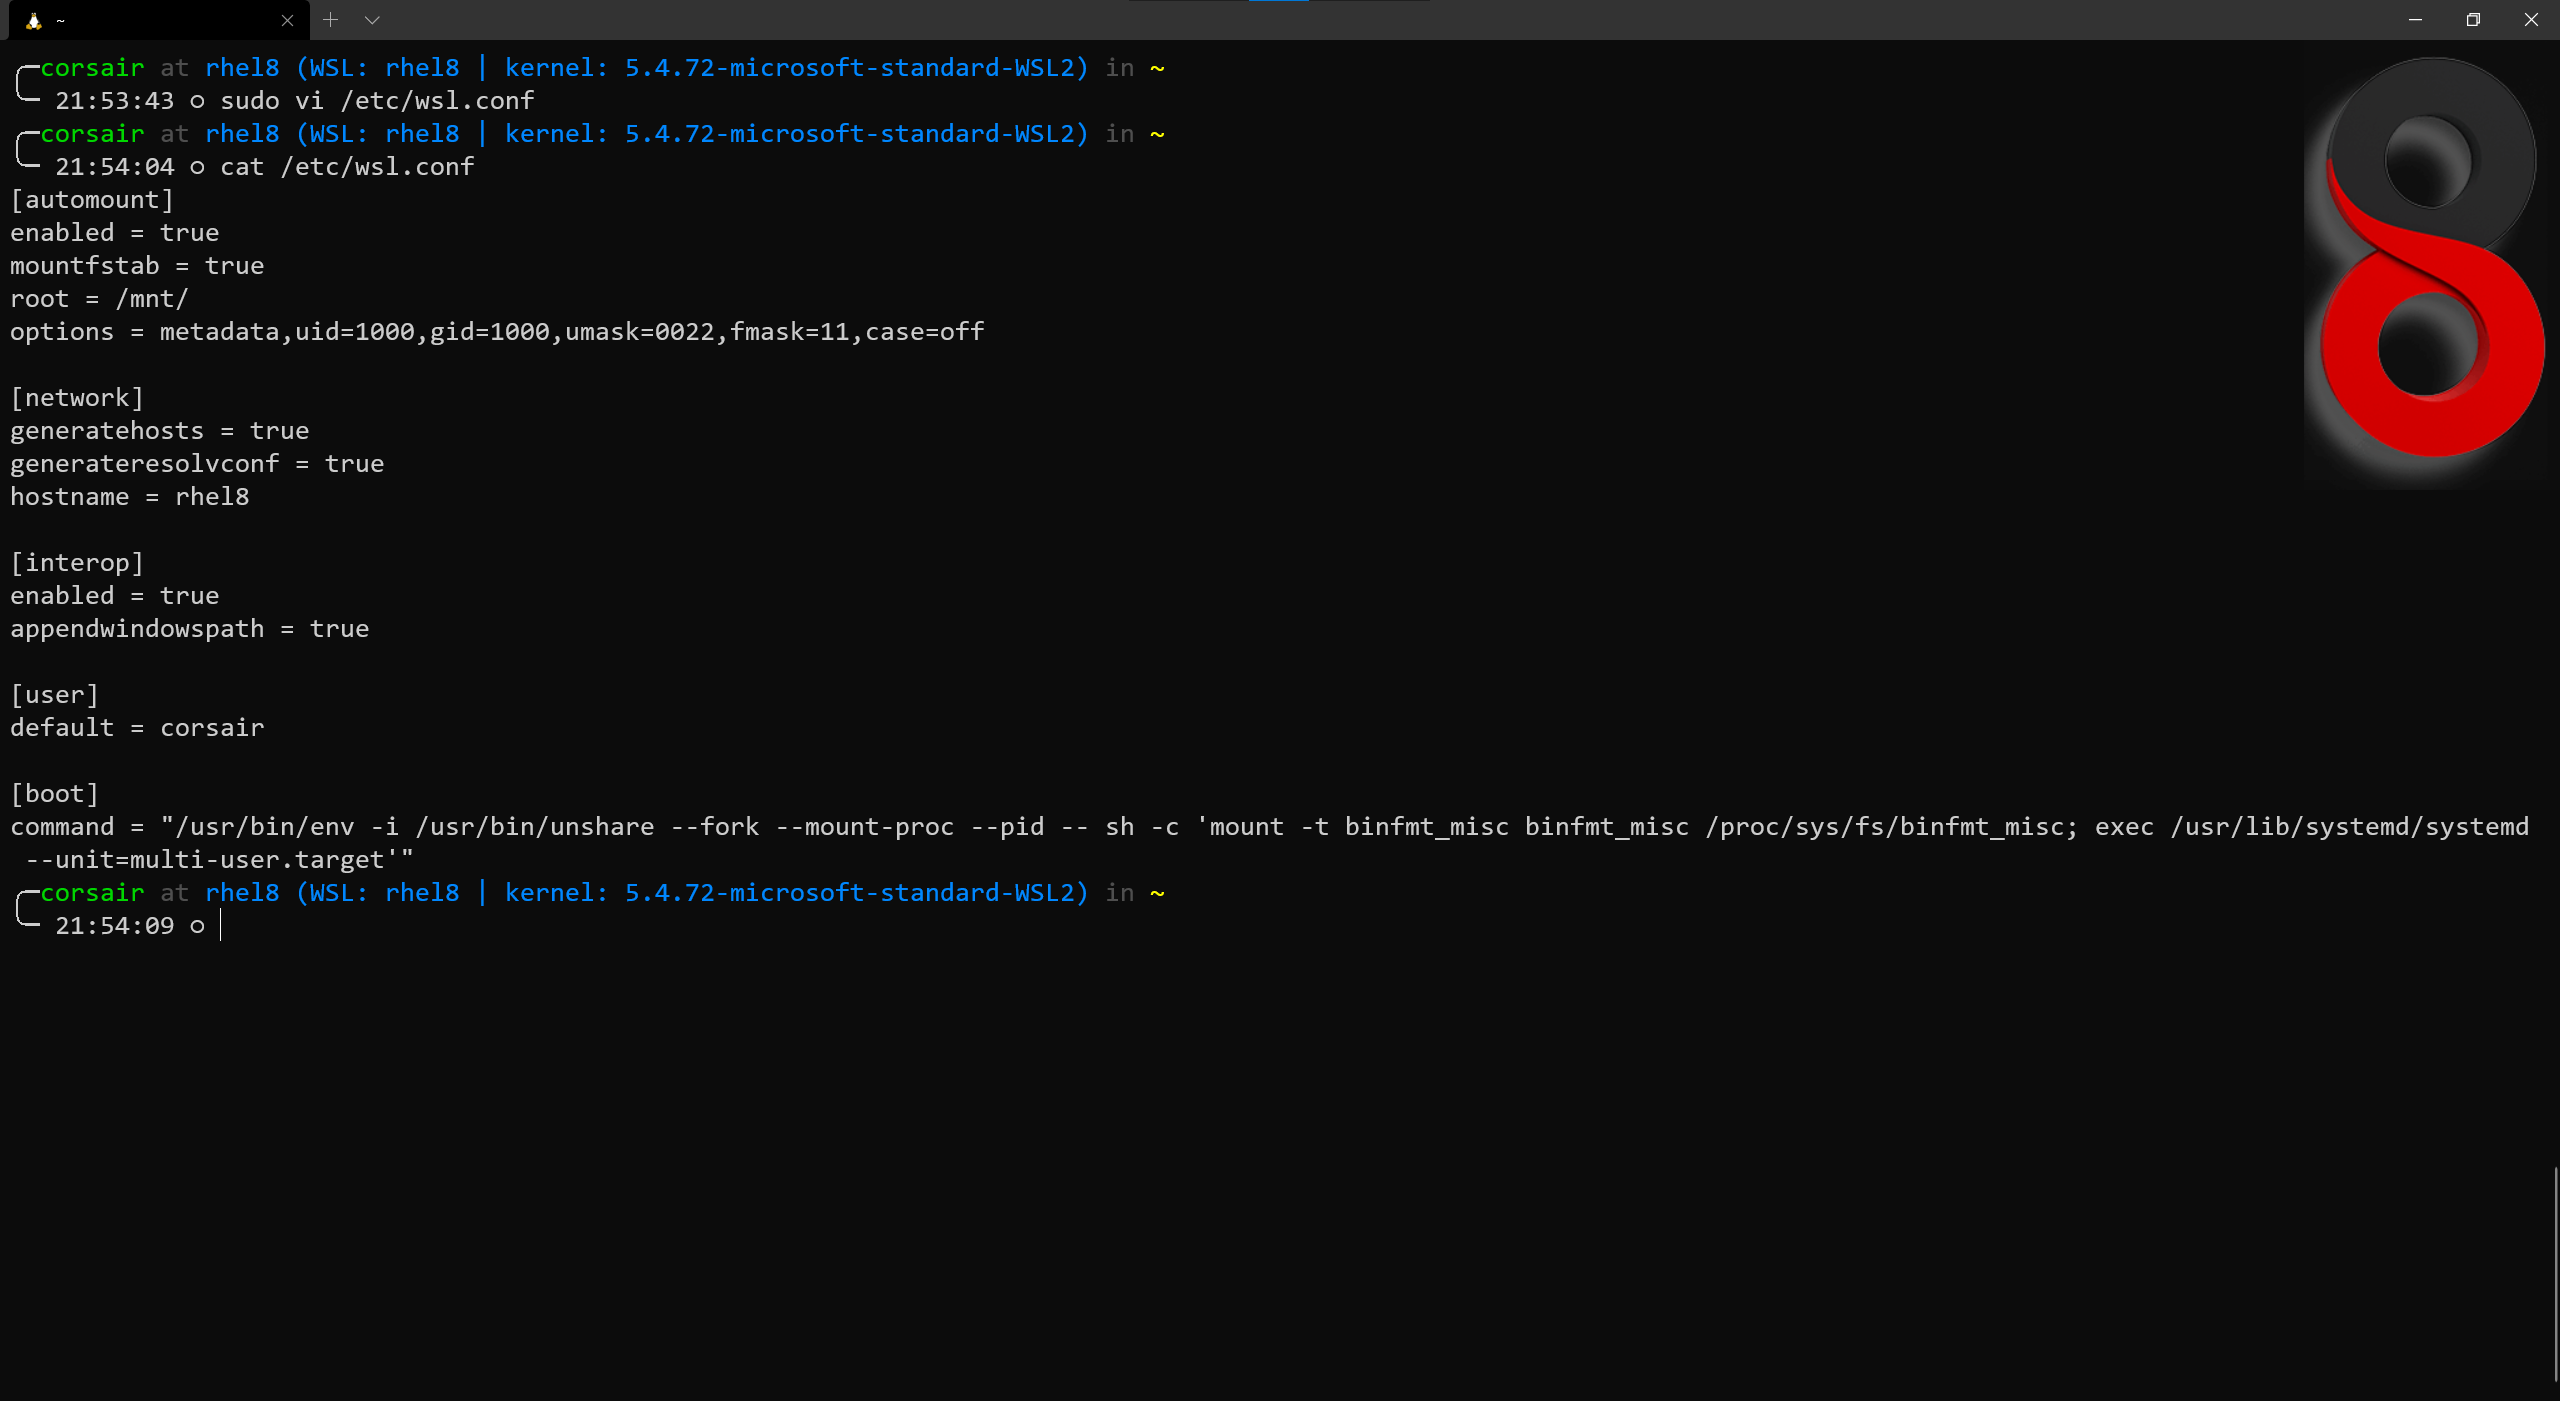
# Edit the wsl configuration file with a preferred text editor
sudo vi /etc/wsl.conf

## Add the new boot section with the command to start SystemD at the end of the file
## Source: https://github.com/diddlesnaps/one-script-wsl2-systemd/tree/build-21286%2B
[boot]
command = "/usr/bin/env -i /usr/bin/unshare --fork --mount-proc --pid -- sh -c 'mount -t binfmt_misc binfmt_misc /proc/sys/fs/binfmt_misc; exec /usr/lib/systemd/systemd --unit=multi-user.target'"

# [Optional] Check if the change has been successfully saved
cat /etc/wsl.conf
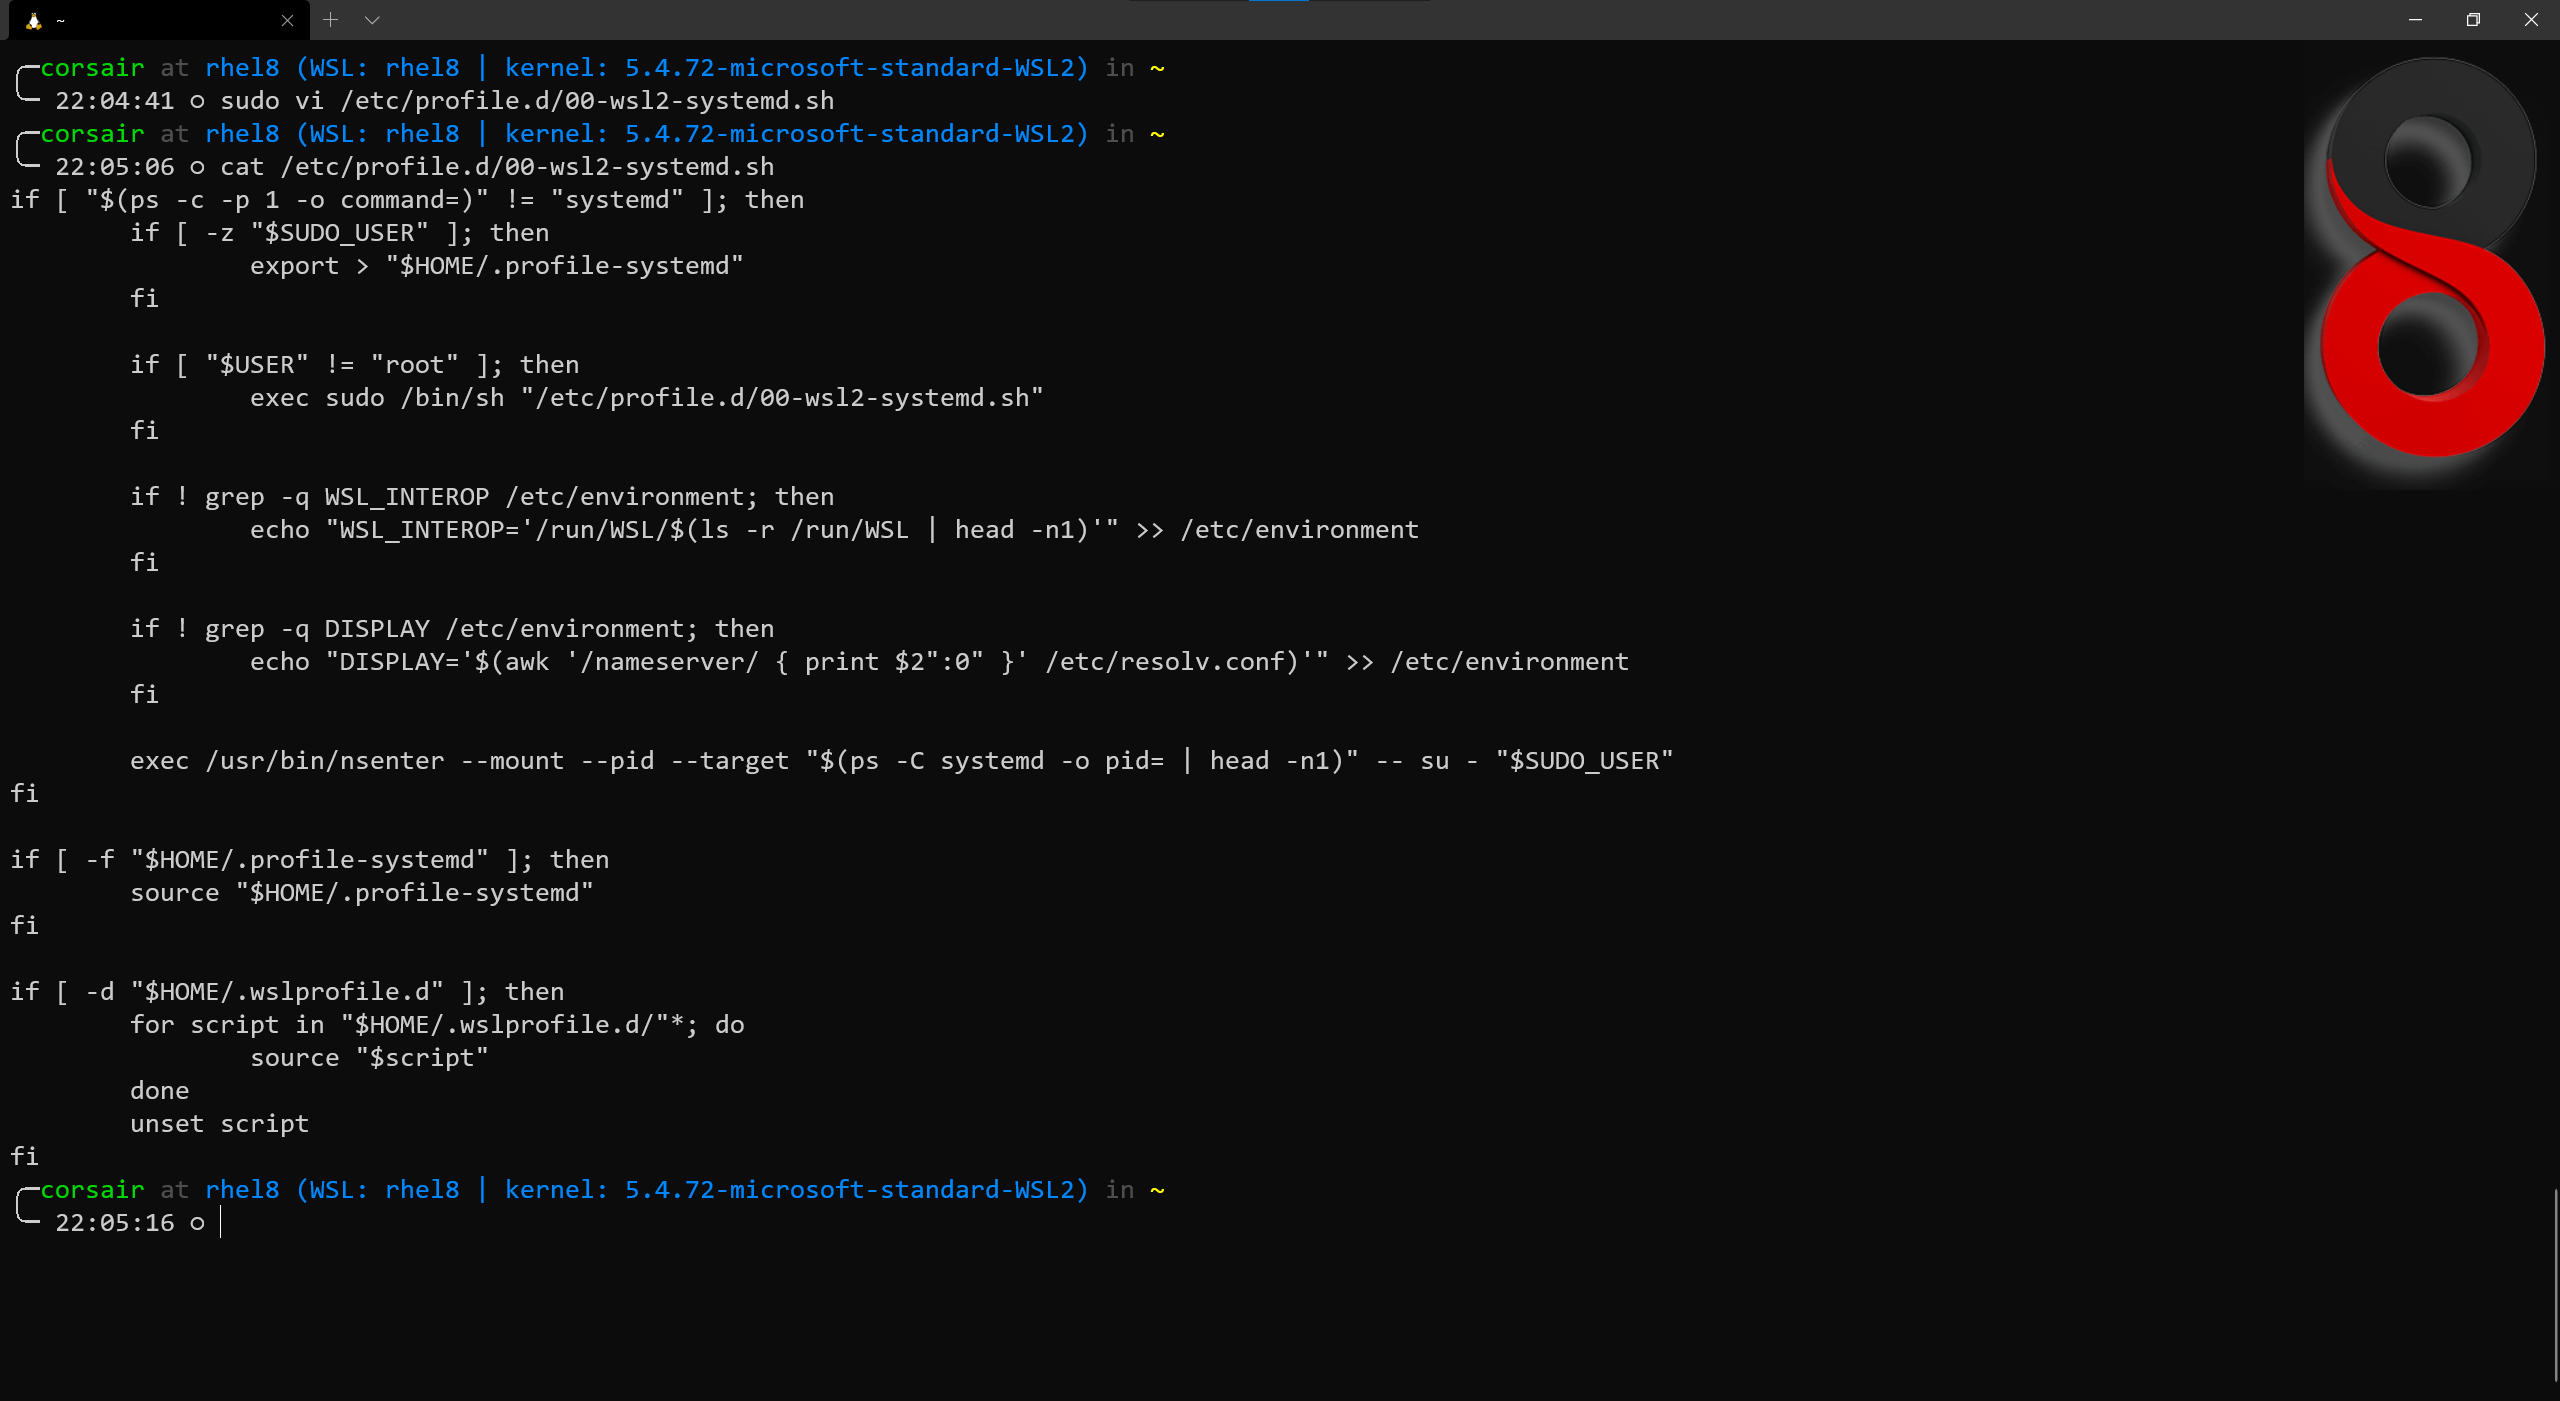
Then we will need to create a script to be launched with the distro starts:
# Create the script to be launched when the distro starts
sudo vi /etc/profile.d/00-wsl2-systemd.sh

## The file should have the following content
if [ "$(ps -c -p 1 -o command=)" != "systemd" ]; then
        if [ -z "$SUDO_USER" ]; then
                export > "$HOME/.profile-systemd"
        fi

        if [ "$USER" != "root" ]; then
                exec sudo /bin/sh "/etc/profile.d/00-wsl2-systemd.sh"
        fi

        if ! grep -q WSL_INTEROP /etc/environment; then
                echo "WSL_INTEROP='/run/WSL/$(ls -r /run/WSL | head -n1)'" >> /etc/environment
        fi

        if ! grep -q DISPLAY /etc/environment; then
                echo "DISPLAY='$(awk '/nameserver/ { print $2":0" }' /etc/resolv.conf)'" >> /etc/environment
        fi

        exec /usr/bin/nsenter --mount --pid --target "$(ps -C systemd -o pid= | head -n1)" -- su - "$SUDO_USER"
fi

if [ -f "$HOME/.profile-systemd" ]; then
        source "$HOME/.profile-systemd"
fi

if [ -d "$HOME/.wslprofile.d" ]; then
        for script in "$HOME/.wslprofile.d/"*; do
                source "$script"
        done
        unset script
fi

# [Optional] Check if the file has been correctly saved
cat /etc/profile.d/00-wsl2-systemd.sh
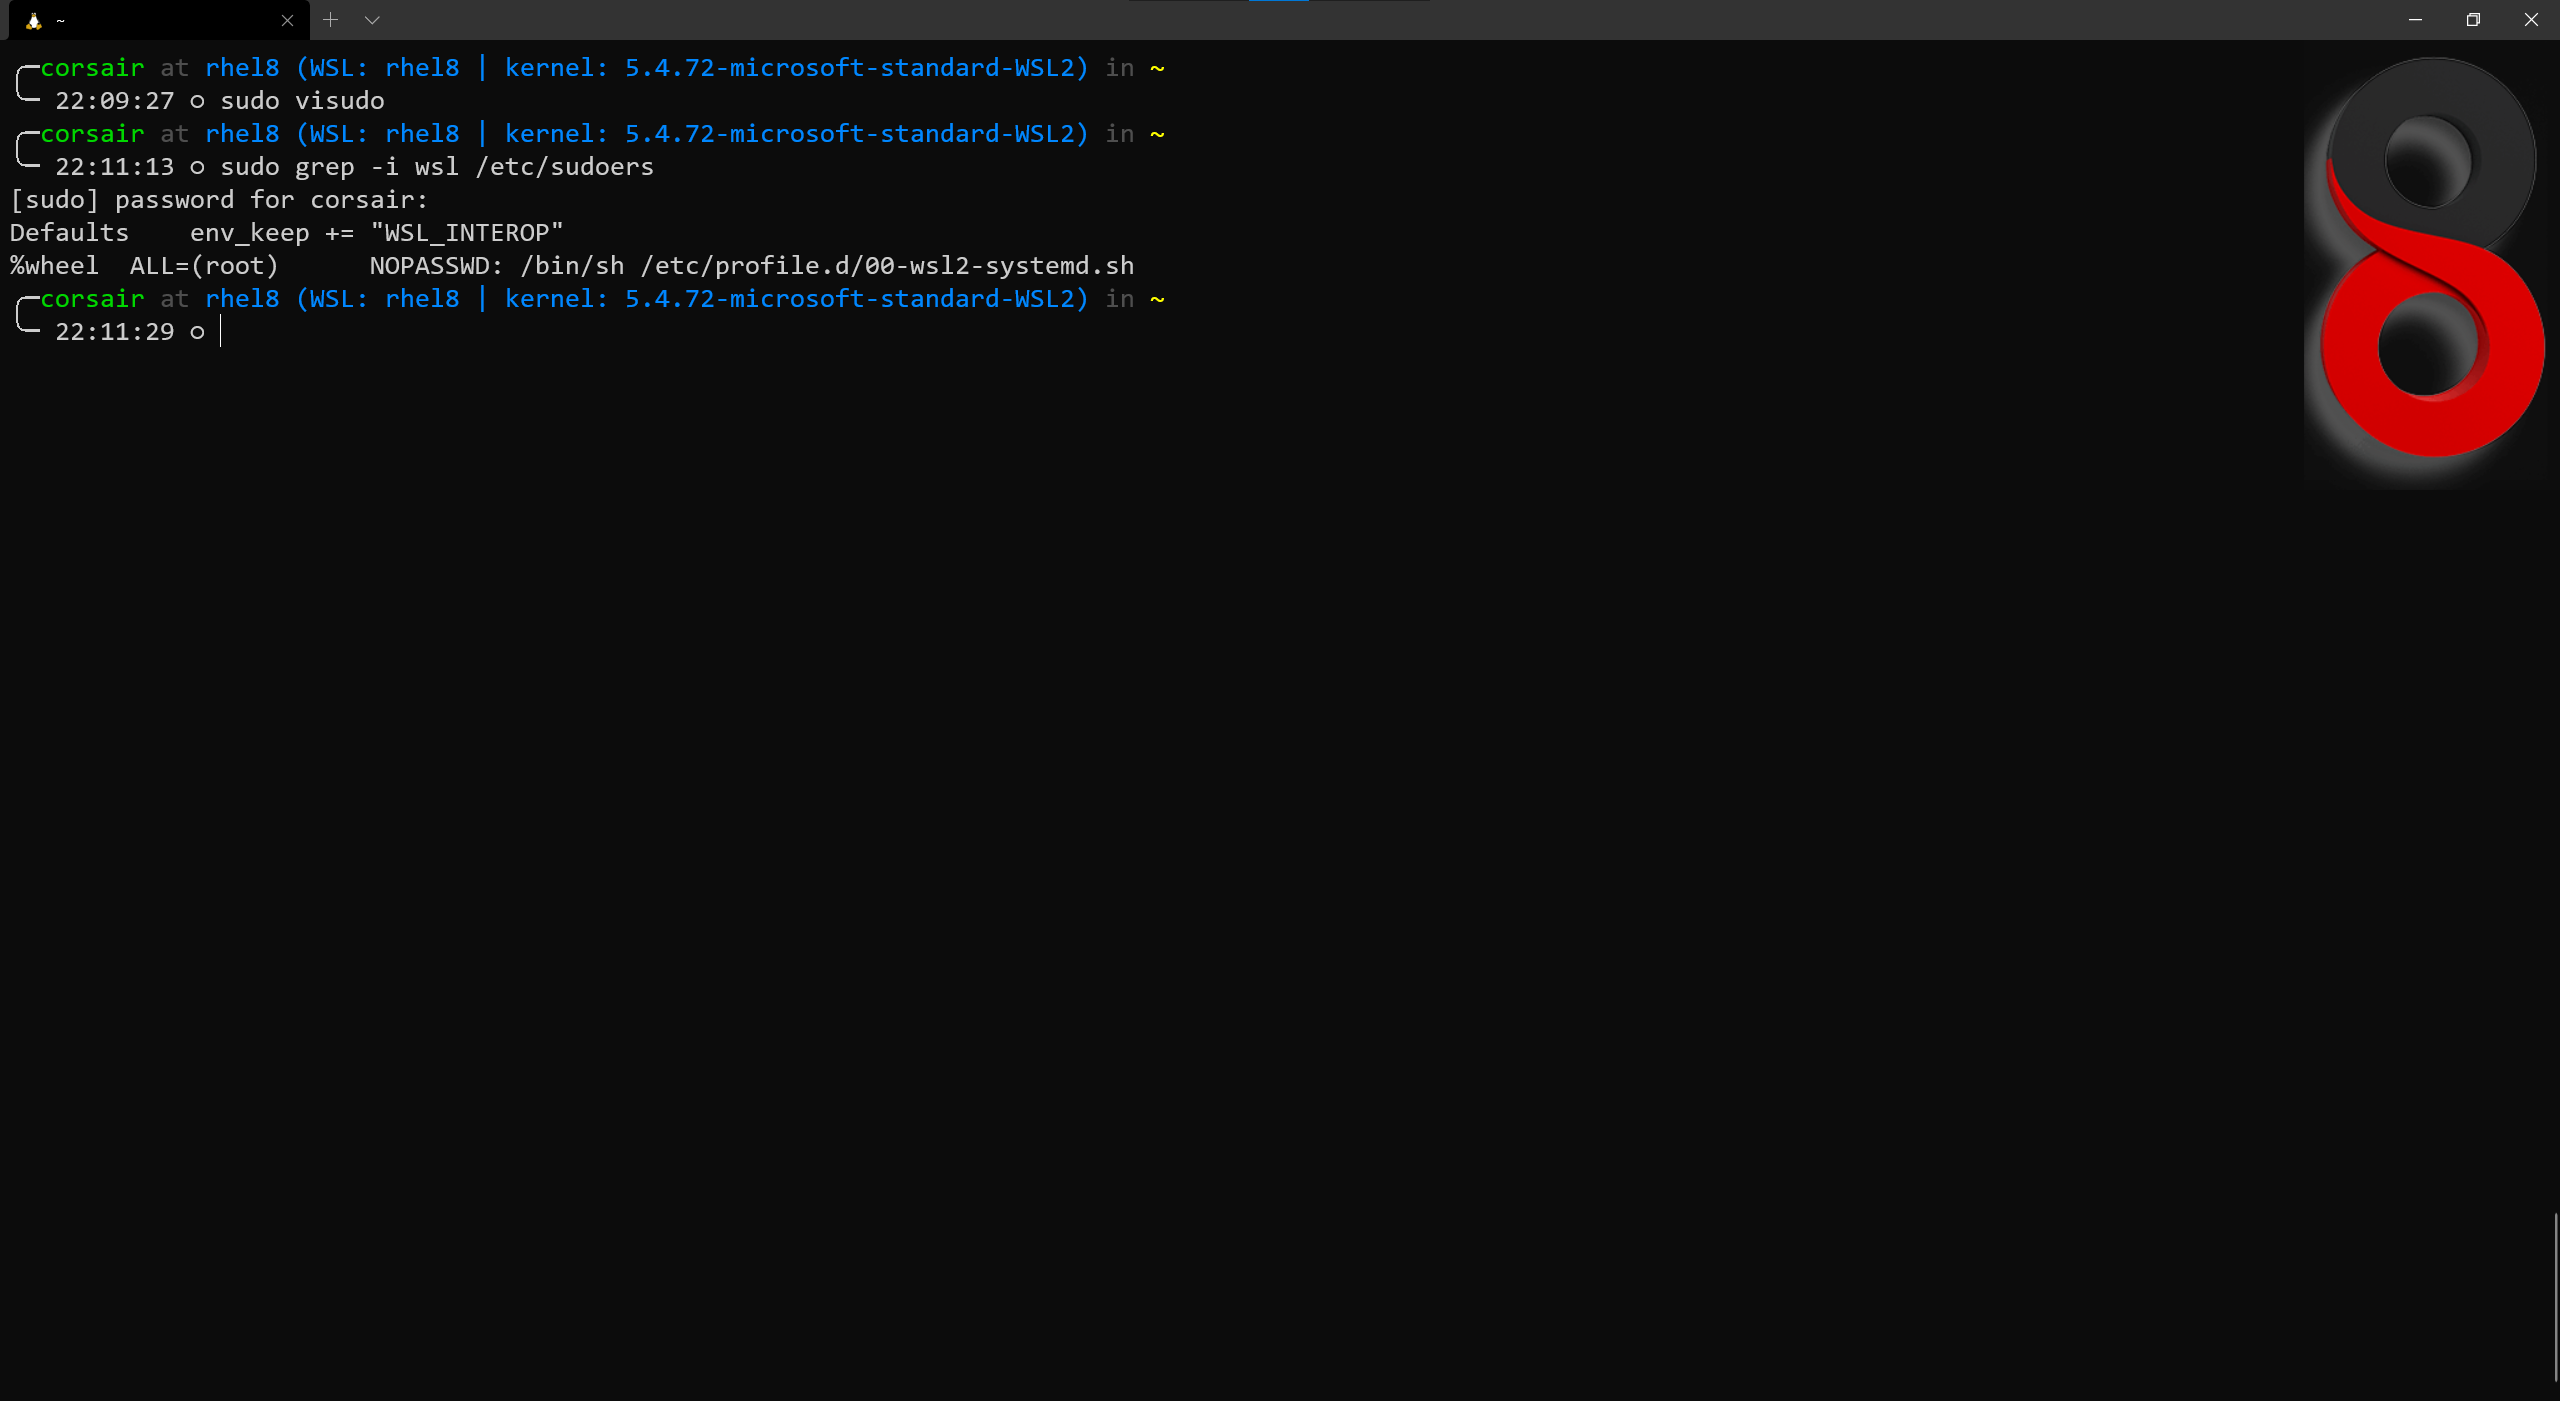
The third step will be to update the sudoers file in order to avoid to enter our password every time the distro starts:
# Edit the sudoers file
sudo visudo

## Add a new value to the environment variables that are kept
Defaults env_keep += "WSL_INTEROP"

## Add the command to run the script without password
%wheel ALL=(root) NOPASSWD: /bin/sh /etc/profile.d/00-wsl2-systemd.sh

# [Optional] Check if the sudoers have been correctly updated
sudo grep -i wsl /etc/sudoers
With all the configuration done, we can now exit the distro in stop the distro from powershell:
# Stop the custom distro only
wsl --terminate rhel8
We can now launch a new session of our distro and check if SystemD processes are running, specially the pid 1:
# Check which processes are running when the distro starts
ps -ef
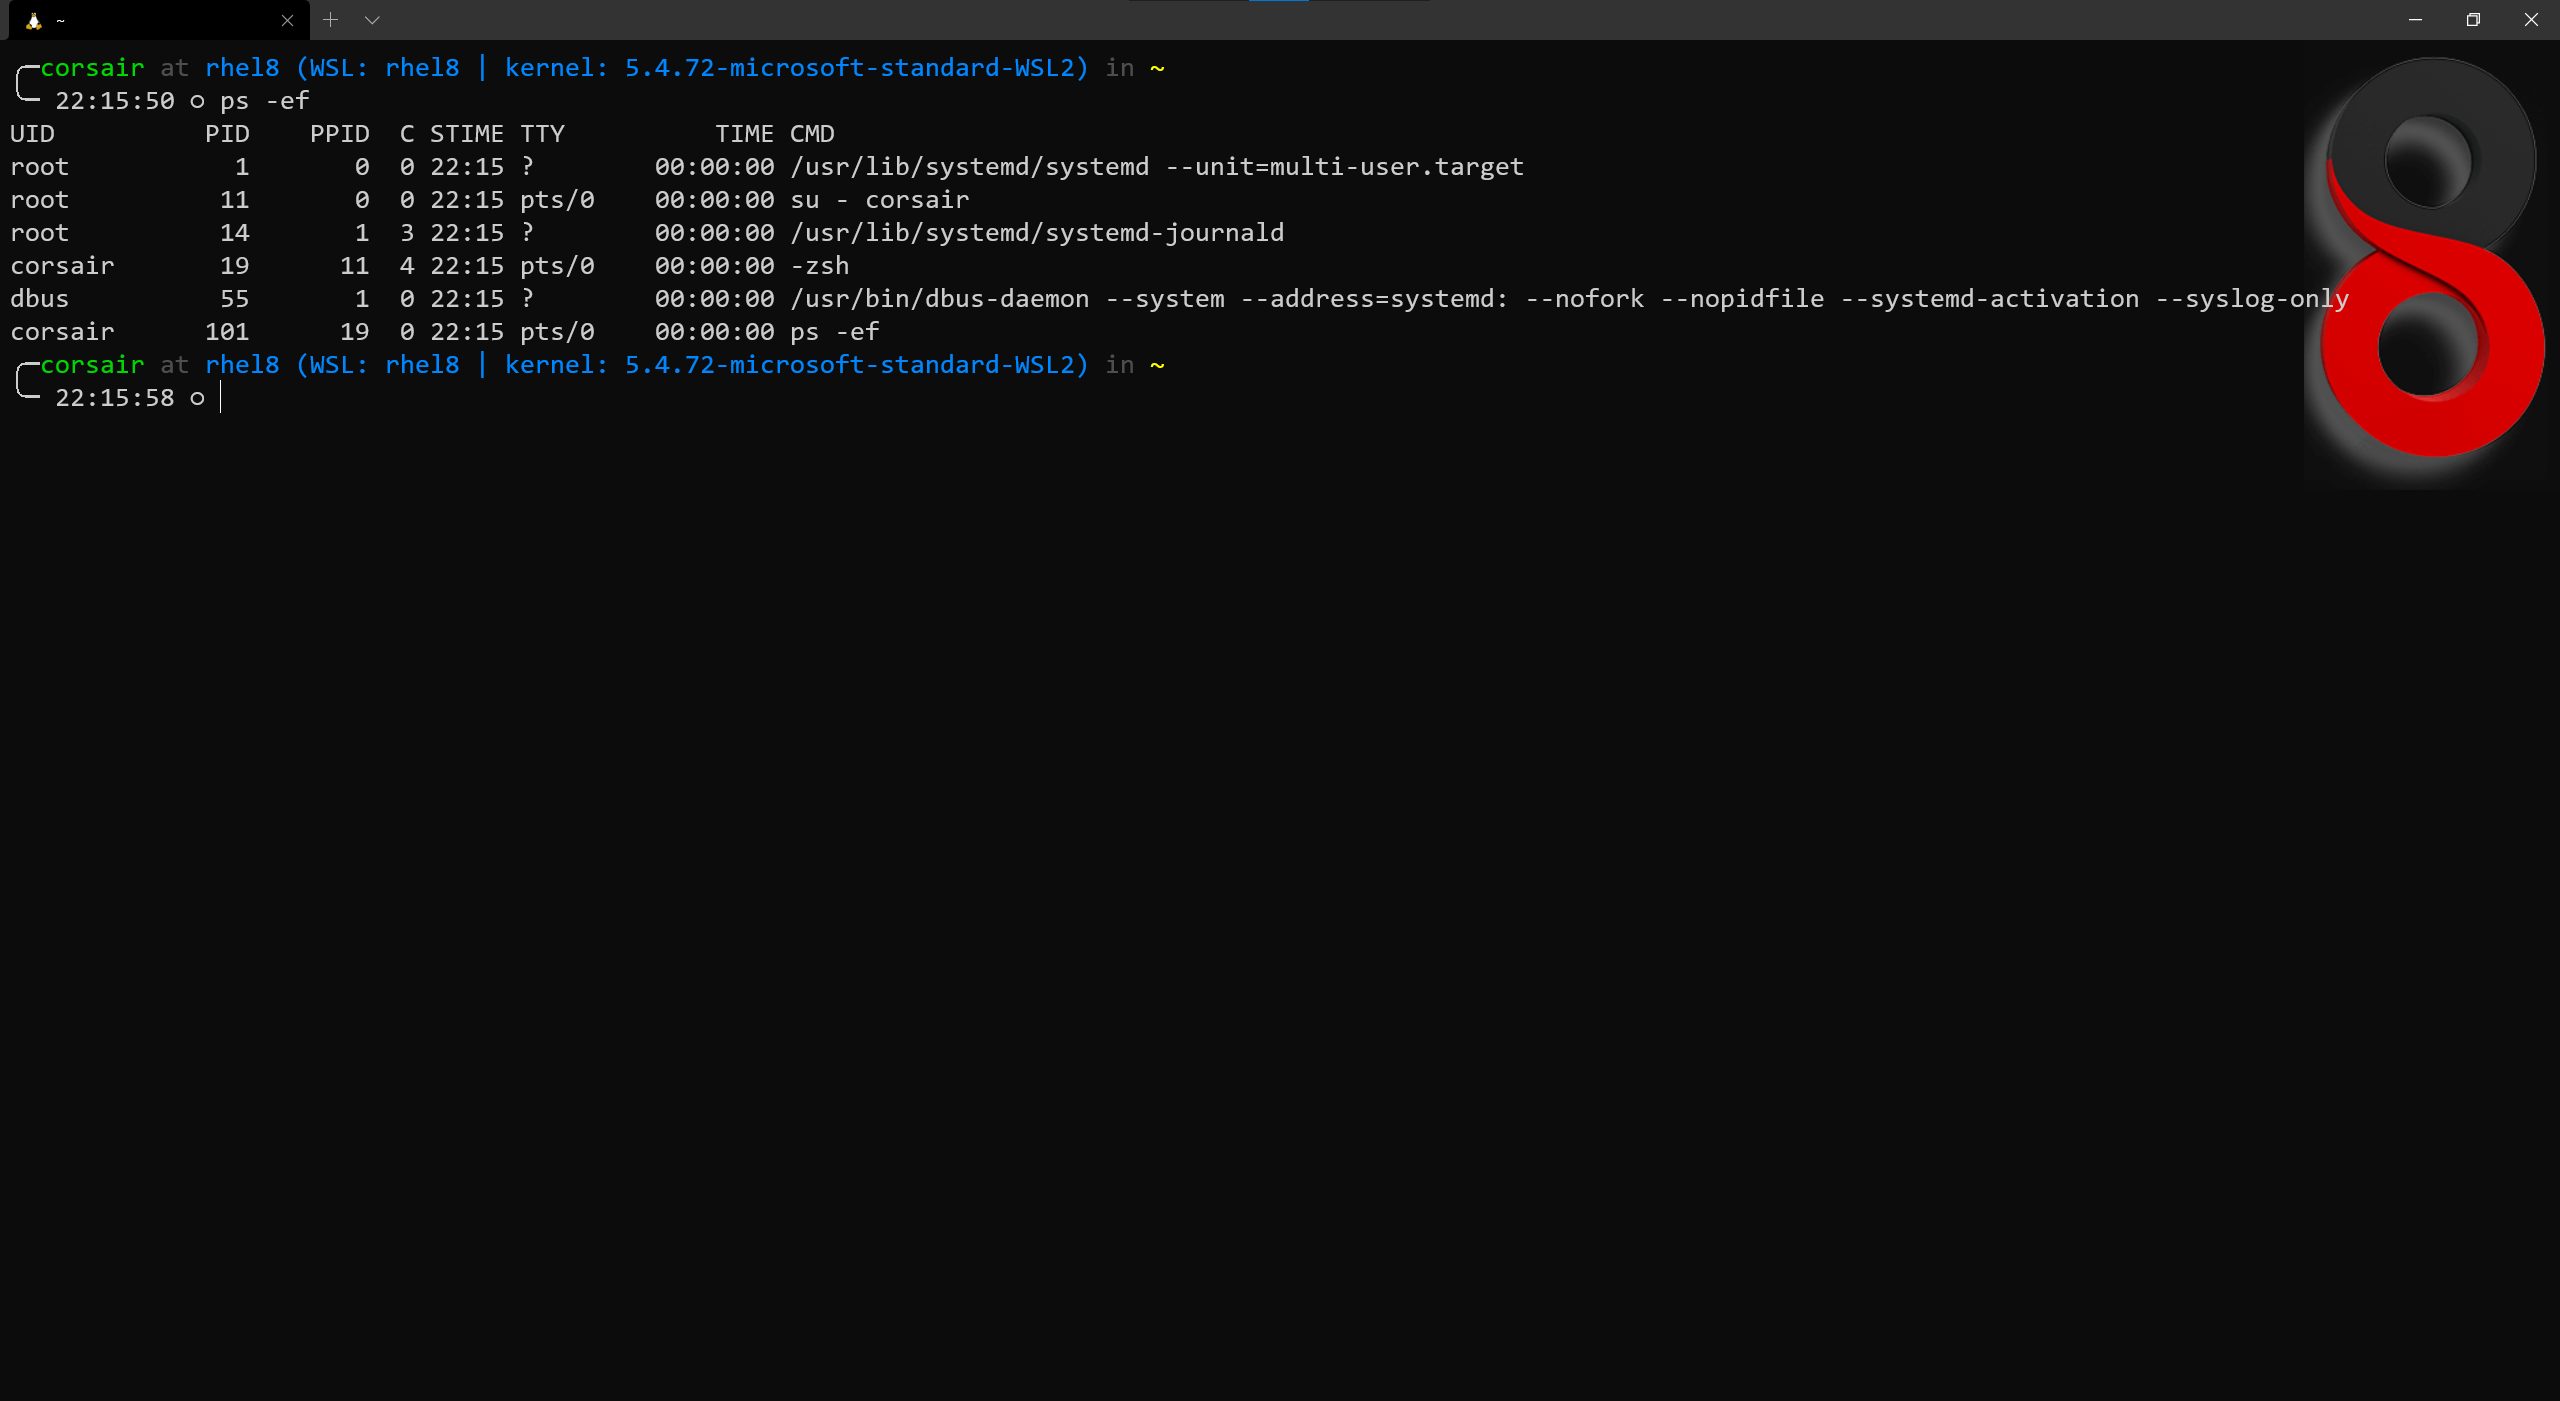
Success! we have now our distro with SystemD. This will help us greatly for our last setup.
RHEL likes Moby
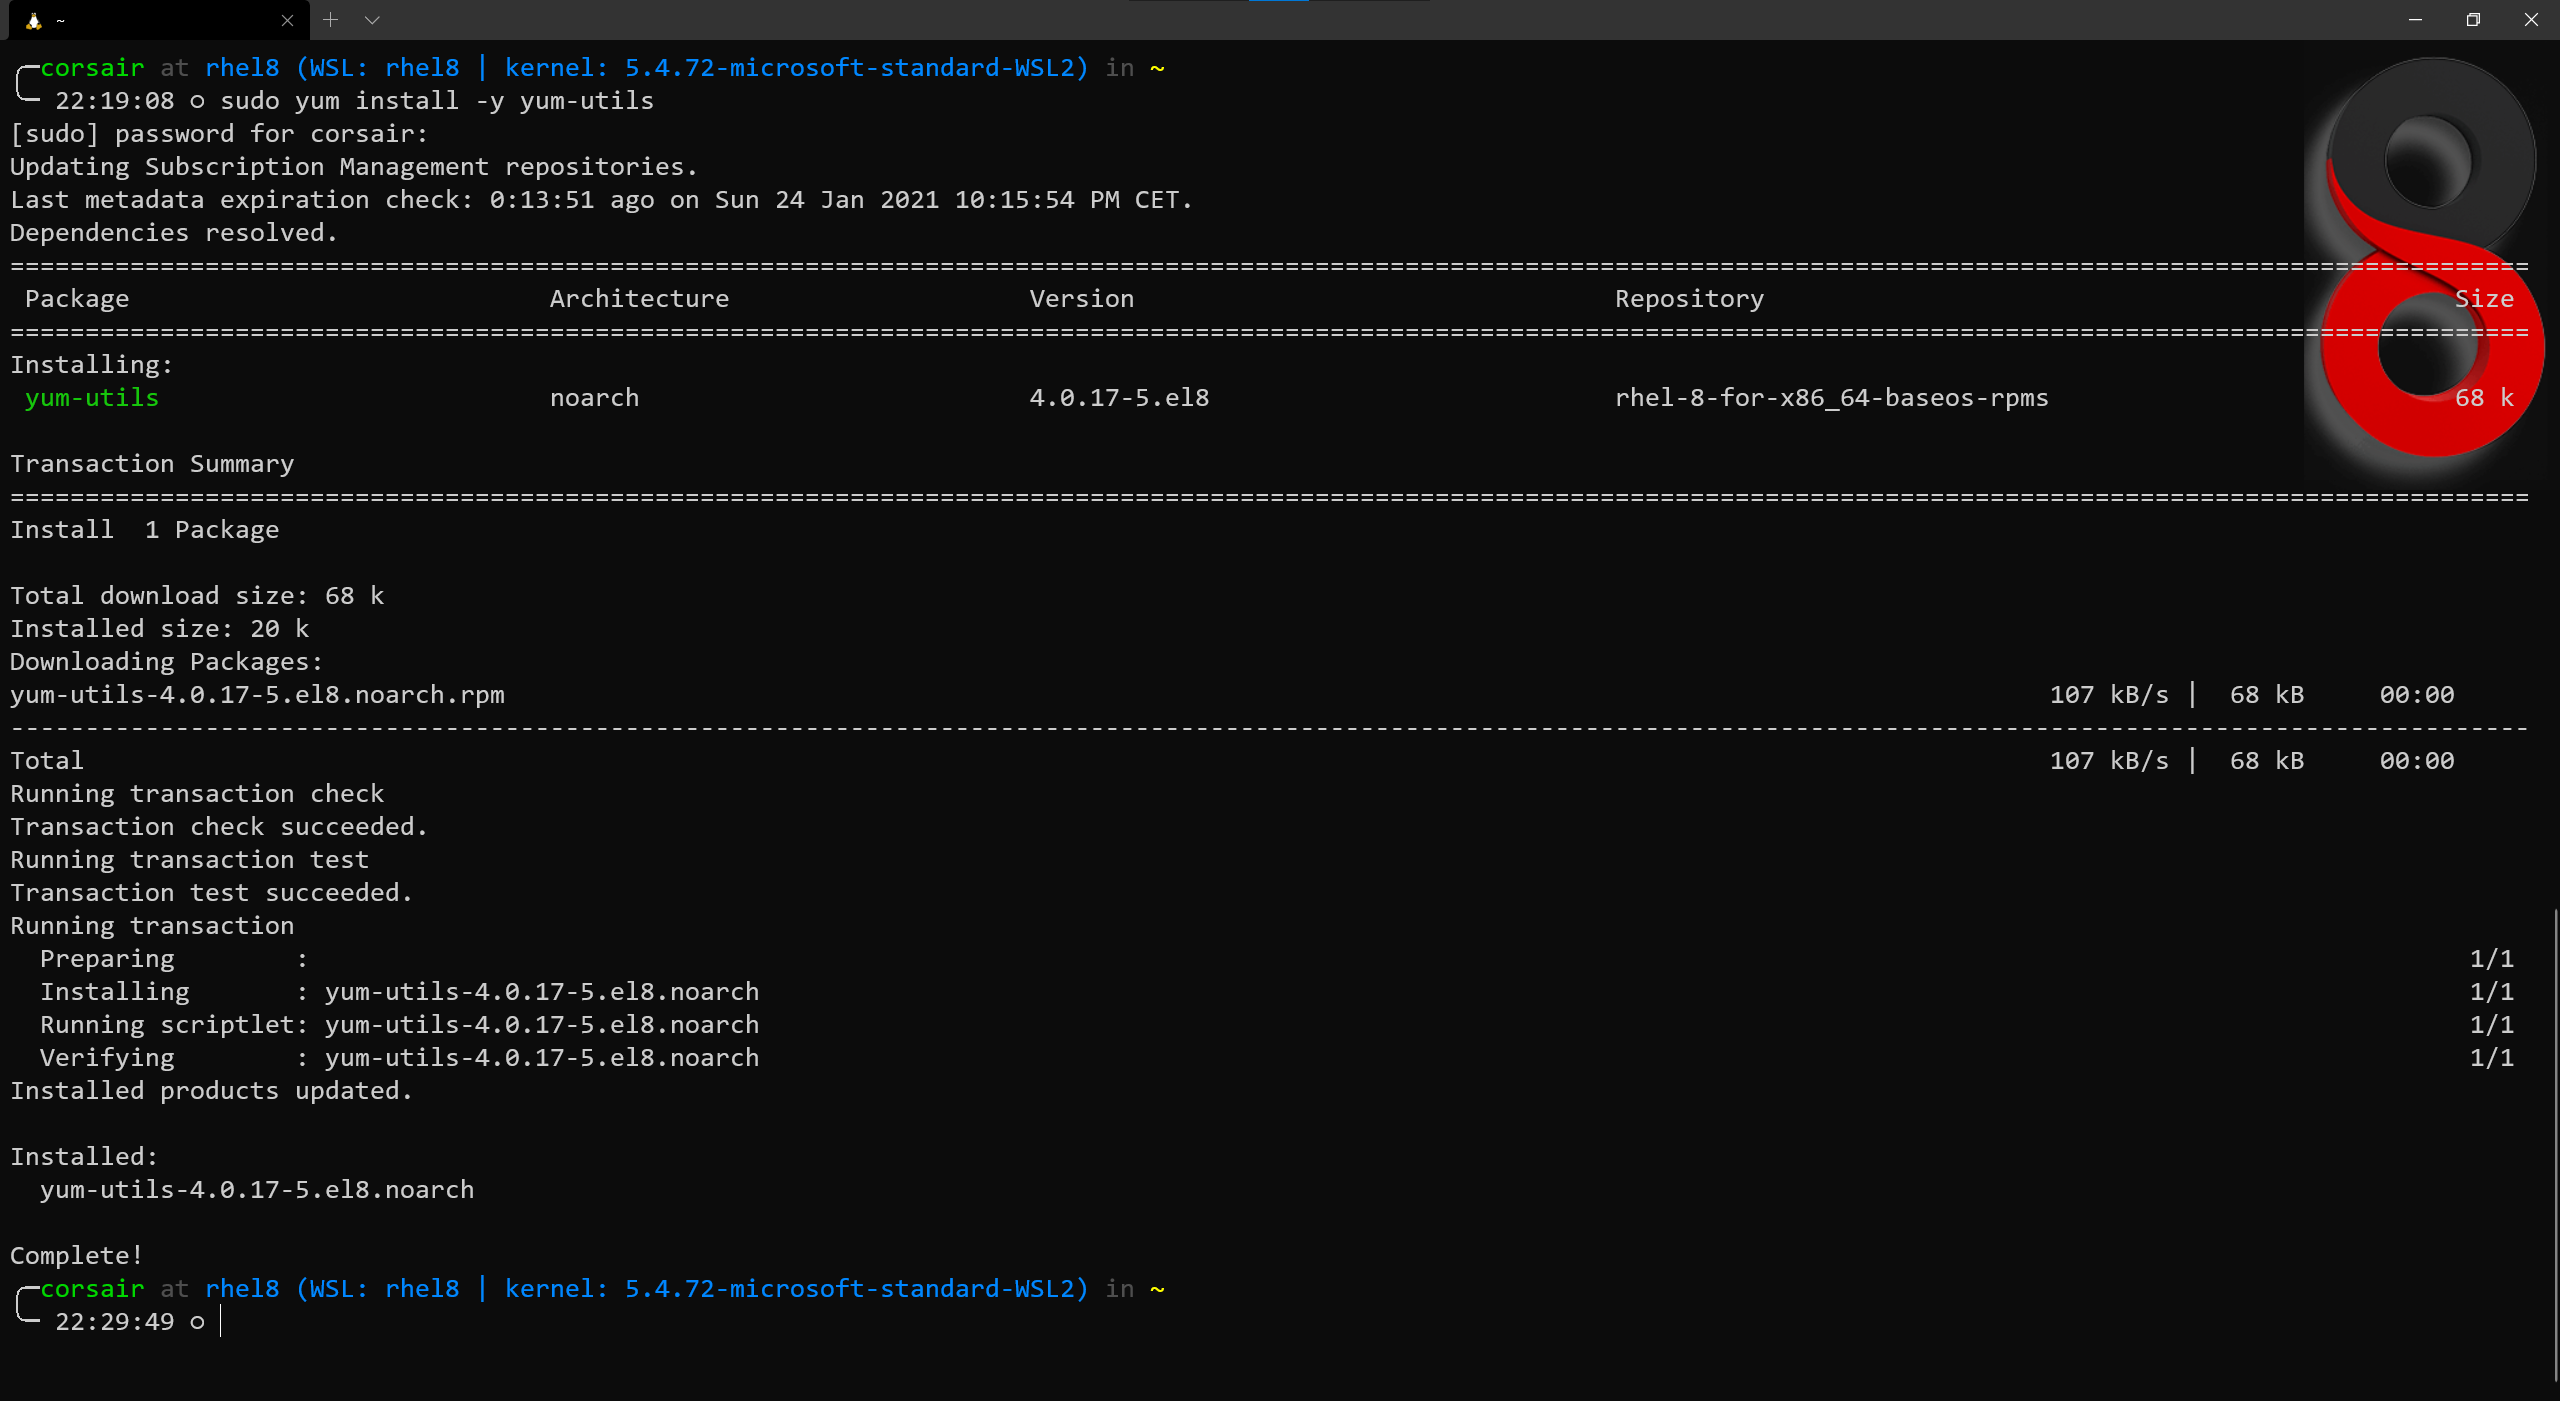
As stated in the introduction, by default RHEL doesn’t provide a repo containing Docker applications (both daemon and client).
However, Docker provides the documentation to be installed on CentOS and, lucky us, we can leverage the documentation as is:
# Install the yum-utils package
sudo yum install -y yum-utils
# Add the Docker repository
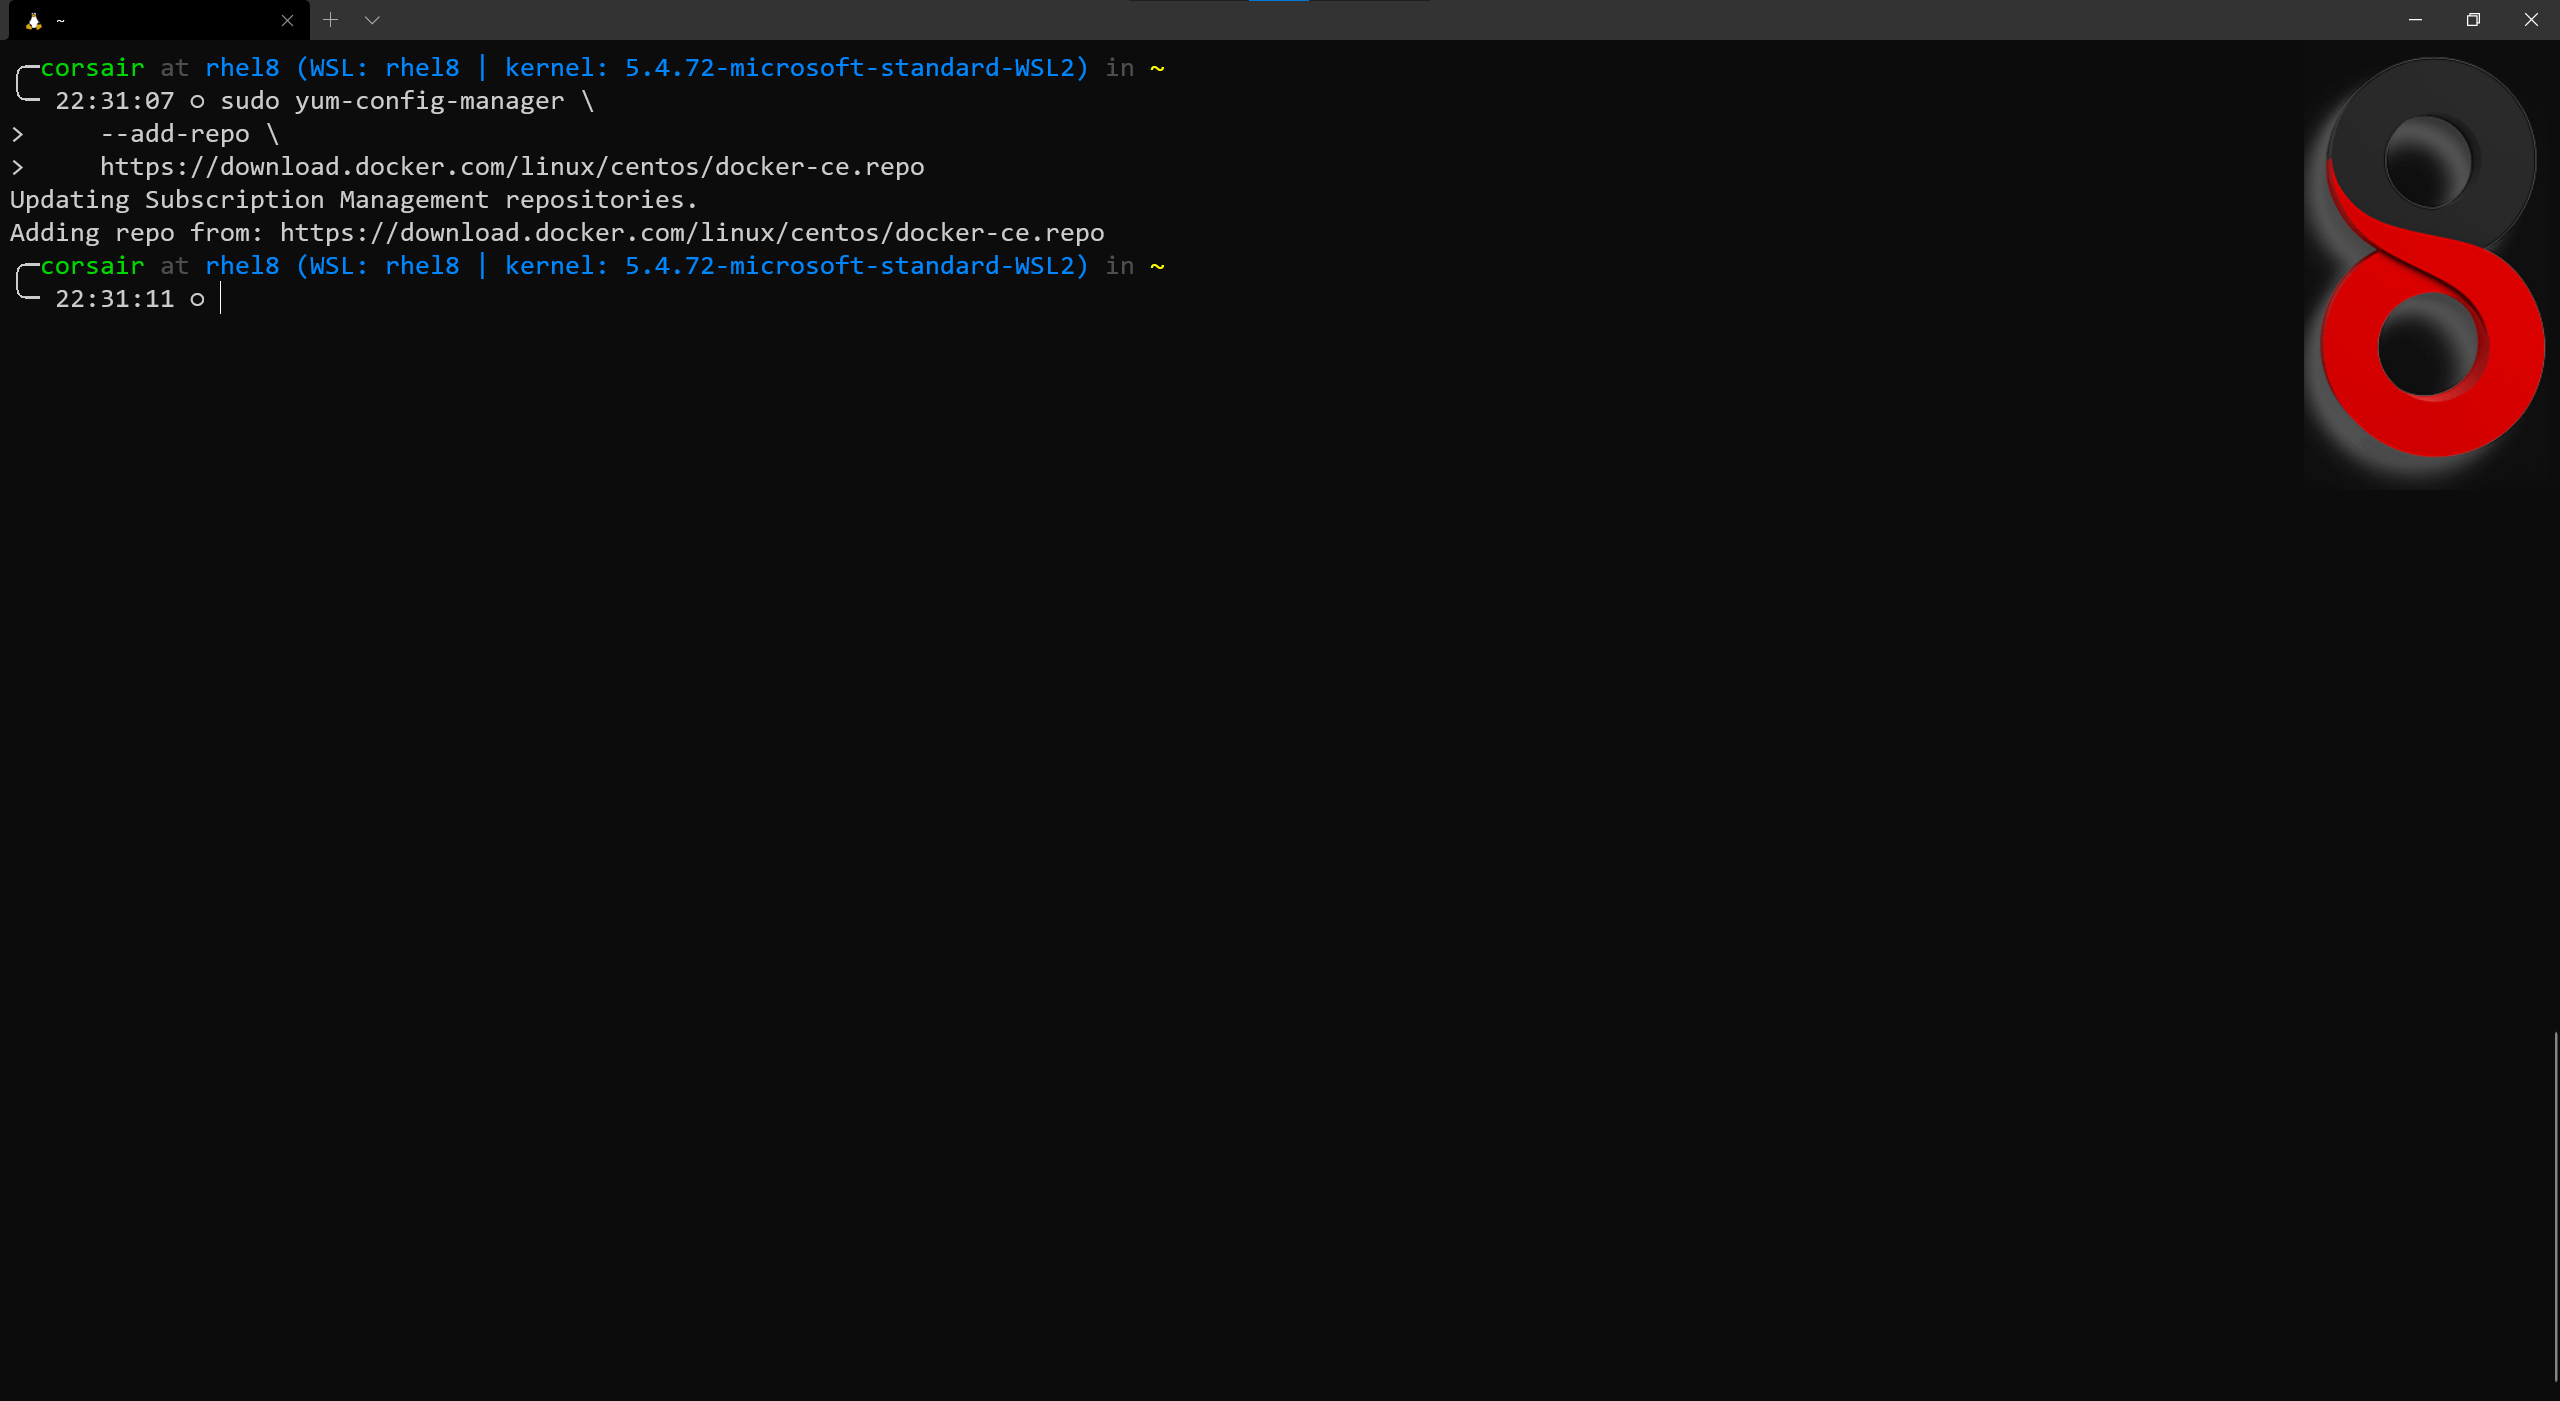
sudo yum-config-manager \
--add-repo \
https://download.docker.com/linux/centos/docker-ce.repo
# Install Docker
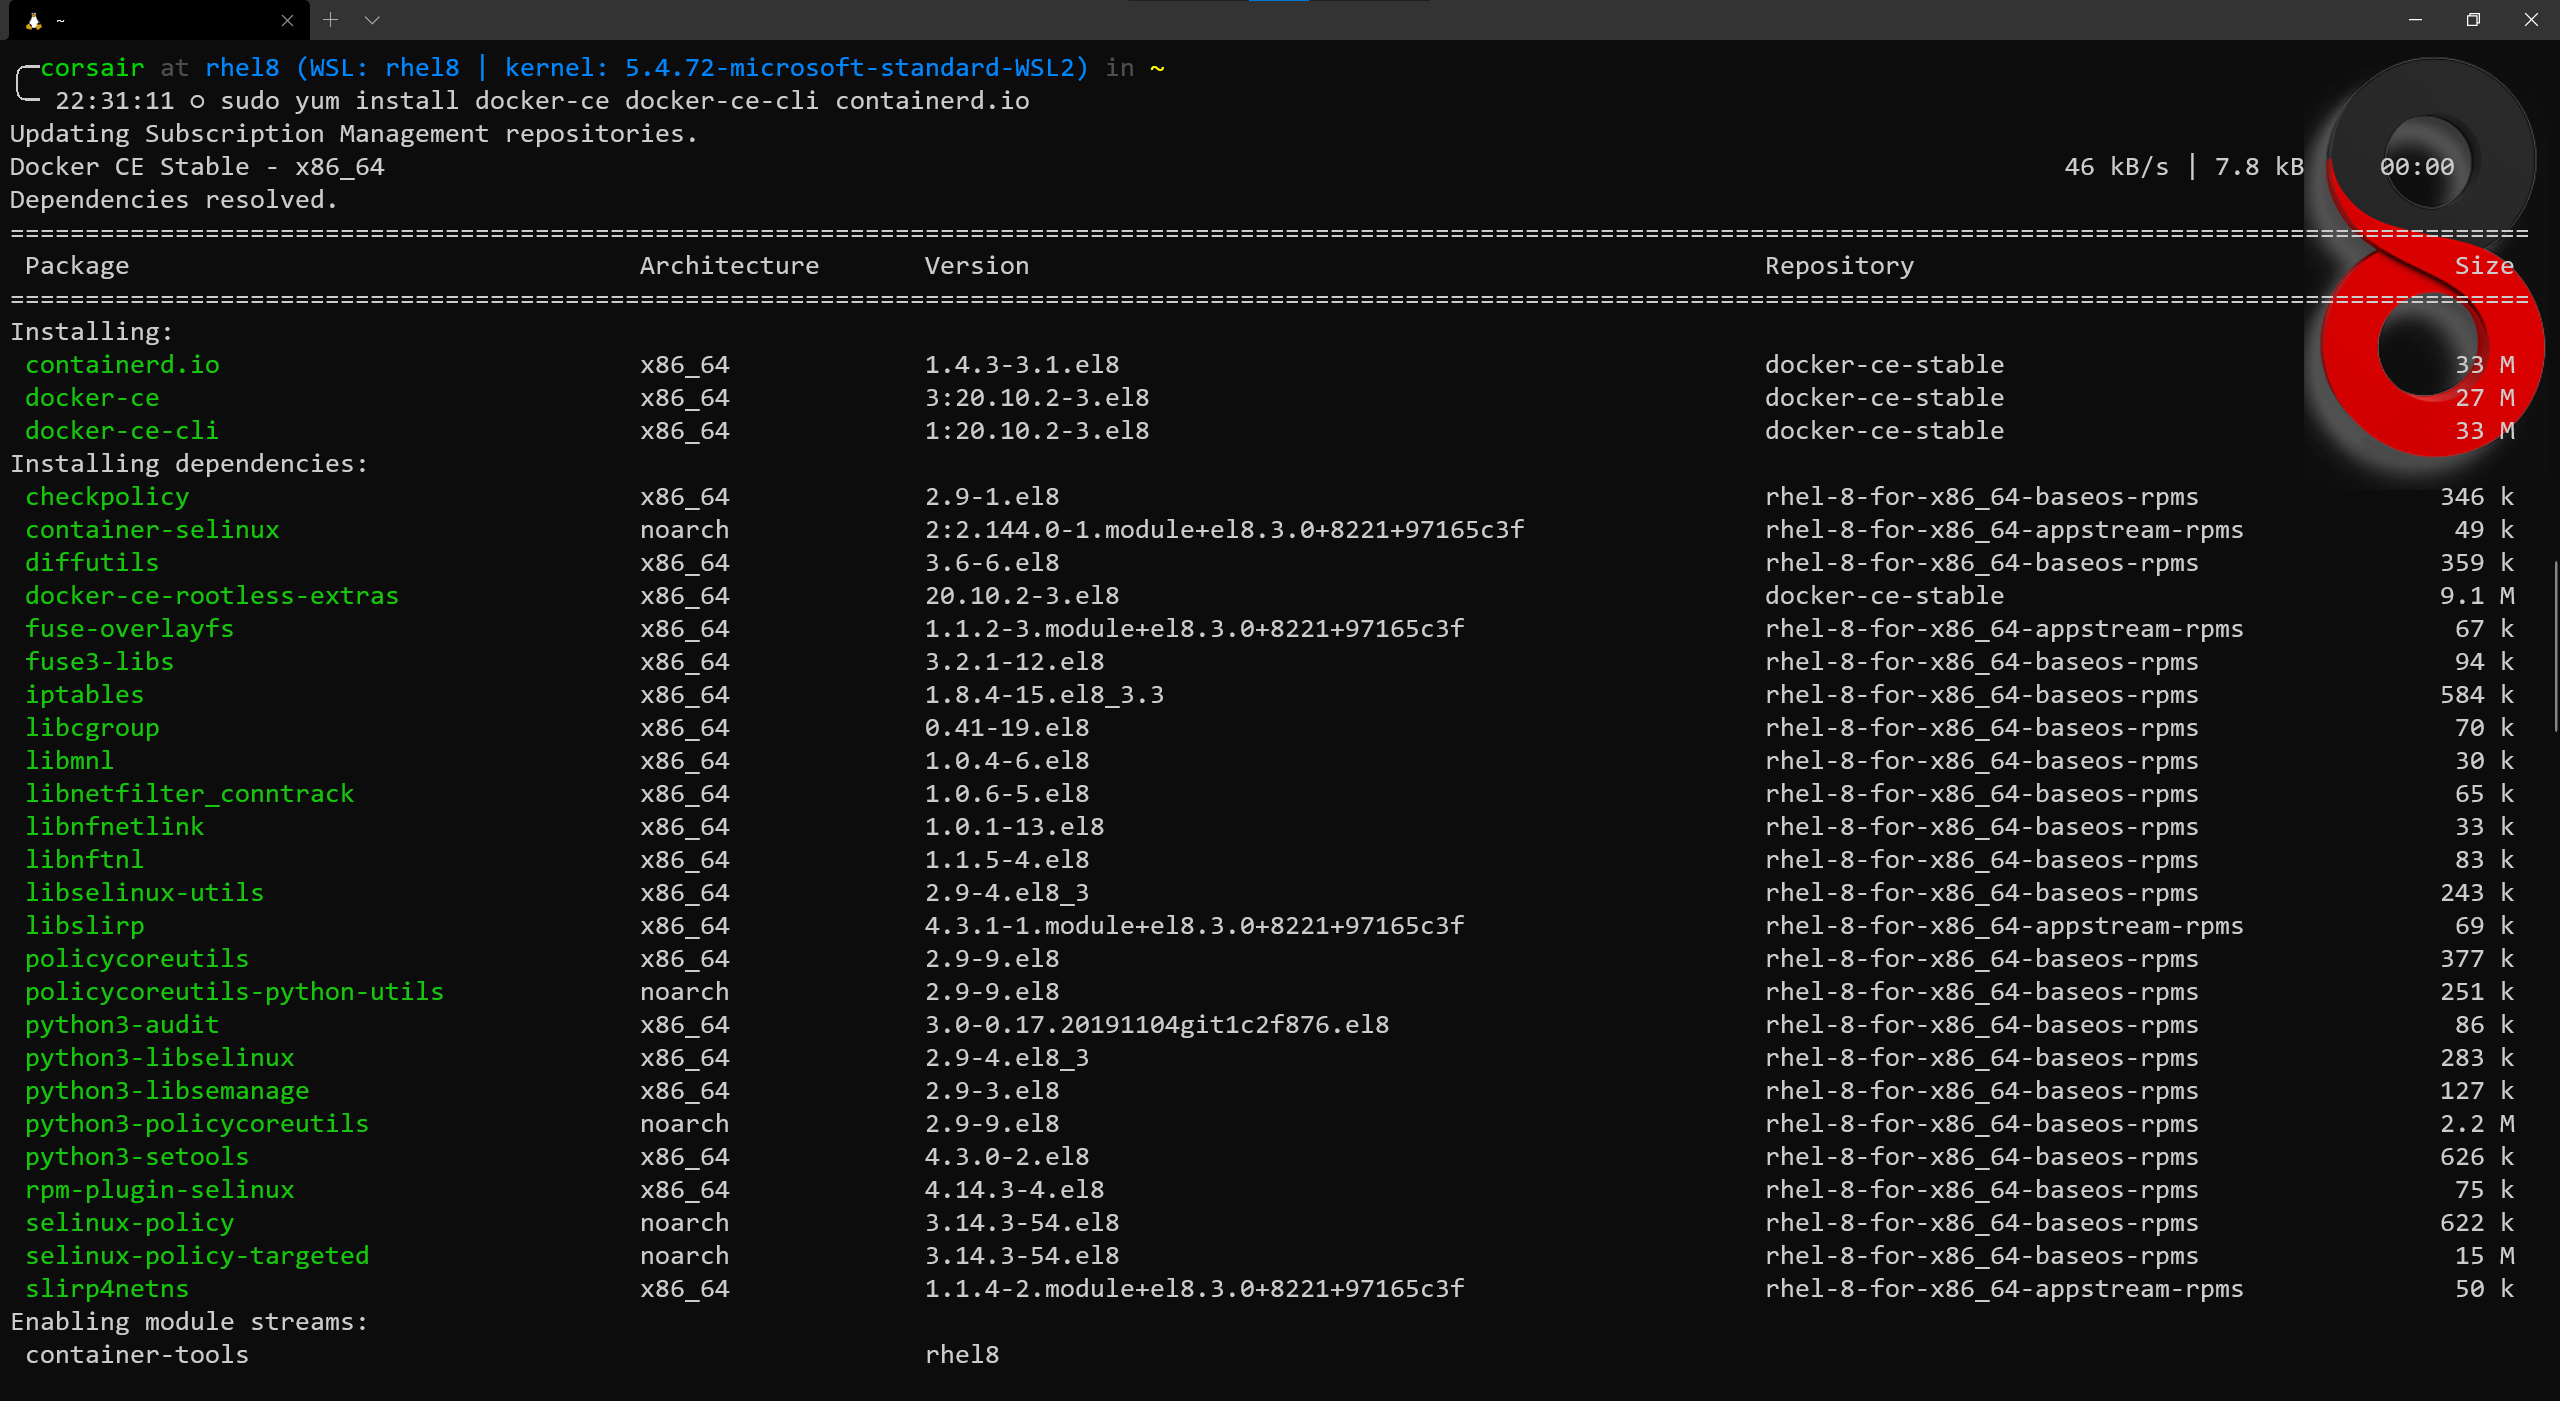
sudo yum install docker-ce docker-ce-cli containerd.io
## We will need approve the import of the Docker GPG key
## Just type 'y' and press Enter
Now comes a mandatory change in the Docker SystemD file, before we can start it.
The “issue” here is that Red Hat do not run iptables and instead have switched to its successor, nftables.
Hopefully for us, we can change the Docker start command to avoid looking for iptables:
# Update the Docker SystemD service
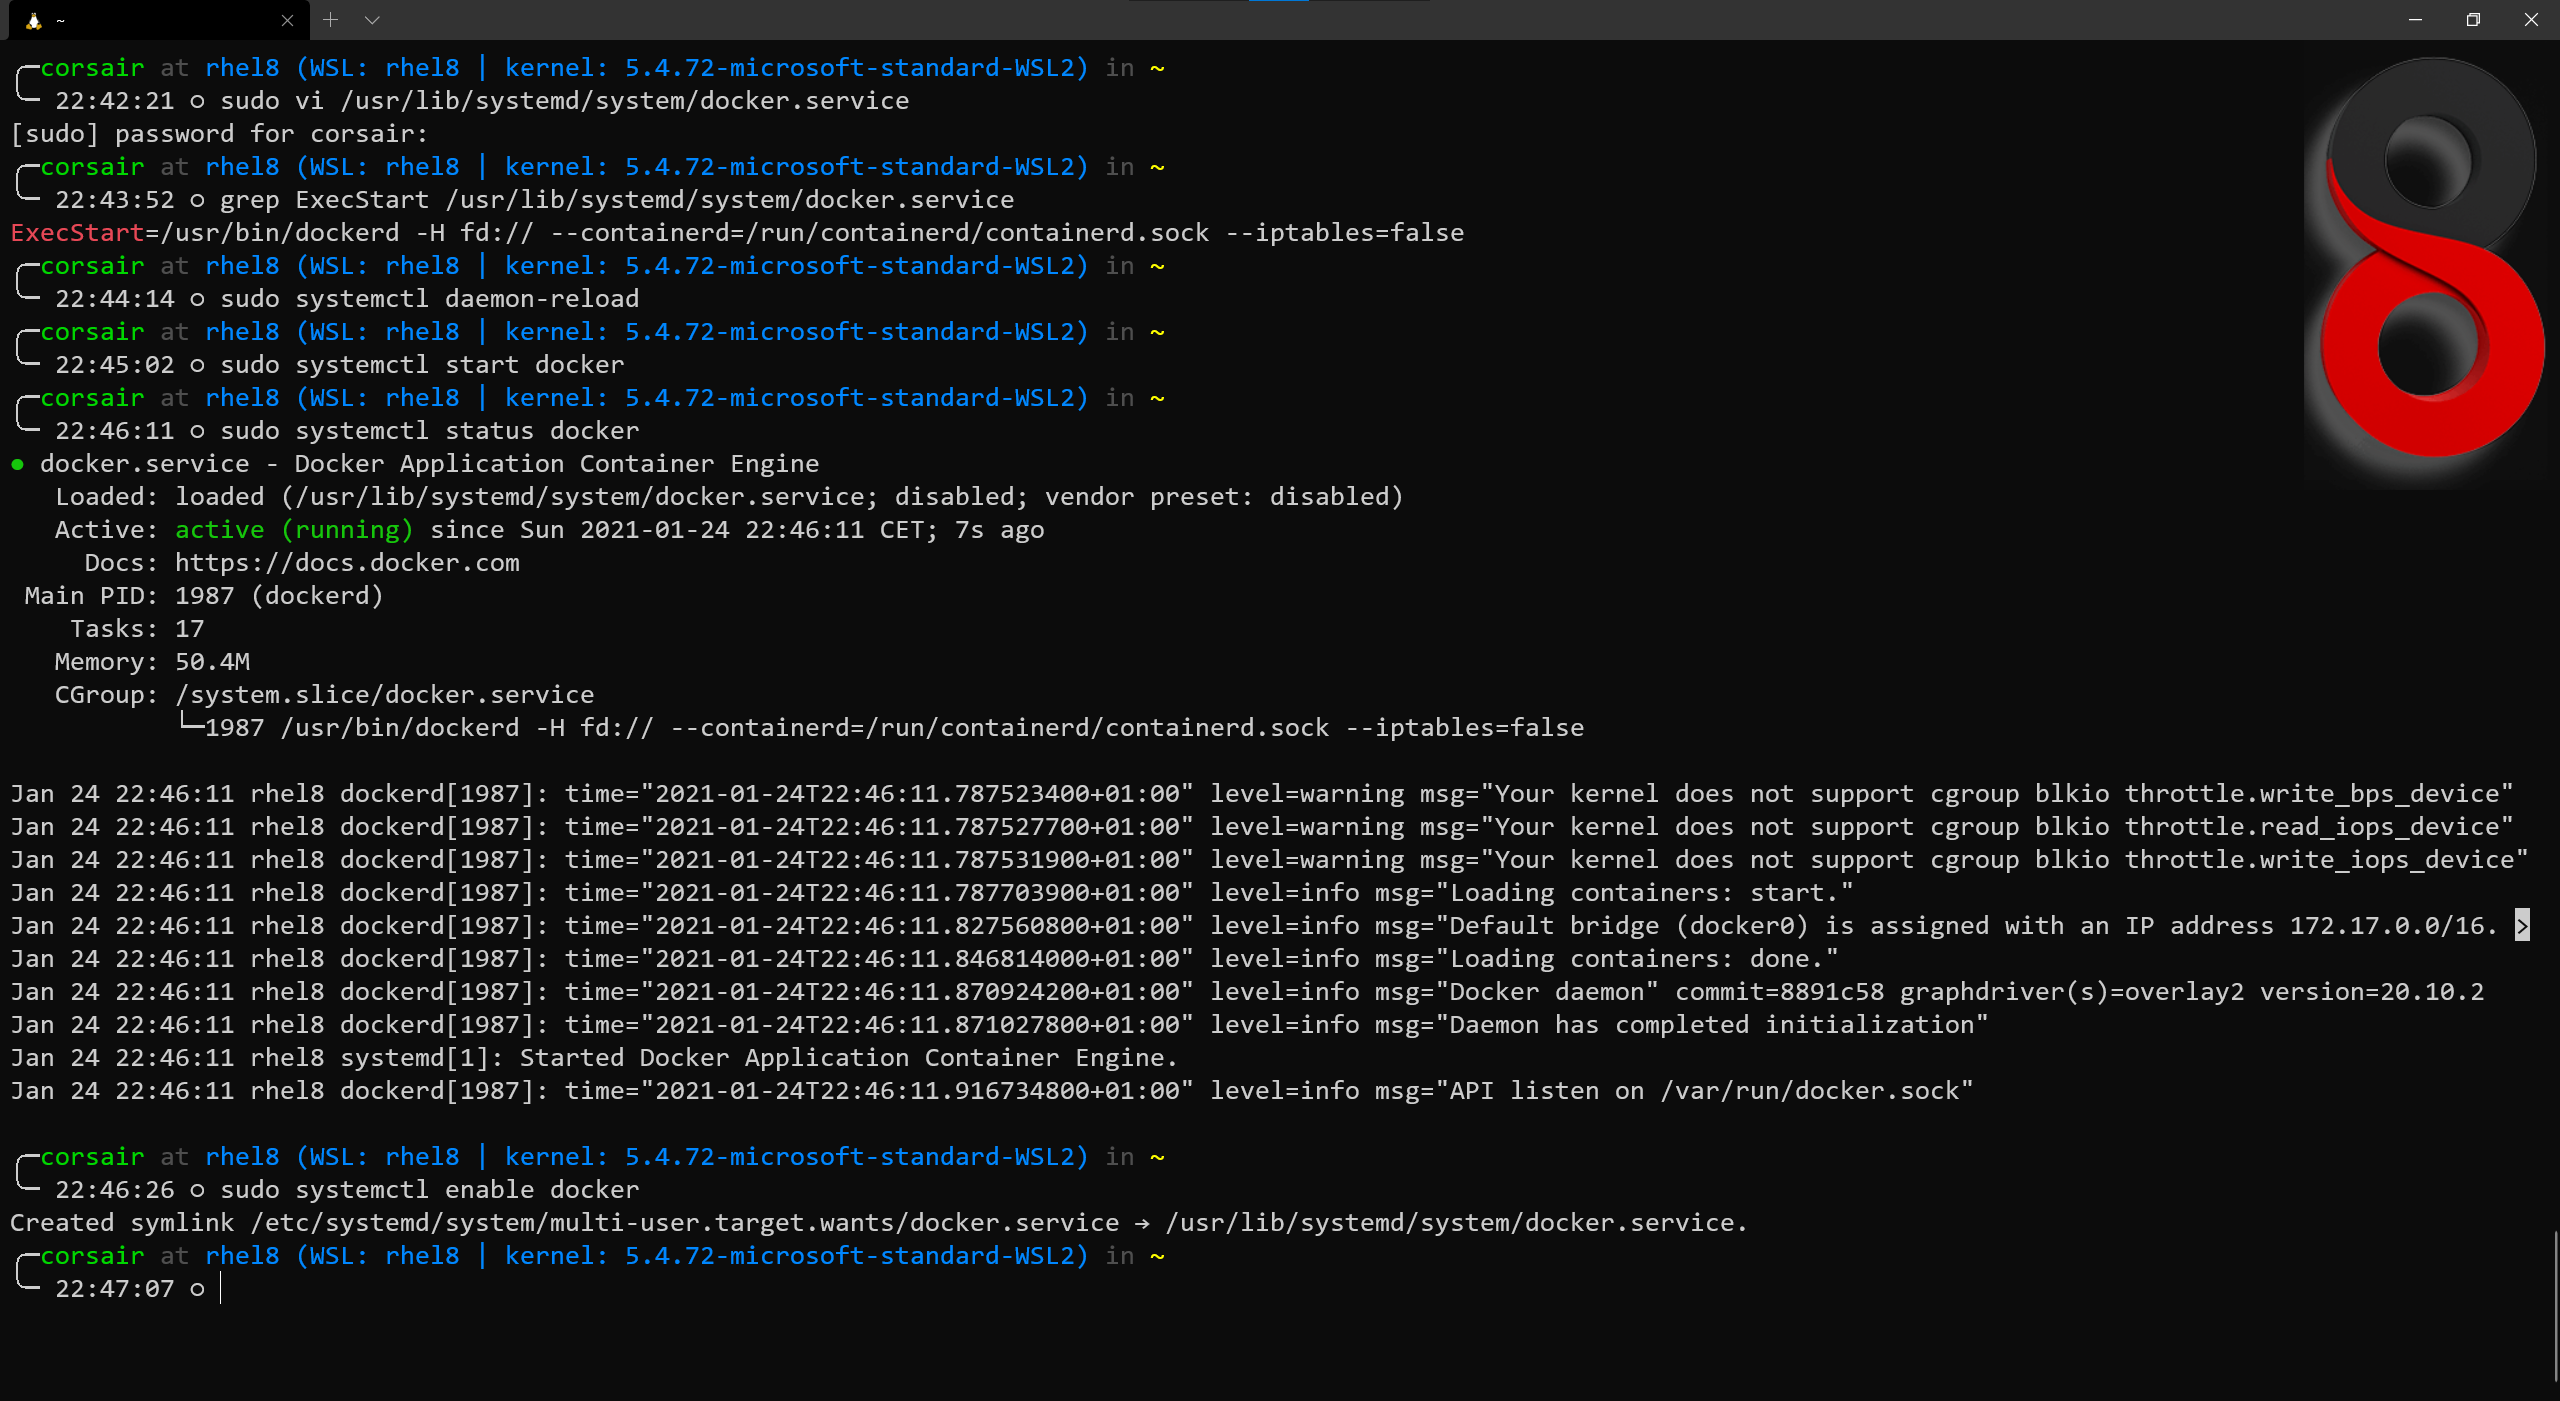
sudo vi /usr/lib/systemd/system/docker.service
## Locate the ExecStart option and add --iptables=false at the end of the line
ExecStart=/usr/bin/dockerd -H fd:// --containerd=/run/containerd/containerd.sock --iptables=false
# [Optional] Check if the file has been correctly saved
grep ExecStart /usr/lib/systemd/system/docker.service
# Reload the SystemD service configuration files
sudo systemctl daemon-reload
# Start Docker
sudo systemctl start docker
# Check if Docker has been correctly started
sudo systemctl status docker
# Enable Docker to be started when the distro starts
sudo systemctl enable docker
In order for us to use Docker without the sudo command, we need to add our user to the docker group and once done, we can check which version has been installed:
# Add our user to the docker group
sudo usermod -aG docker $USER

# Refresh the group docker without launching a new shell
newgrp docker

# Check the Docker version
docker version

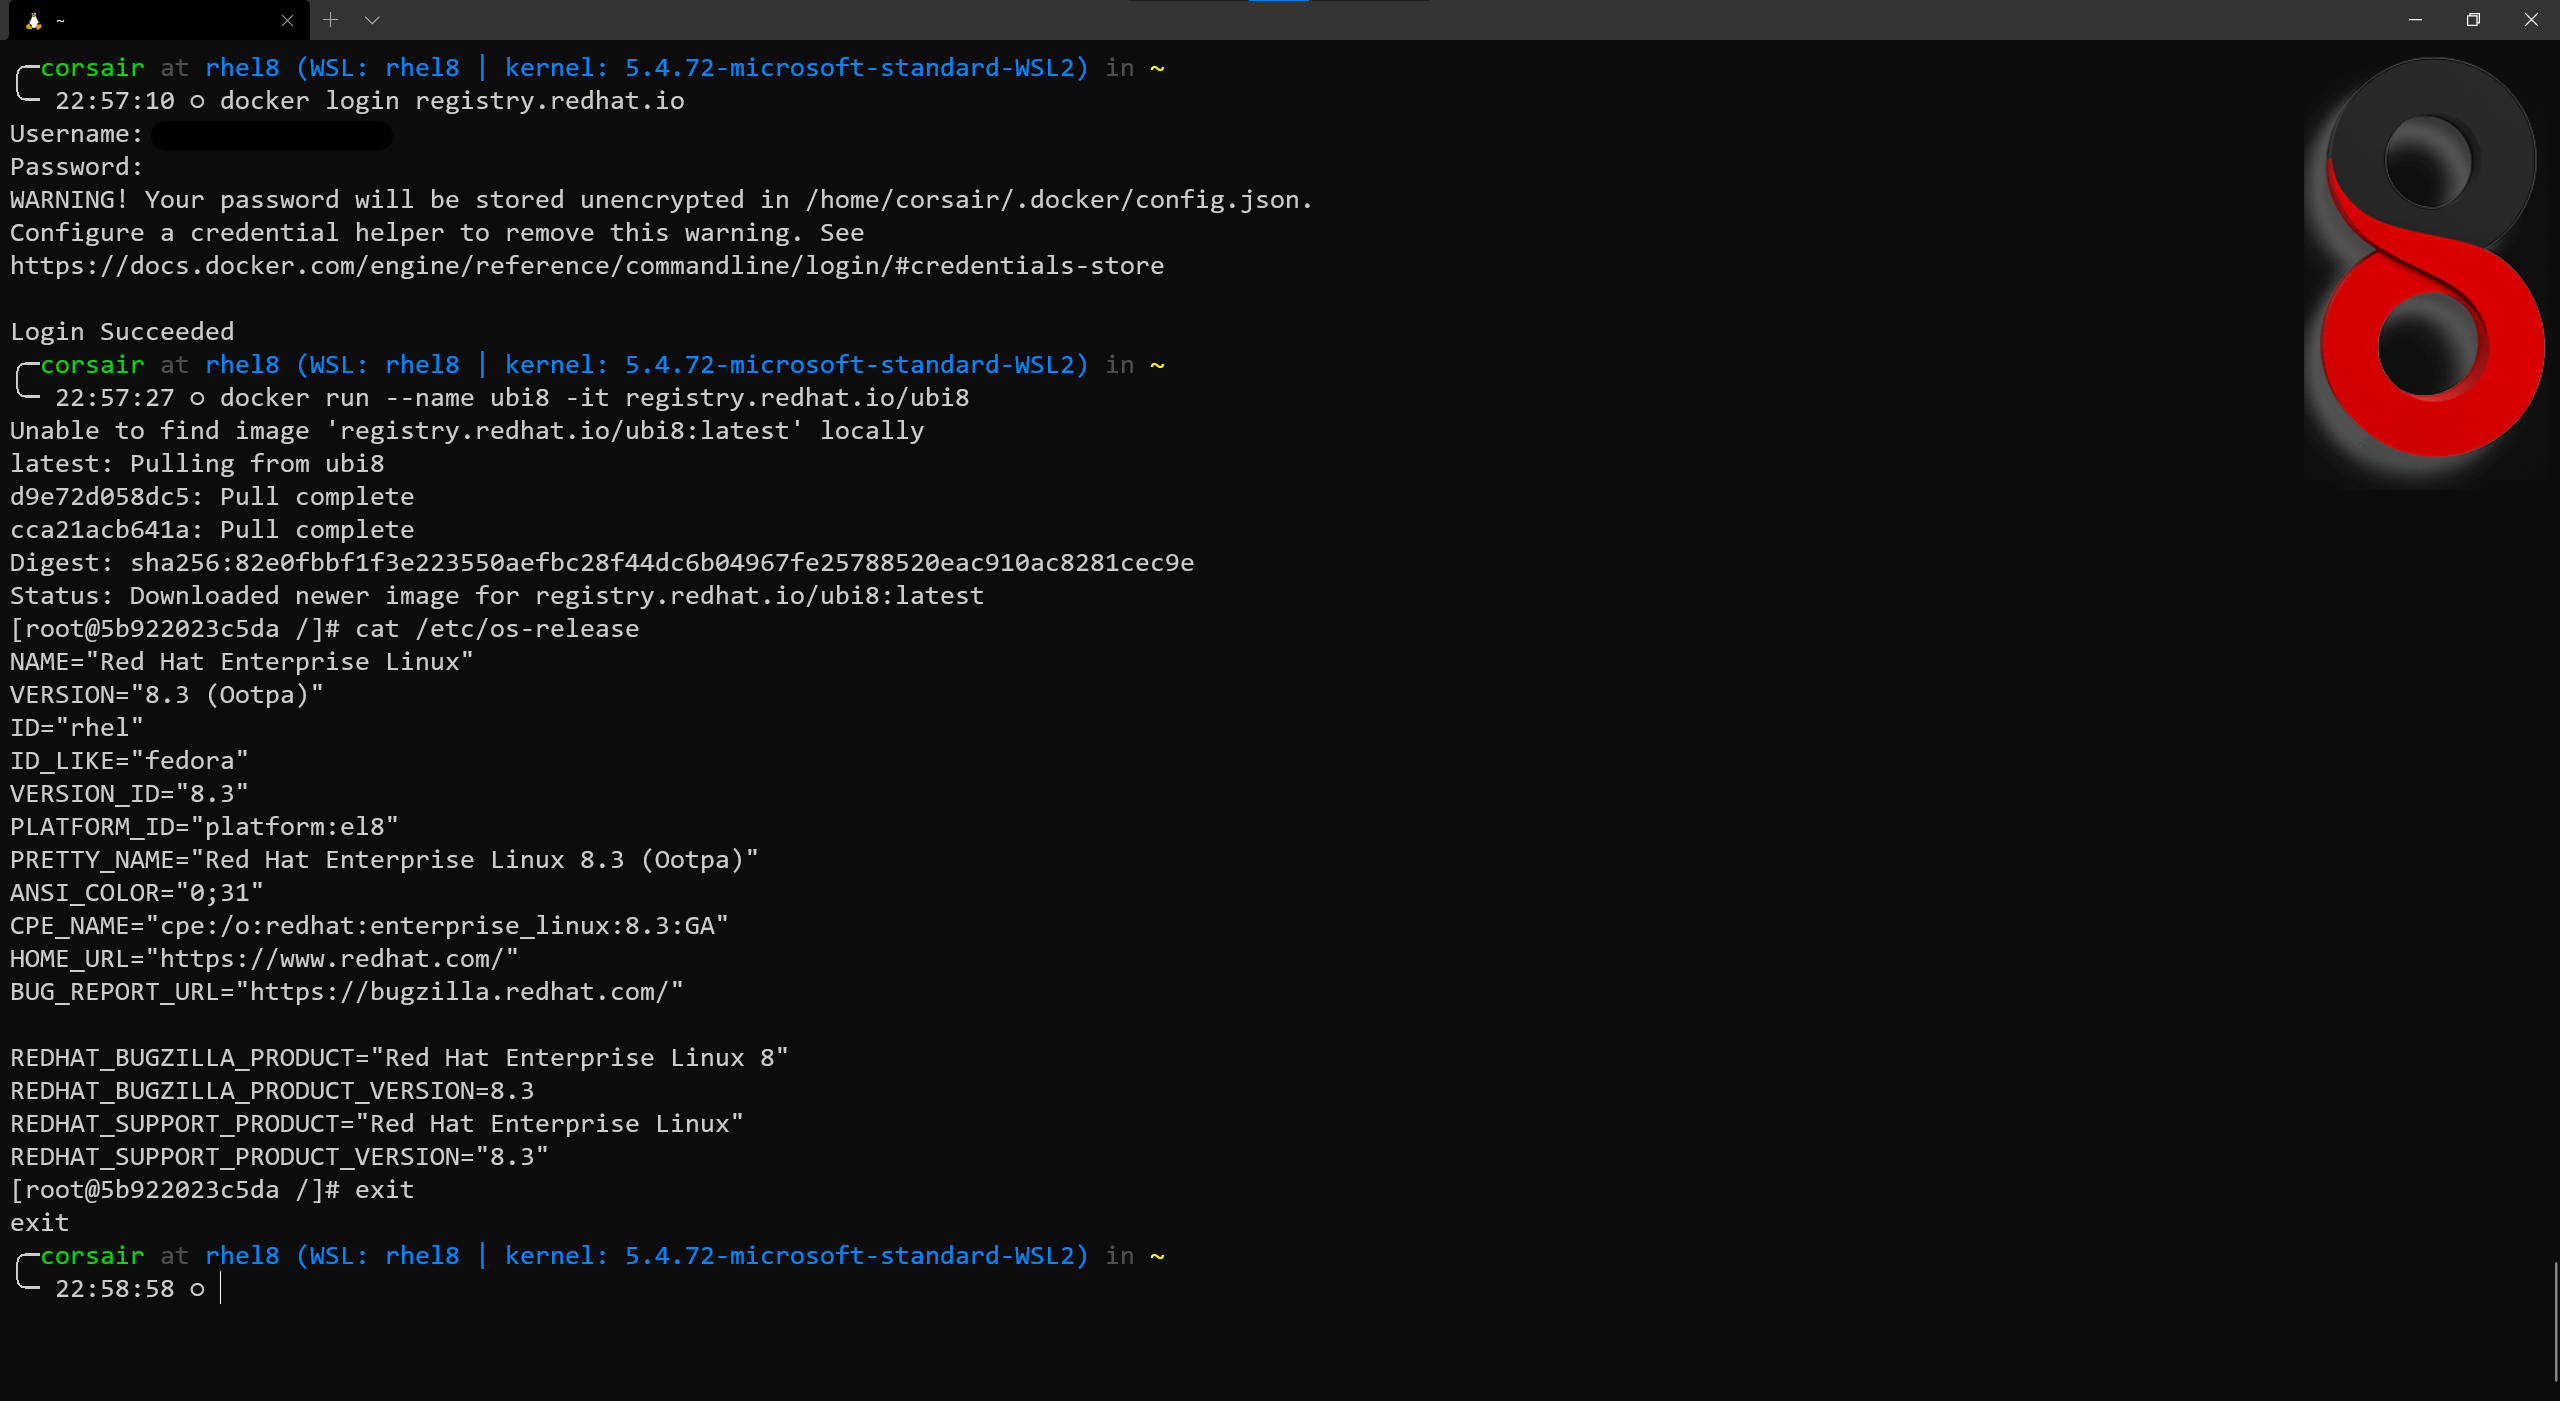
Let us end like we started and connect to the Red Hat Docker registry and pull an image from it (read: Inception):
# Login to the Red Hat registry
# Enter the Red Hat account username and password
docker login registry.redhat.io

# Pull the Universal Base Image 8
docker run --name ubi8 -it registry.redhat.io/ubi8
Conclusion
What a fun experience and if this blog needs to prove only one point, it is that WSL2 is a platform to run Linux and, thanks to some scripts, the experience is getting each time closer to a VM or Bare Metal one.
By understanding the capabilities and limitations of the distro of our choice, we can “revert” some impacting decisions and make the distro fit perfectly our requirements.
Be careful though, official support might not be possible and this is where the limitations and other roadblocks will arise. Still, technically it was totally possible.
Last word, as usual, if there is any comments, feel free to send them to @nunixtech on Twitter.
>>> Nunix out <<<