WSL2 init: emerging OpenRC
WSL2 init: emerging OpenRC
Introduction
Since WSL2 has been released, the community has tried (quite successfully) to add SystemD to their distros.
Currently, the most commons solutions are:
- A single script by the awesome Dani - GitHub - diddledani/one-script-wsl2-systemd: The one-script variant of the systemd hack for WSL2
- A “fully integrated” packages and installer by the amazing Arkane Systems: GitHub - arkane-systems/genie: A quick way into a systemd “bottle” for WSL
Note: Other solutions exist, but these two are the most known in the WSL community.
Both solutions allow you to run SystemD as PID1. These solutions evolved along the years and are today very well integrated with WSL2 and, more recently, with WSL2g.
However, in the Linux community, there’s quite a debate on SystemD itself, and not all the Linux distros use it.
So, “what if” you could run another init system instead of SystemD?
Sources
As I often stated: all ideas have an inspiration or are an alternative to something already done/existing.
For this blog post, my main inspirations were:
- OpenRC on WSL2: Rancher Desktop WSL distro
- SystemD without
PID1: Blog by march1993
Also, a very special mention to the Gentoo wiki which might be one of the best sources of knowledge for Linux.
Other references will be properly linked in the blog post.
So to everyone who already took the time to create content: THANK YOU!
Prerequisites
The following list might be quite long, so I won’t explain how to install it. However I will put the links that I used my own setup.
Here is my setup:
- OS: Windows 11 Insiders Dev channel
Windows 11 Features:
WSL2: a Store or Custom distro
- For OpenRC, I used Gentoo
- For SystemD, I used both Ubuntu 21.10 and FedoraRemix
[Optional] Windows Terminal
OpenRC: the challenger
OpenRC is the “other” very known init system, used by distros like Alpine, Gentoo and Devuan (just to name the few more known).
While quite known, OpenRC has never been implemented in a WSL2 distro (to my own knowledge), until Rancher Desktop v0.7.0.
The Rancher Desktop OS implemented OpenRC in its simplest form, without re-entering PID1 and it has a set of scripts that takes care of registering and launching the services.
This is where you will “fork” it, and build an OpenRC init system with PID1, by copying what as been done with SystemD on WSL2.
Getting ready
As stated, you’ll use Gentoo as the distro for this example. And, as you might already know, Gentoo is not on the store, therefore you have to create a custom distro.
As there’s already a lot of blogs on how to create a custom distro (i.e. WSL2+RHEL8: The Whale with the Red Hat), here is the “fast track” (read: commands only):
# [Optional] Create a `bin` directory on Windows home and add it to your PATH variable
mkdir $env:USERPROFILE\bin
$userenv = [System.Environment]::GetEnvironmentVariable("Path", "User")
[System.Environment]::SetEnvironmentVariable("PATH", $userenv + "; " + $env:USERPROFILE + "\bin", "User")
## Restart your terminal or add temporarily the directory to your PATH variable
$env:PATH="$env:USERPROFILE\bin;$env:PATH"
# Assuming you don't have any container runtime (Docker Desktop, Podman, Rancher Desktop), download Google Crane
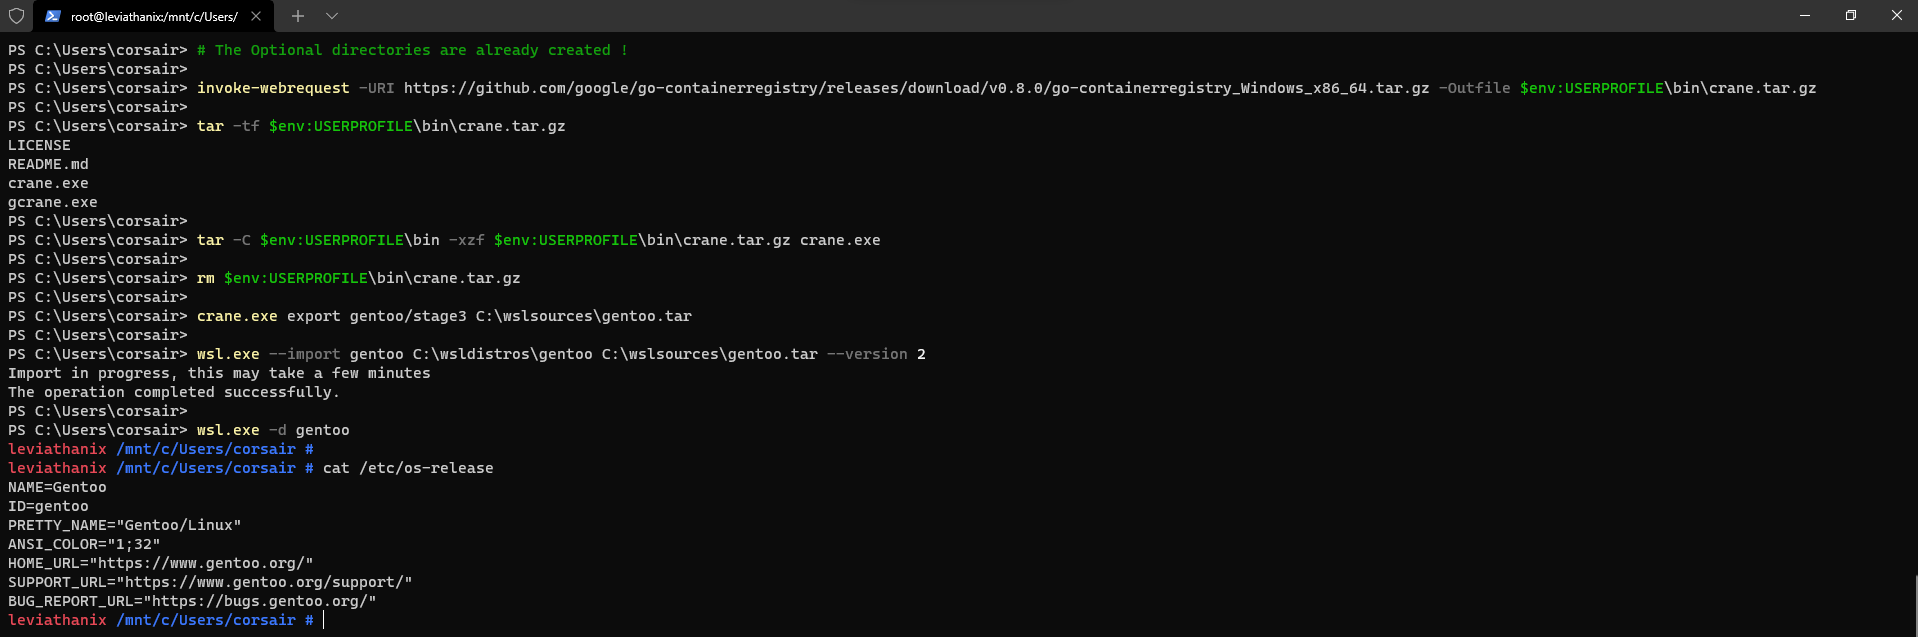
invoke-webrequest -URI https://github.com/google/go-containerregistry/releases/download/v0.8.0/go-containerregistry_Windows_x86_64.tar.gz -Outfile $env:USERPROFILE\bin\crane.tar.gz
# Check the file content
tar -tf $env:USERPROFILE\bin\crane.tar.gz
# Extract only the "crane.exe" file to the "bin" directory
tar -C $env:USERPROFILE\bin -xzf $env:USERPROFILE\bin\crane.tar.gz crane.exe
## [Optional] Delete the archive file
rm $env:USERPROFILE\bin\crane.tar.gz
# [Optional] Create a "wslsources" and "wsldistros" directories
mkdir C:\wsldistros,C:\wslsources
# Download Gentoo rootfs on Docker Hub
crane.exe export gentoo/stage3 C:\wslsources\gentoo.tar
# Create the Gentoo WSL2 custom distro
wsl.exe --import gentoo C:\wsldistros\gentoo C:\wslsources\gentoo.tar --version 2
# Launch the Gentoo WSL2 custom distro
wsl.exe -d gentoo
Note: Google Crane allows us to save a container image into a
rootfs, instead of saving the layers (i.e.docker save <container image>)
We have now a new WSL2 custom distro, so it’s time to configure OpenRC.
Lightning fast configuration
Before you configure anything, as the OS is brand new, you need to ensure it’s up-to-date. If you also picked Gentoo, then the package manager is Portage:
emerge --sync
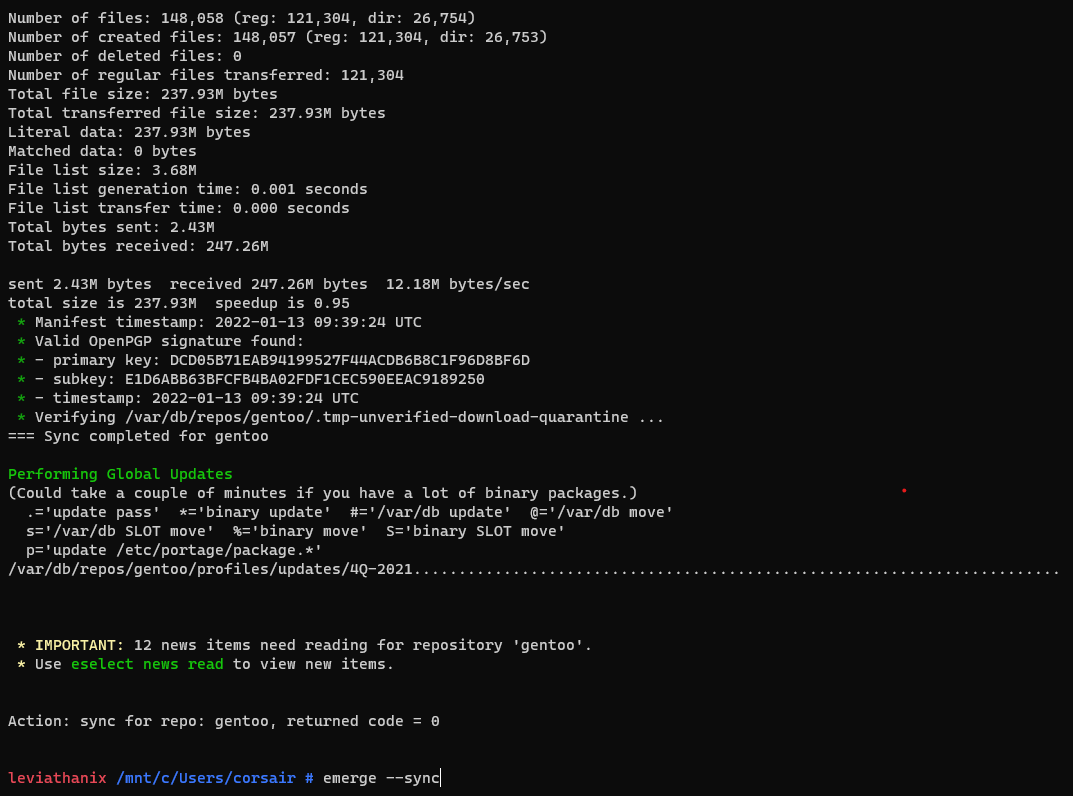
With the OS updated, you can install applications that you’ll need later on:
emerge vim sudo
Initial configuration
The first configuration file that you need to create, is wsl.conf. This file has several settings that will be applied to the current distro only. One of these settings is the [boot] setting, which runs a command when the distro is started.
For OpenRC, the init process is /sbin/init:
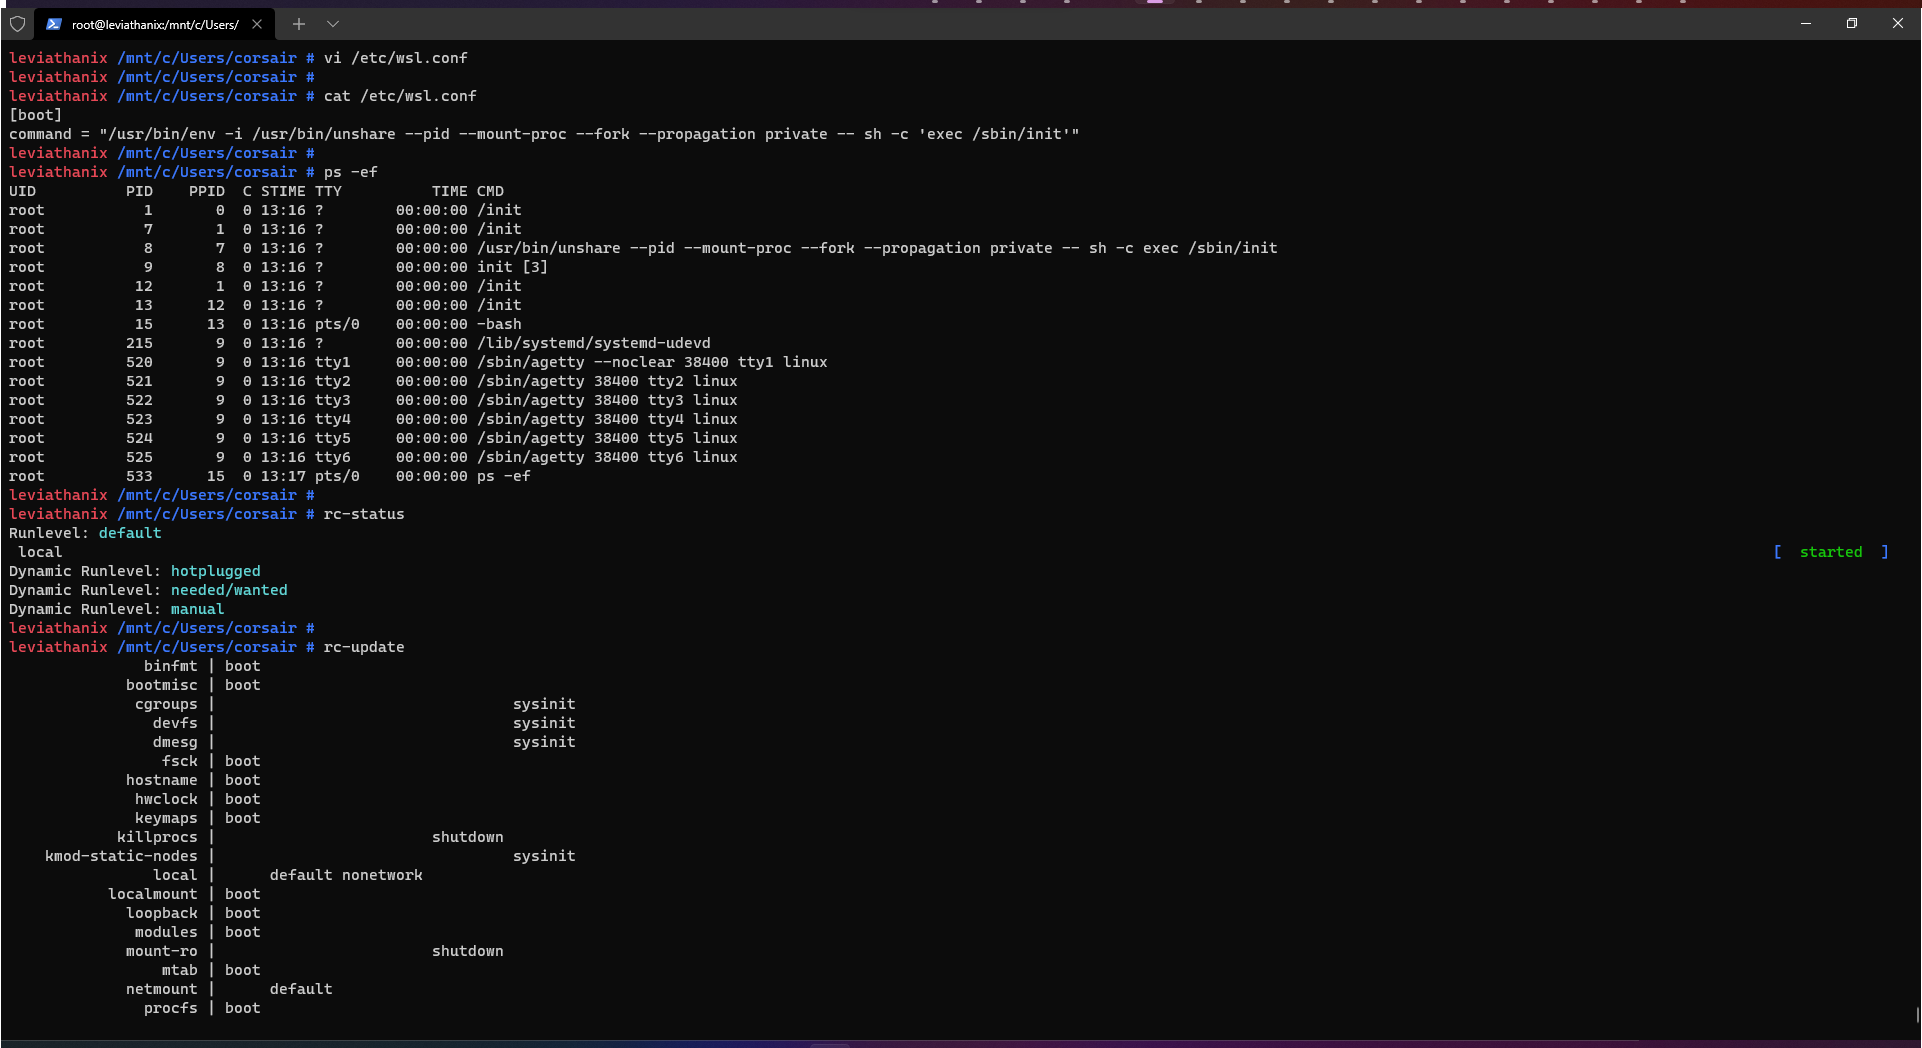
# Create/Edit the wsl.conf file with your favorite editor
vi /etc/wsl.conf

# Add/Edit the [boot] command and save the file
[boot]
command = "/usr/bin/env -i /usr/bin/unshare --pid --mount-proc --fork --propagation private -- sh -c 'exec /sbin/init'"
[Optional] We can already see what this change to by terminating the distro session and starting a new one
# Terminate the WSL2 distro session from Powershell
wsl.exe --terminate gentoo

# Start a new WSL2 distro session
wsl.exe -d gentoo
Once the new session started, you can check the running processes:
# Check the running processes
ps -ef

# Check the OpenRC status
rc-status

# Check the current OpenRC services
rc-update
PID1 is the target
While OpenRC is now running and you can list the services, the WSL2 init process is still the one running as PID1. Thanks to all the work done on WSL2 SystemD, you can leverage the knowledge and apply it to OpenRC:
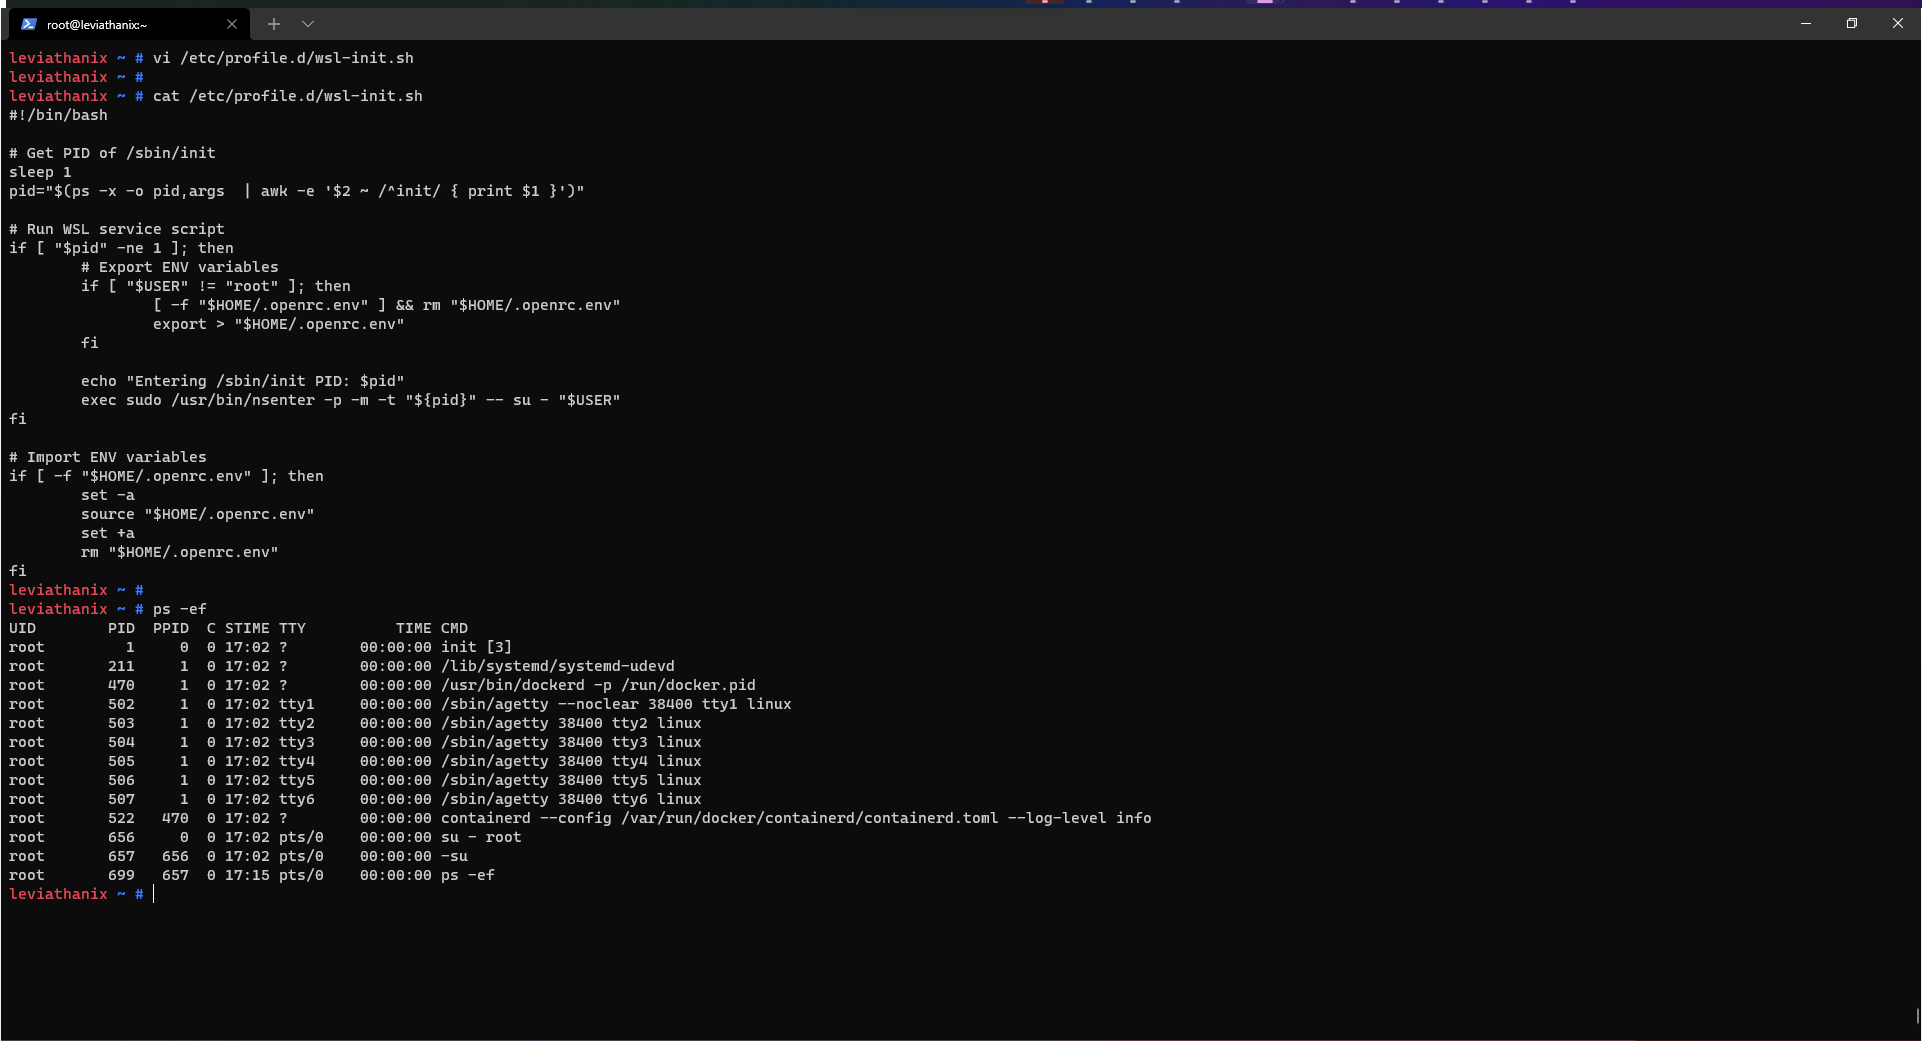
# Create a script for entering PID 1 and save it in /etc/profile.d/
vi /etc/profile.d/wsl-init.sh

## Content of the file /etc/profile.d/wsl-init.sh
#!/bin/bash

# Get PID of /sbin/init
sleep 1
pid="$(ps -u root -o pid,args | awk -e '$2 ~ /^init/ { print $1 }')"

# Run WSL service script
if [ "$pid" -ne 1 ]; then
  # Export ENV variables
  if [ "$USER" != "root" ]; then
    [ -f "$HOME/.openrc.env" ] && rm "$HOME/.openrc.env"
    export > "$HOME/.openrc.env"
  fi

  echo "Entering /sbin/init PID: $pid"
  exec sudo /usr/bin/nsenter -p -m -t "${pid}" -- su - "$USER"
fi

# Import ENV variables
if [ -f "$HOME/.openrc.env" ]; then
  set -a
  source "$HOME/.openrc.env"
  set +a
  rm "$HOME/.openrc.env"
fi
Note: the scripts located in
/etc/profile.d/do not need to be made executable (i.e.chmod +x ...)
You can now terminate the WSL2 distro session and start a new one where you will have OpenRC as PID1:
# Terminate the WSL2 distro session from Powershell
wsl.exe --terminate gentoo

# Start a new WSL2 distro session
wsl.exe -d gentoo
Once the new session started, you can check the running processes:
# Check the running processes
ps -ef
Conclusion
While SystemD is now as small as a one script, or has very advanced and useful installers, OpenRC implementation seems very simple in comparison.
But, as stated in the introduction, this due to the fact that the work of community has come this far and implementing it now, makes maybe even more sense as we have a better grasp on how WSL2 works.
I hope this will help you and as usual, if you do anything (cool or not) with it, tag me on Twitter (@nunixtech) as I’m always willing to see what are your own crazy ideas.
>>> Nunix out <<<
Bonus 1: Docker on WSL2, the service way
I could not resist and add a Bonus section to show what OpenRC on WSL2 could do for us.
One of the main advantages, is that it will allow us to run applications such as Docker, and allow them to start when the session start.
Here is the installation, still on Gentoo:
# Search for Docker in the Gentoo repo
emerge -s Gentoo

# Install the Docker package
emerge app-containers/docker
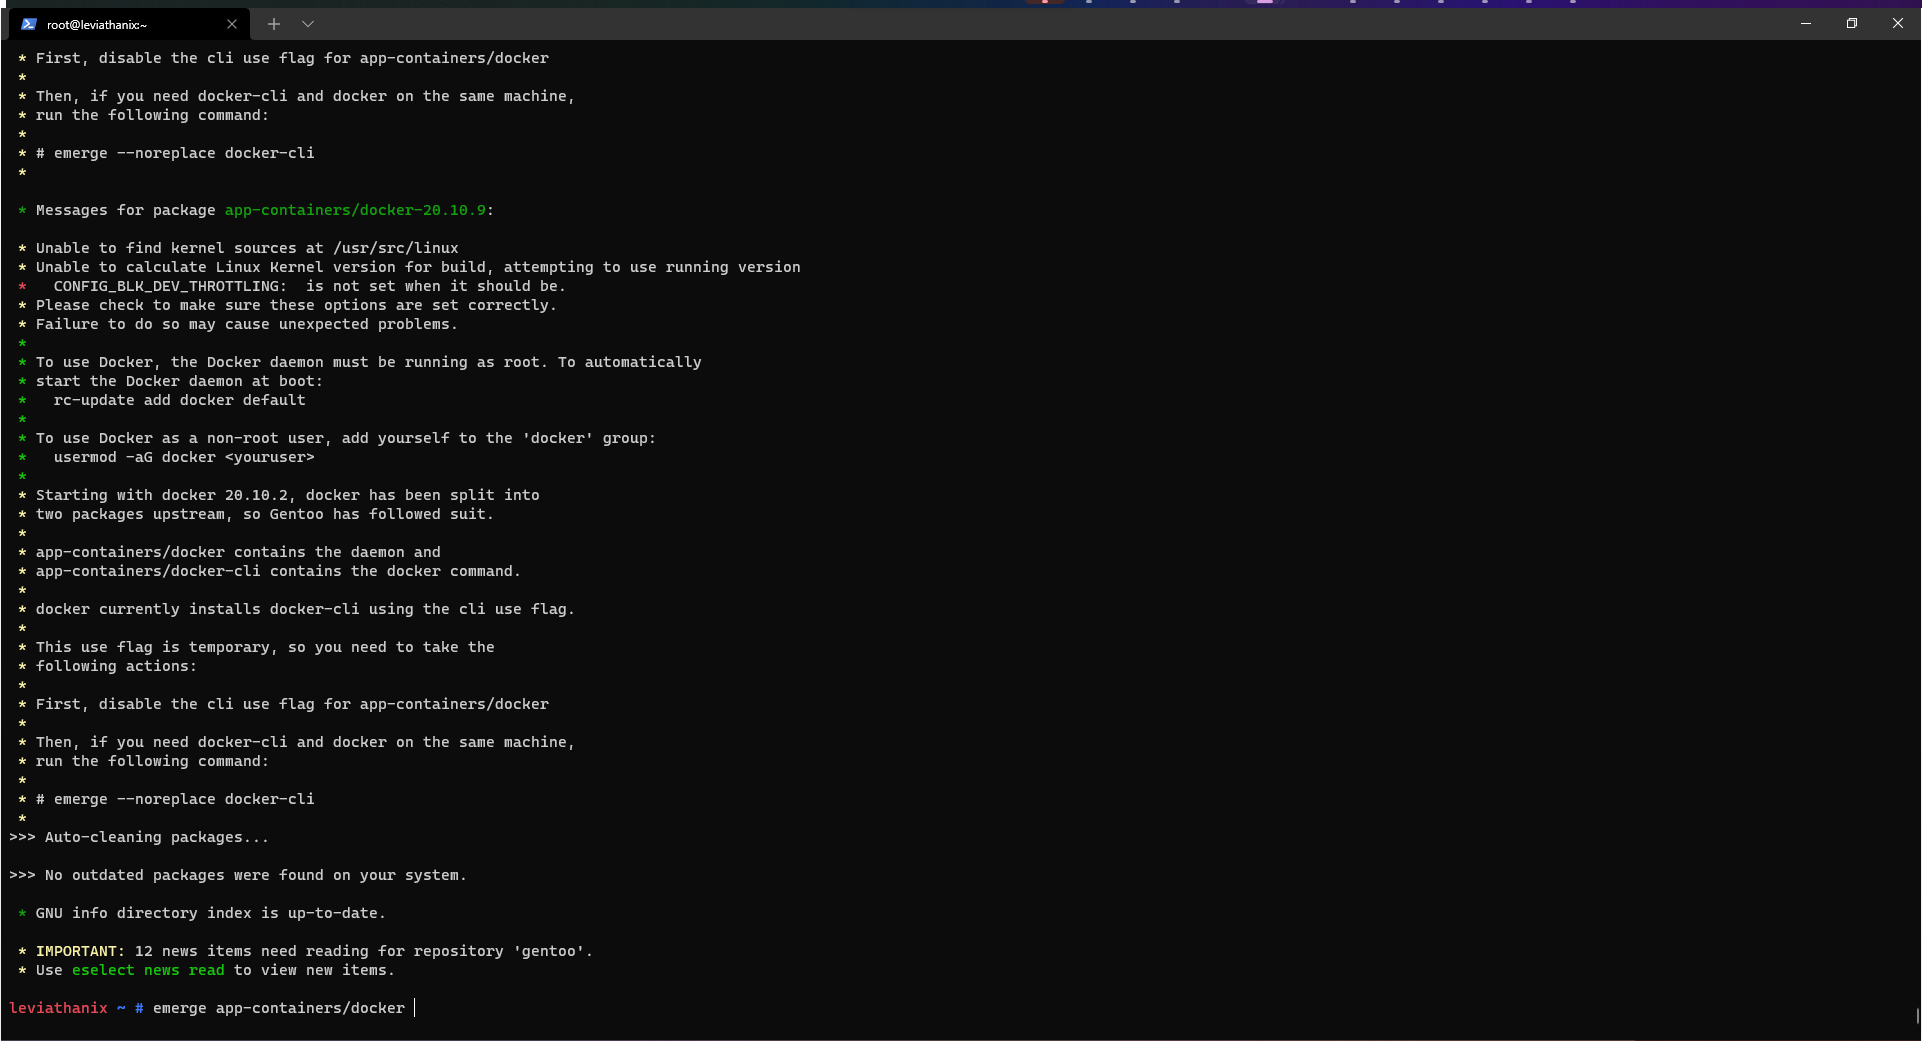
As stated at the end of the install log, you can find the command to run for starting Docker “at boot”:
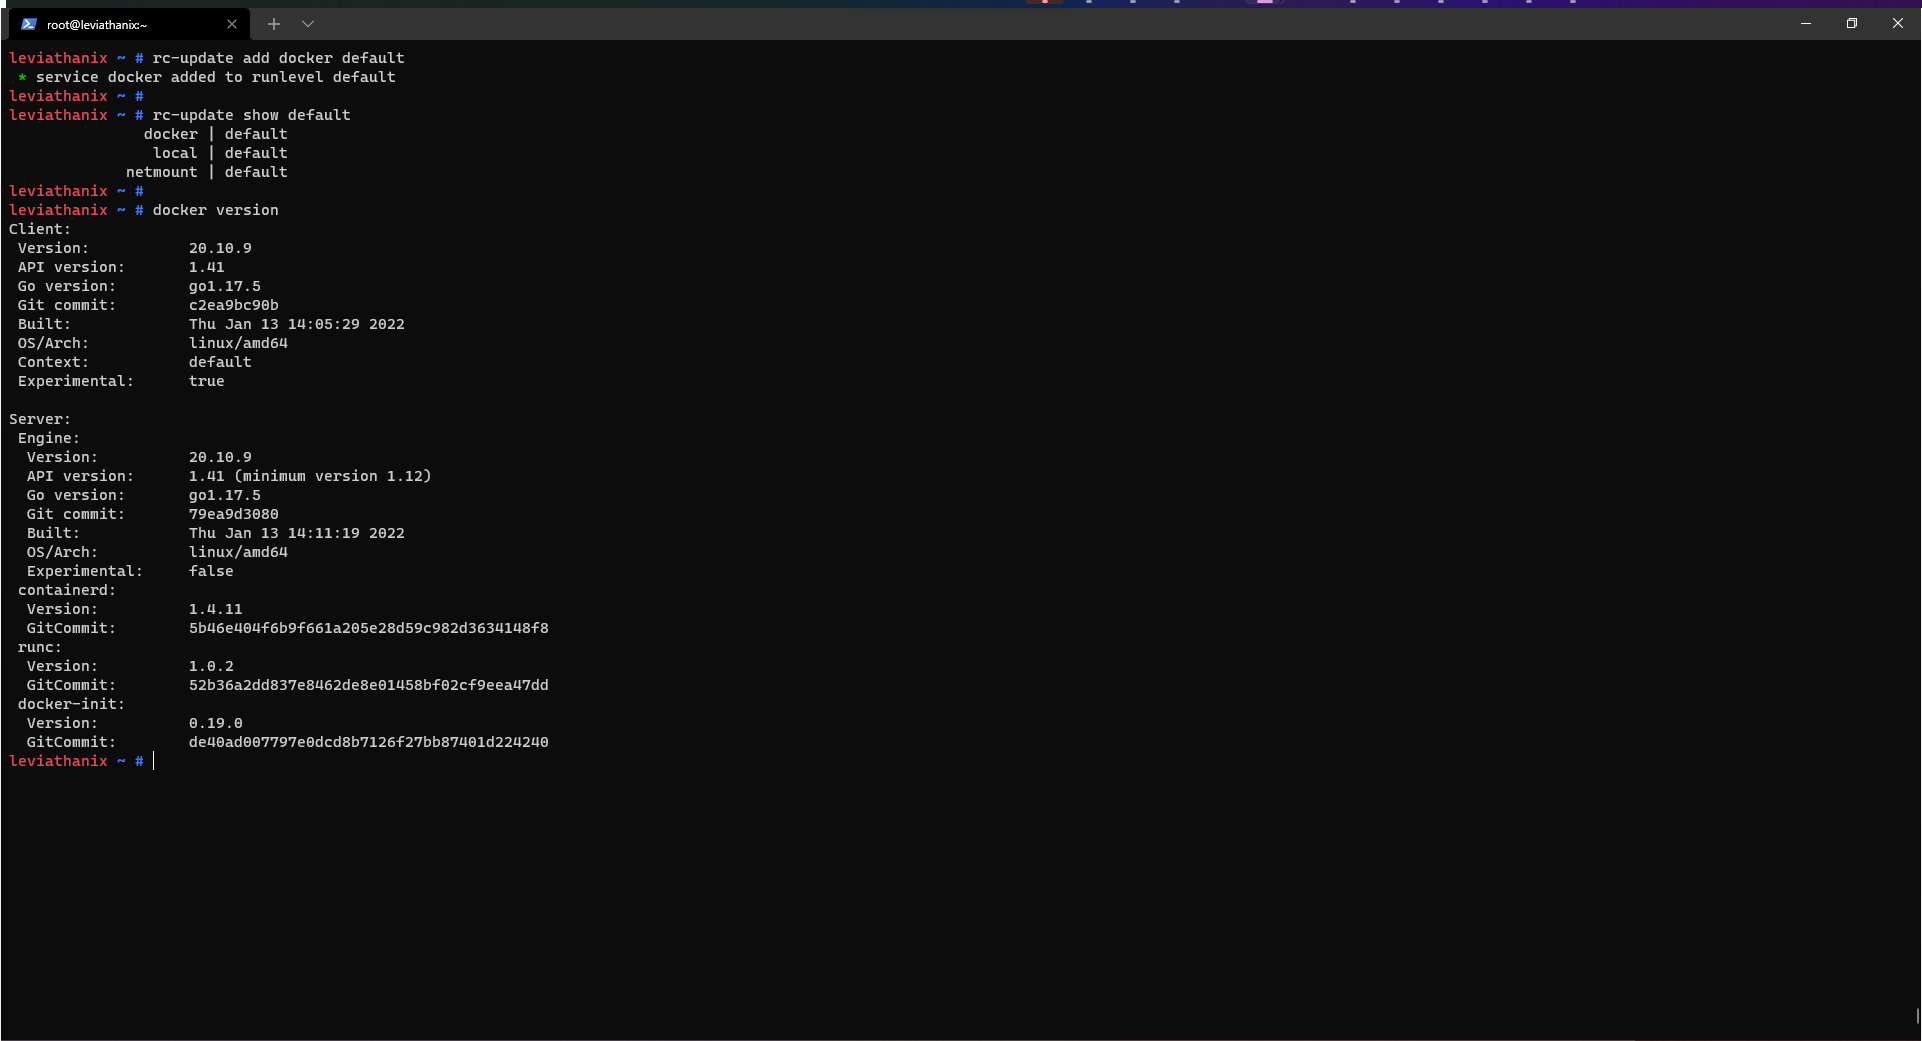
# Add Docker to the "default" boot profile
rc-update add docker default

# Check if the service has been correctly registered
rc-update show default

# Check if Docker is correctly running
docker version
Finally, terminate the WSL2 distro session:
# Terminate the WSL2 distro session from Powershell
wsl.exe --terminate gentoo

# Start a new WSL2 distro session
wsl.exe -d gentoo
And start a new WSL2 distro session, Docker should be running:
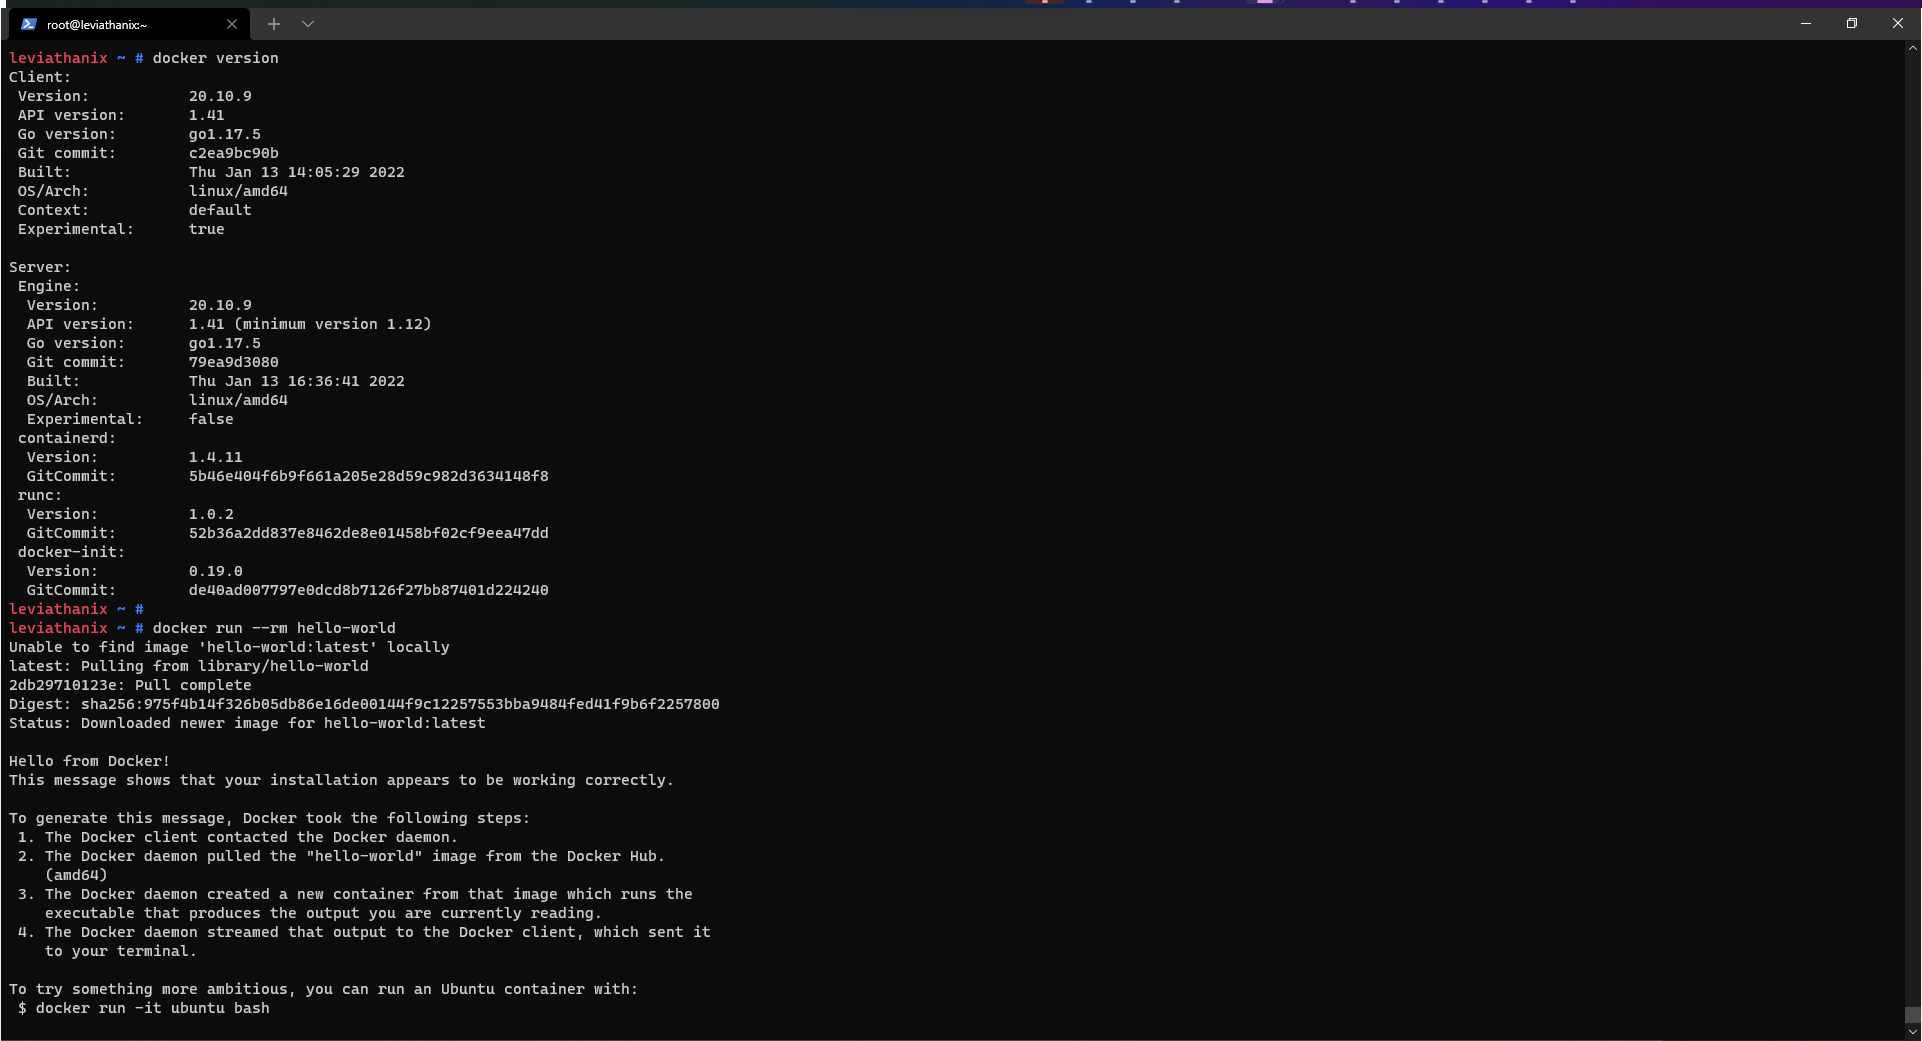
# Check if Docker is running
docker version

# [Optional] Create your first Docker container
docker run --rm hello-world
Bonus 2: OpenRC loves Ketchup (K3sup)
Ok, I must admit I’m really excited by all the opportunities we have with OpenRC (same goes for SystemD). So while we are in the containers/Cloud Native world, let’s use two of the best tools I came across for deploying, very easily, a K3s node cluster (K3sup) and the needed tooling (Arkade)
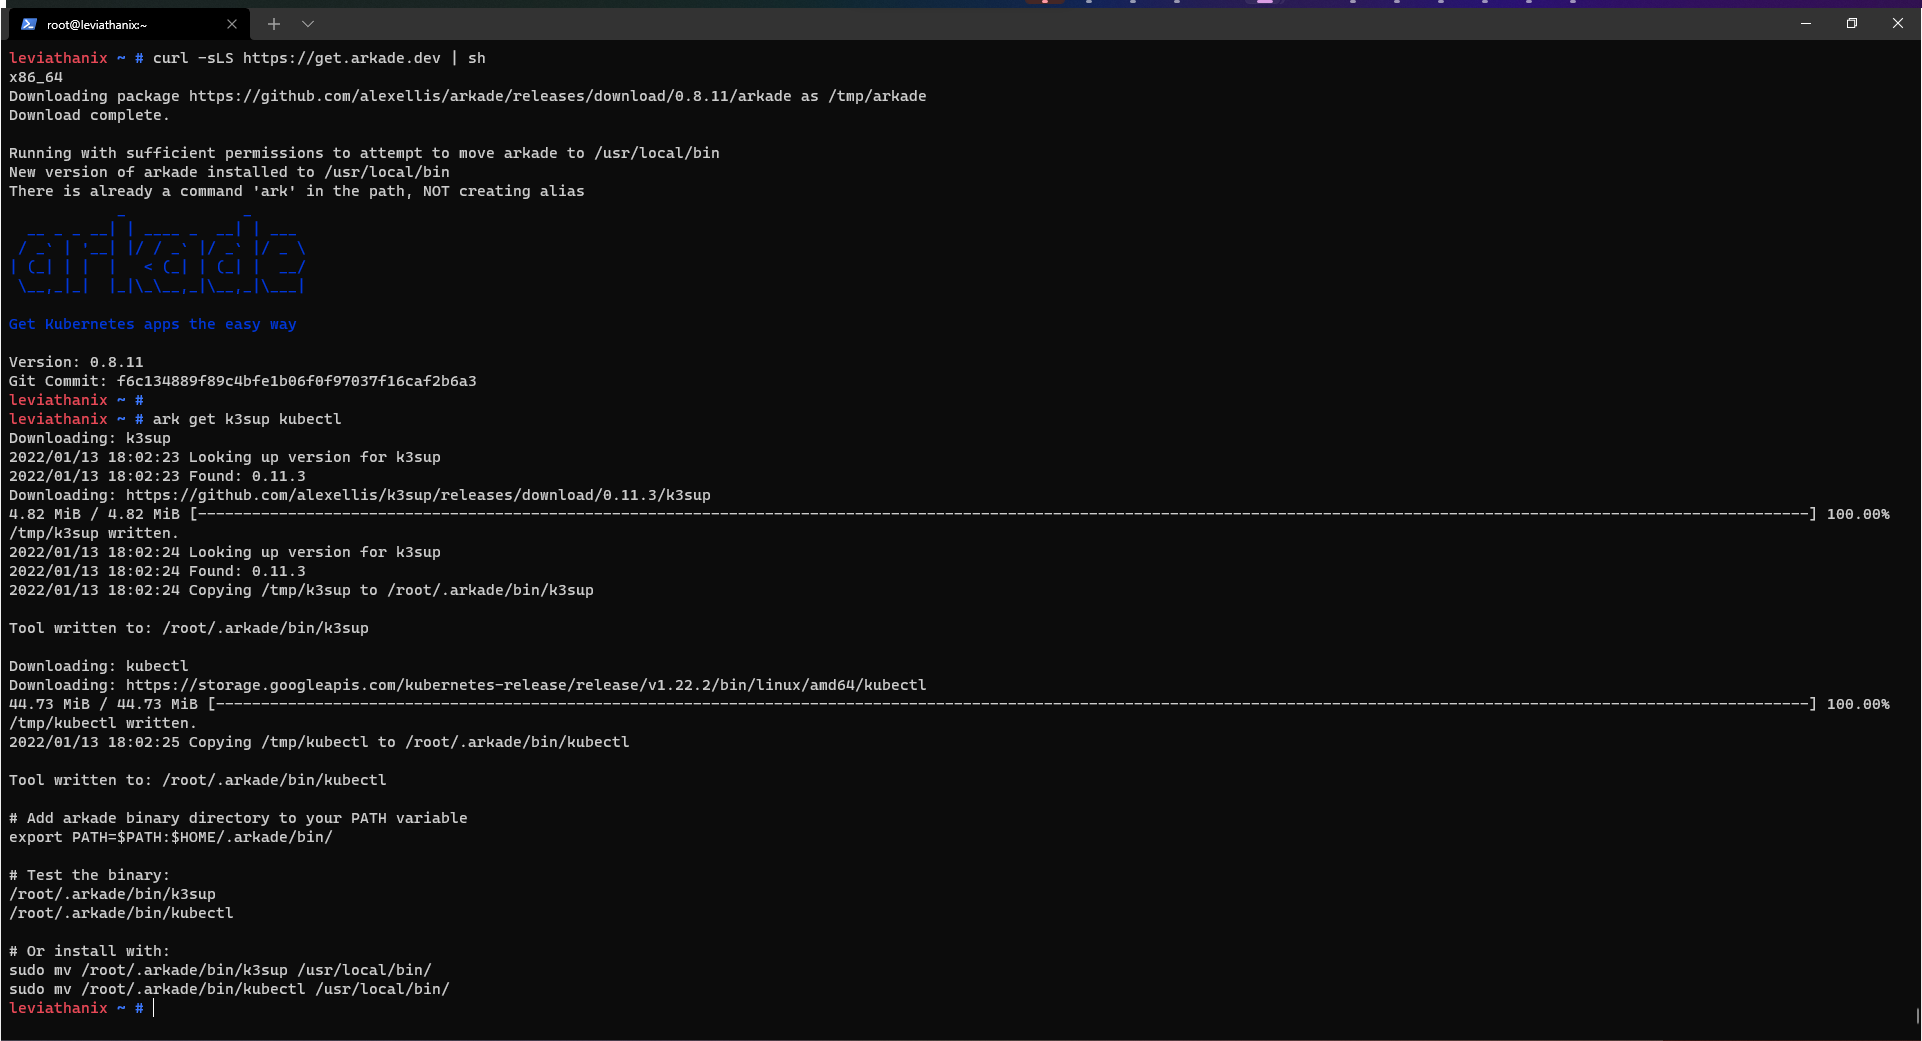
Let’s install Arkade first and get all the tools needed with it:
# Install Arkade with the official script
curl -sLS https://get.arkade.dev | sh

# Get both K3sup and Kubectl
ark get k3sup kubectl
Now, create a one node K3s cluster:
# [Optional] Update your path with the Arkade bin directory
export PATH=$PATH:$HOME/.arkade/bin/
# Create the K3s cluster with K3sup
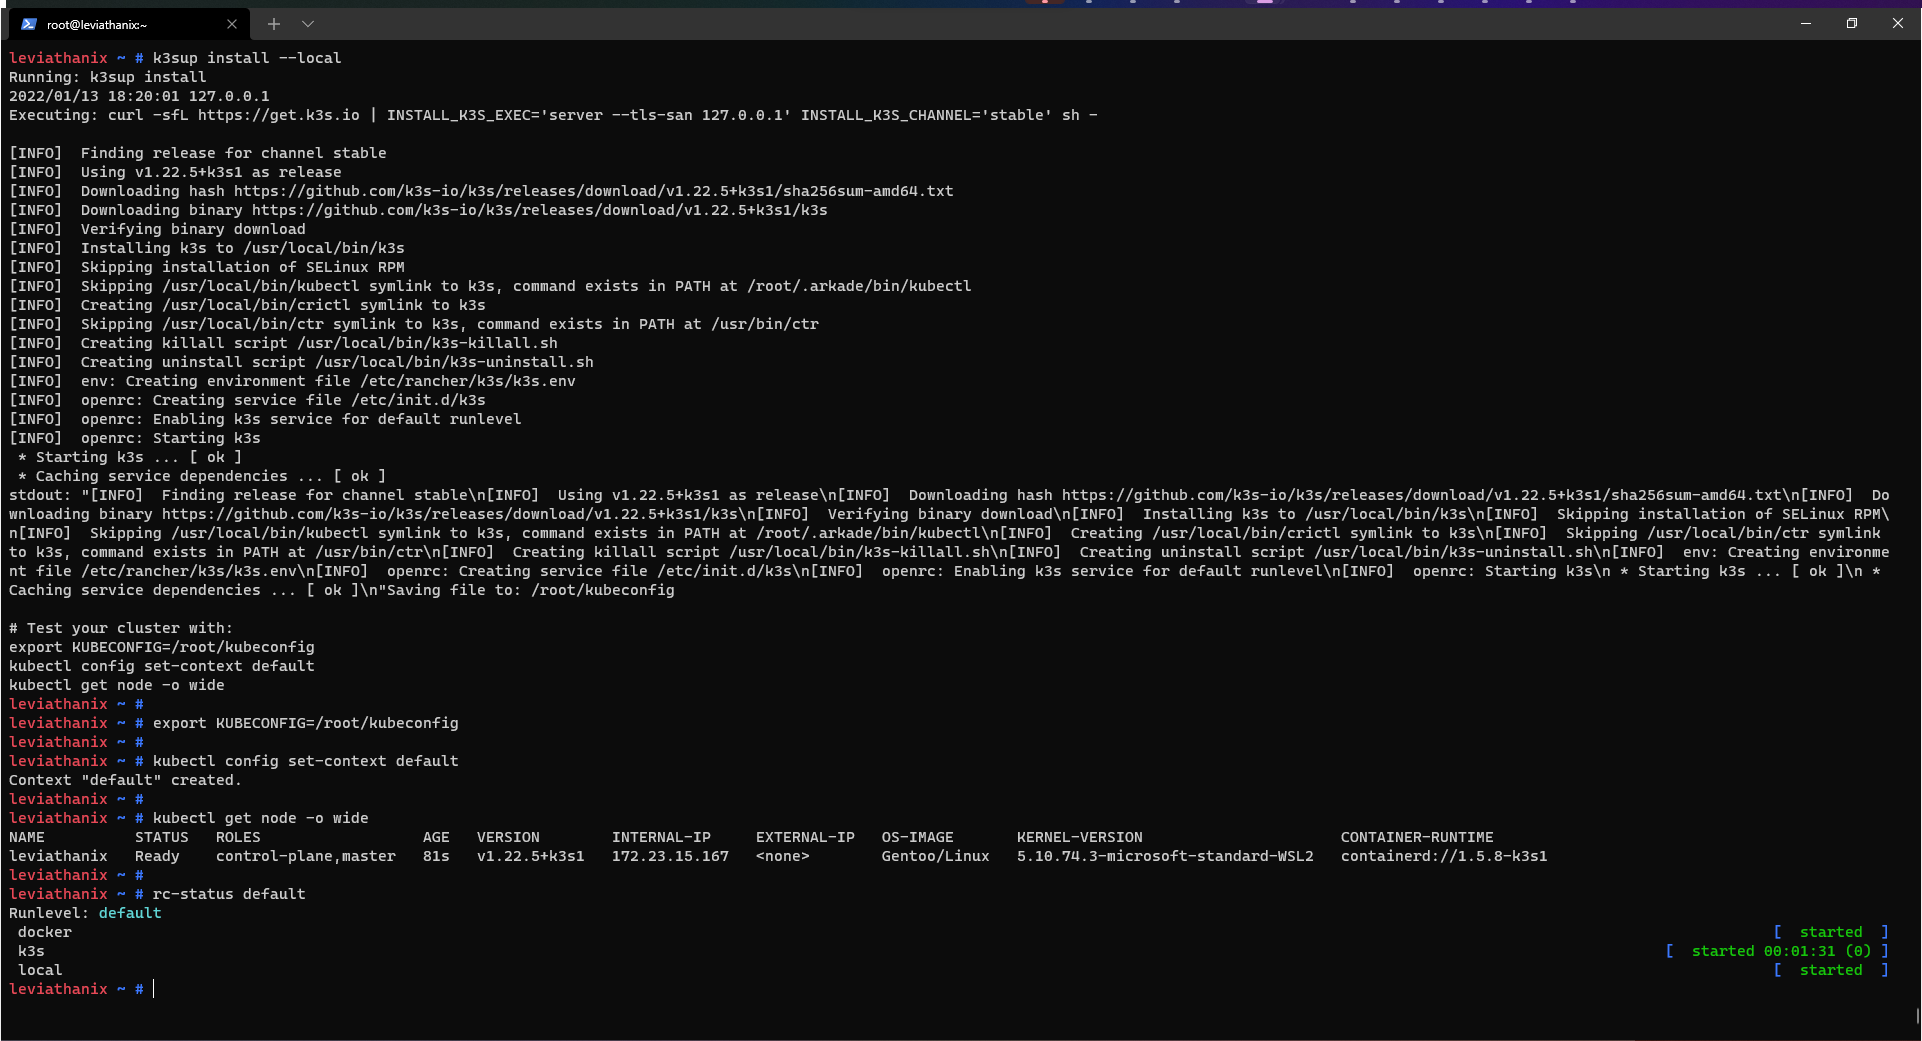
k3sup install --local
# Test the cluster with the commands displayed at the end of the install log
export KUBECONFIG=/root/kubeconfig
kubectl config set-context default
kubectl get node -o wide
# Check if the service is correctly registered
rc-status default